Judging Halter Horses (From the Top Down)
LPM-00842 View this publication in PDF form to print or download.
Conscientious halter horse judges must know all the important and relevant points about the breeds, ages and classes of horses they place. Much time and effort go into learning what is desirable and undesirable in a horse, and how to make comparisons between horses in a class or compare horses to an imagined breed standard.
This publication assumes the reader has at least some of that knowledge and offers some helpful suggestions pertaining to the mechanics of judging as well as preparing and presenting oral reasons. It is hoped that the information will help you do a better job of judging and have more fun in the process.
Introduction
Equally important as knowing what to look for in a halter horse class and how to evaluate what you see is knowing how to go about doing the work of judging. Most good judges develop and follow a routine when evaluating and placing a class. By doing the same things in the same order for each class, they are less likely to overlook important items. A routine also helps the audience follow what the judge is doing. Different classes may call for different routines. For example, you would “work” a class of 200 horses differently than a class of four.
It is not important that all judges follow the same routine; beginners will find they soon develop a pattern without really trying. Following are some tips for establishing a routine:
- Make sure you are able to see all of the important points for each horse and compare them between horses.
- Make sure you can see and feel the horses with a minimum of disturbance to them and their handlers.
- Allow smooth and efficient movement of horses through the “way of going” portion of the class.
- Conserve your energy and still do the work that must be done. Remember, you may be in a dusty, hot arena and have to walk several miles in loose, cloddy footing during the day’s events, so you need to be in good shape and able to do your work in an efficient manner.
Explaining and defending your placings is important in helping others understand your logic and in preventing confrontations with folks who may disagree with you. Most of the time they will accept your explanation if it is publicly presented in a logical and confident manner, even if they don’t agree. Oral reasons given at the close of a class are especially helpful to younger showmen and can be useful teaching tools.
Mechanics of Judging Halter Horses
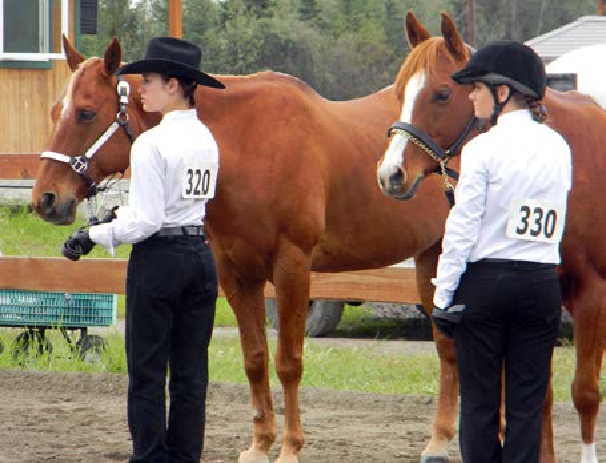 Halter horses are viewed from one or both sides, the rear and the front. In addition,
it is valuable to watch the horses as they enter the ring to note any peculiarities
about their overall conformation or gait. In judging contests, classes are always
numbered from left to right as you face the class. In shows, the horses are not numbered
in any particular way, but rather are identified by the number the handler wears.
When viewing a class of horses, stay back at least 20 feet so you can see each horse individually as well as the other horses around him. Standing too close is the most common mistake made by beginning judges. To compare horses accurately you must view every horse from the same angle, so you must move up and down the line. Do not try to see everything from one place. Judging halter classes requires a lot of walking; just like horses, judges must have a good set of feet and legs. Comfortable footwear is a must.
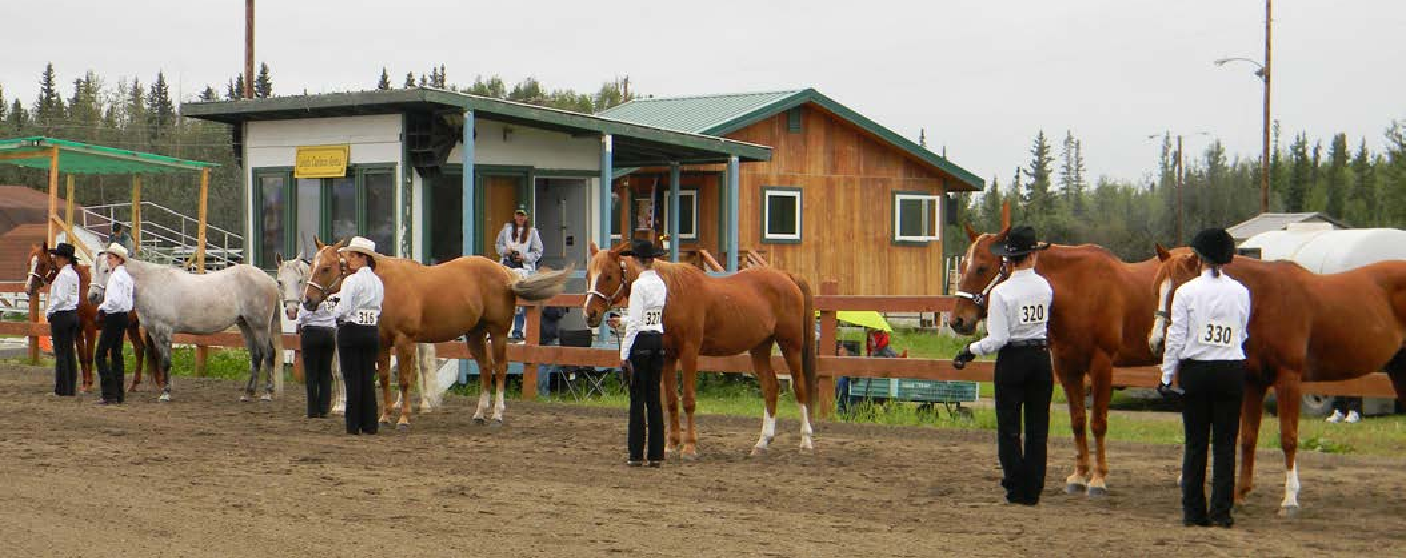
When you judge a show, it is acceptable to move horses around as you wish if you need them closer for careful comparisons. However, in a judging contest, animals are not usually moved from their assigned positions.
The Side View
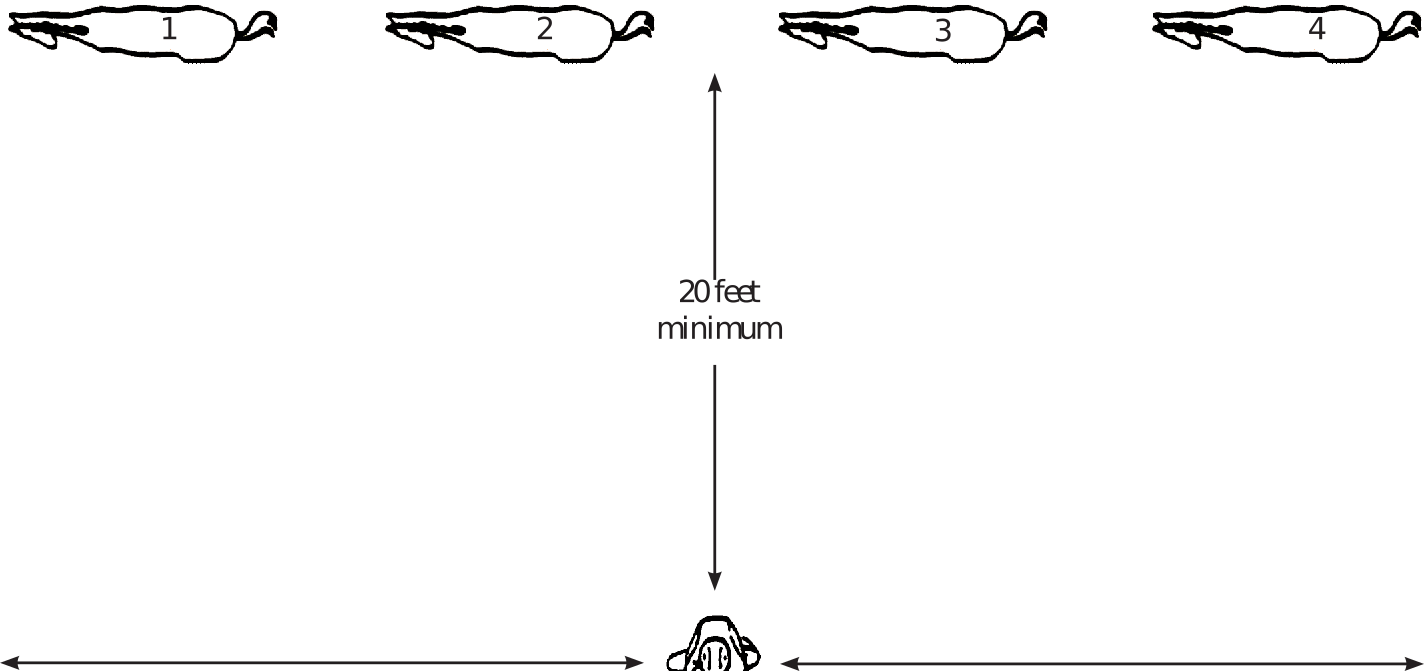
Move laterally along this line from the head of #1 to the tail of #4 to see the entire class.
When viewing horses from the side, you should be looking at:
- the horse’s balance
- straightness of leg
- slope of shoulder and pastern
- length, trimness and set of neck
- cleanness of throat latch
- size and shape of head
- prominence of withers
- depth of heart
- straightness of back
- length and levelness of croup
- length of topline compared to length of underline
- evidence of muscling, its length and how it ties together
The Rear View
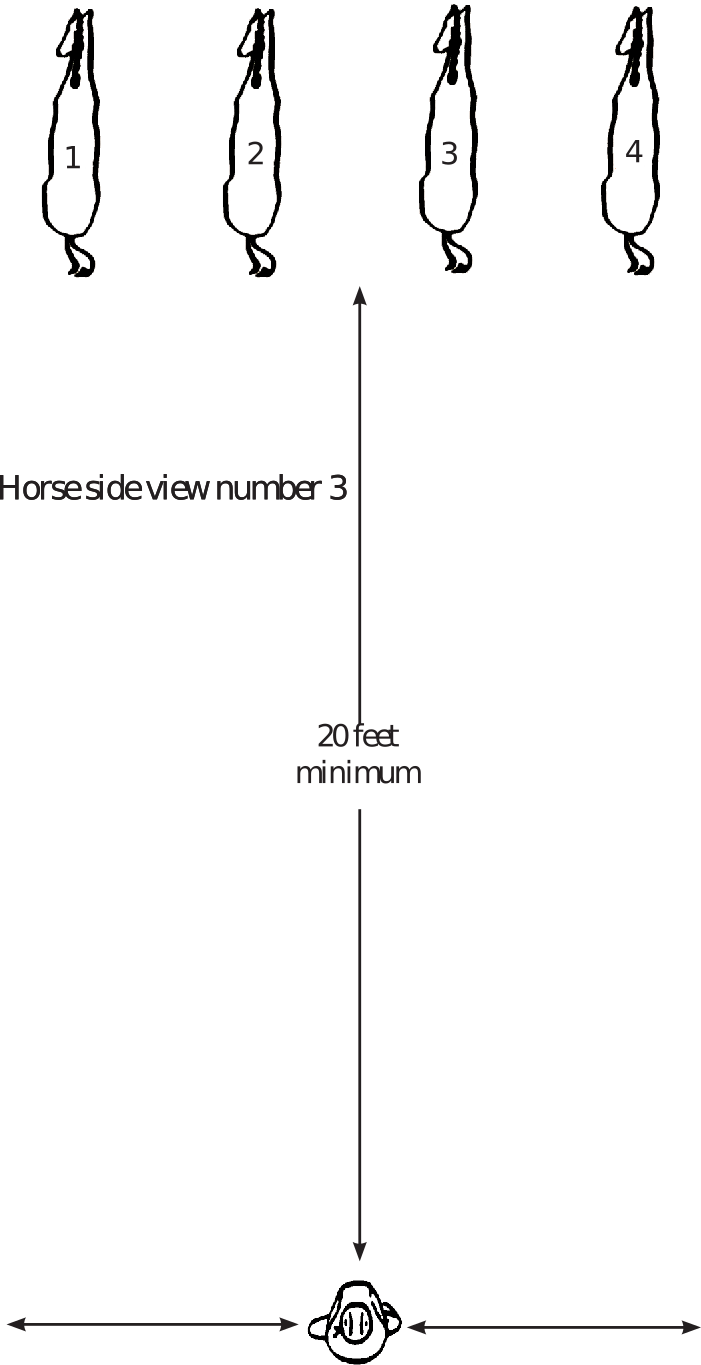
Stand back at least 20 feet and move along a line parallel to the line of the class.
Make the following observations and comparisons from a rear view:
- straightness of rear legs
- thickness through the stifle
- length of muscling and how it ties together
- size of inner and outer gaskin
- cleanness of neck
The Front View
Stand back at least 20 feet and move along a line parallel to the line of the class.
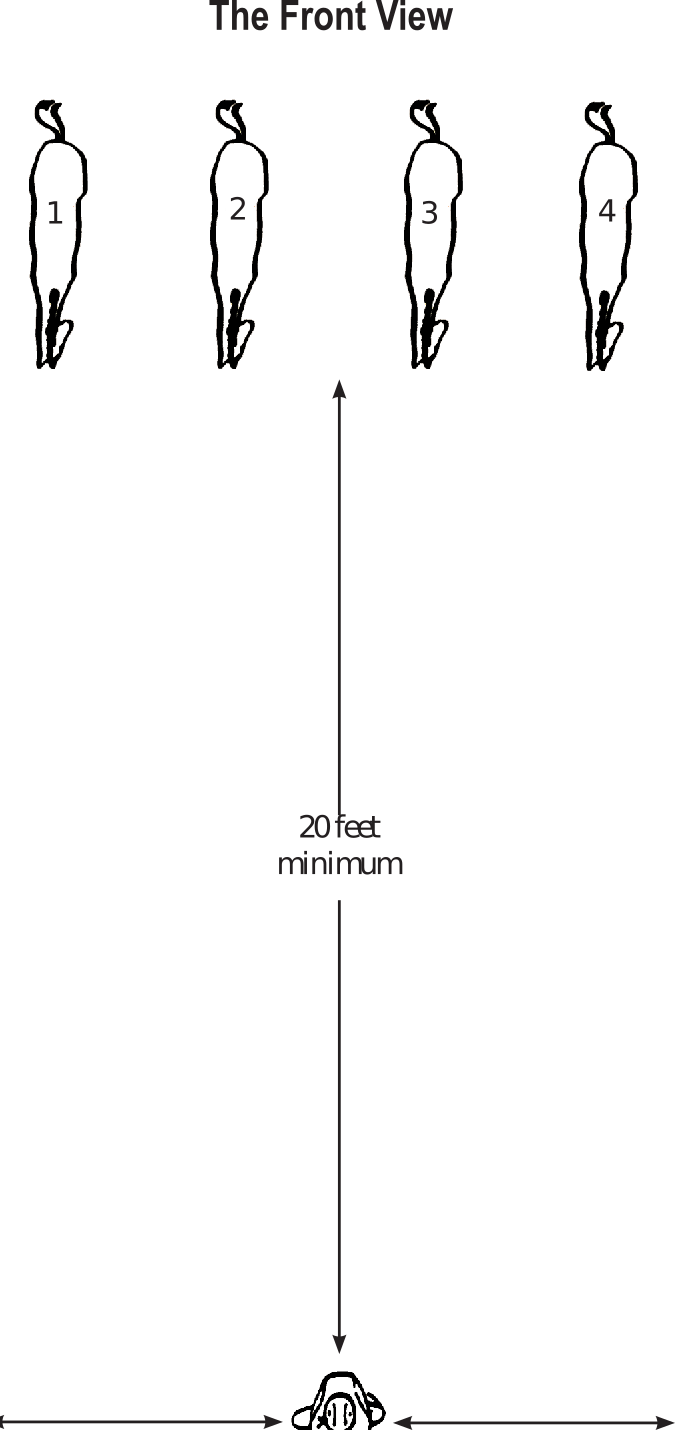
Observe and compare the following from a front view:
- straightness of legs
- muscling and thickness of the chest, shoulder and forearm
- length of muscling and how it ties together
- cleanness of head and neck
Close Inspection
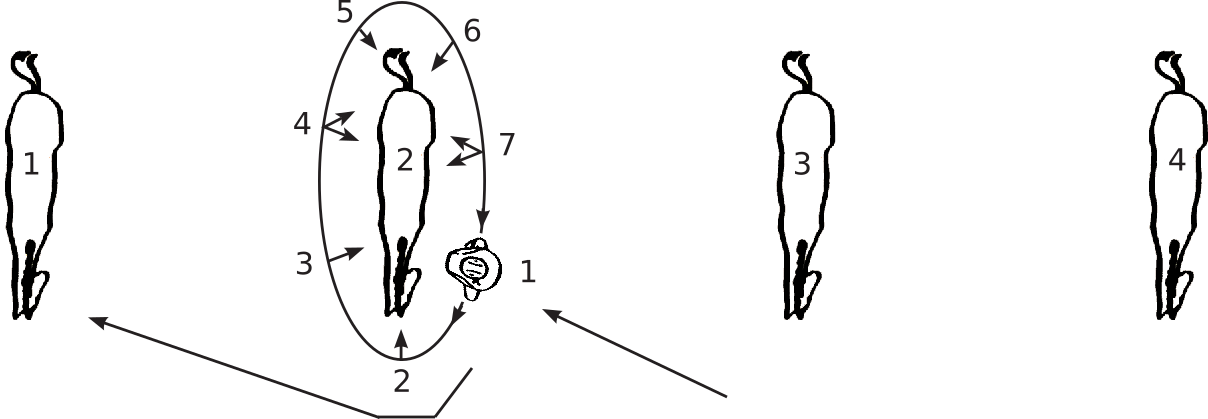
When doing the close inspection, you can be as close to each horse as you want. In this example, the judge has finished with the third and fourth positioned horses and is getting ready to inspect the horse in the second spot. The order in which you work the class is of little importance. It is a good practice to follow the same routine within each class because it helps you organize your thoughts and remember the class. The beginner would do well to actually stop at each of the positions marked numbers 1 through 7 and look at the appropriate parts of each horse. As you gain experience, you will be able to make the circle at a slow walk and still complete the necessary observations. Points that may be viewed from each position follow. They are in no particular order of importance; if you can evaluate a part adequately from one position, there may be no need to look at it from another.
- Width of loin; unsoundnesses, injuries and blemishes of the outside of the left front leg, the inside of the right front leg and the front of both hind legs; condition of the withers; and overshot or undershot mouth.
- Size and clearness of the eyes; size of the nostril; cleanness of head; size and setting of ear; and unsoundnesses, injuries and blemishes of both front legs.
- Unsoundnesses, injuries and blemishes of the outside of the right front leg, the inside of the left front leg and the front of both hind legs; and width of loin and condition of the withers.
- Unsoundnesses, injuries and blemishes of the outside and front of the right hind leg, the inside and front of the left hind leg and the rear of both front legs; and width of loin.
- Unsoundnesses, injuries and blemishes of the rear and outside of the right hind leg and rear and inside of the left hind leg; and a comparison of the inner and outer gaskin.
- Unsoundnesses, injuries and blemishes of the rear and outside of the left hind leg and the rear and inside of the right hind leg; and a comparison of the inner and outer gaskin.
- Width of loin; unsoundnesses, injuries and blemishes of the front and outside of the left hind leg, the front and inside right leg, and the rear of both front legs.
This is not a complete list of the parts and points you might check at each location, nor would you look at every point at every location.
It is a good idea to speak to the horse if you approach from the rear, to let him know you are back there. Always use a soft voice when addressing the horse or showman, and move smoothly to avoid spooking the animals.
Some judges prefer to do the close inspection when the horse is set up in front of them during the way-of-going portion of the class, rather than when they are standing in a line.
The Way of Going
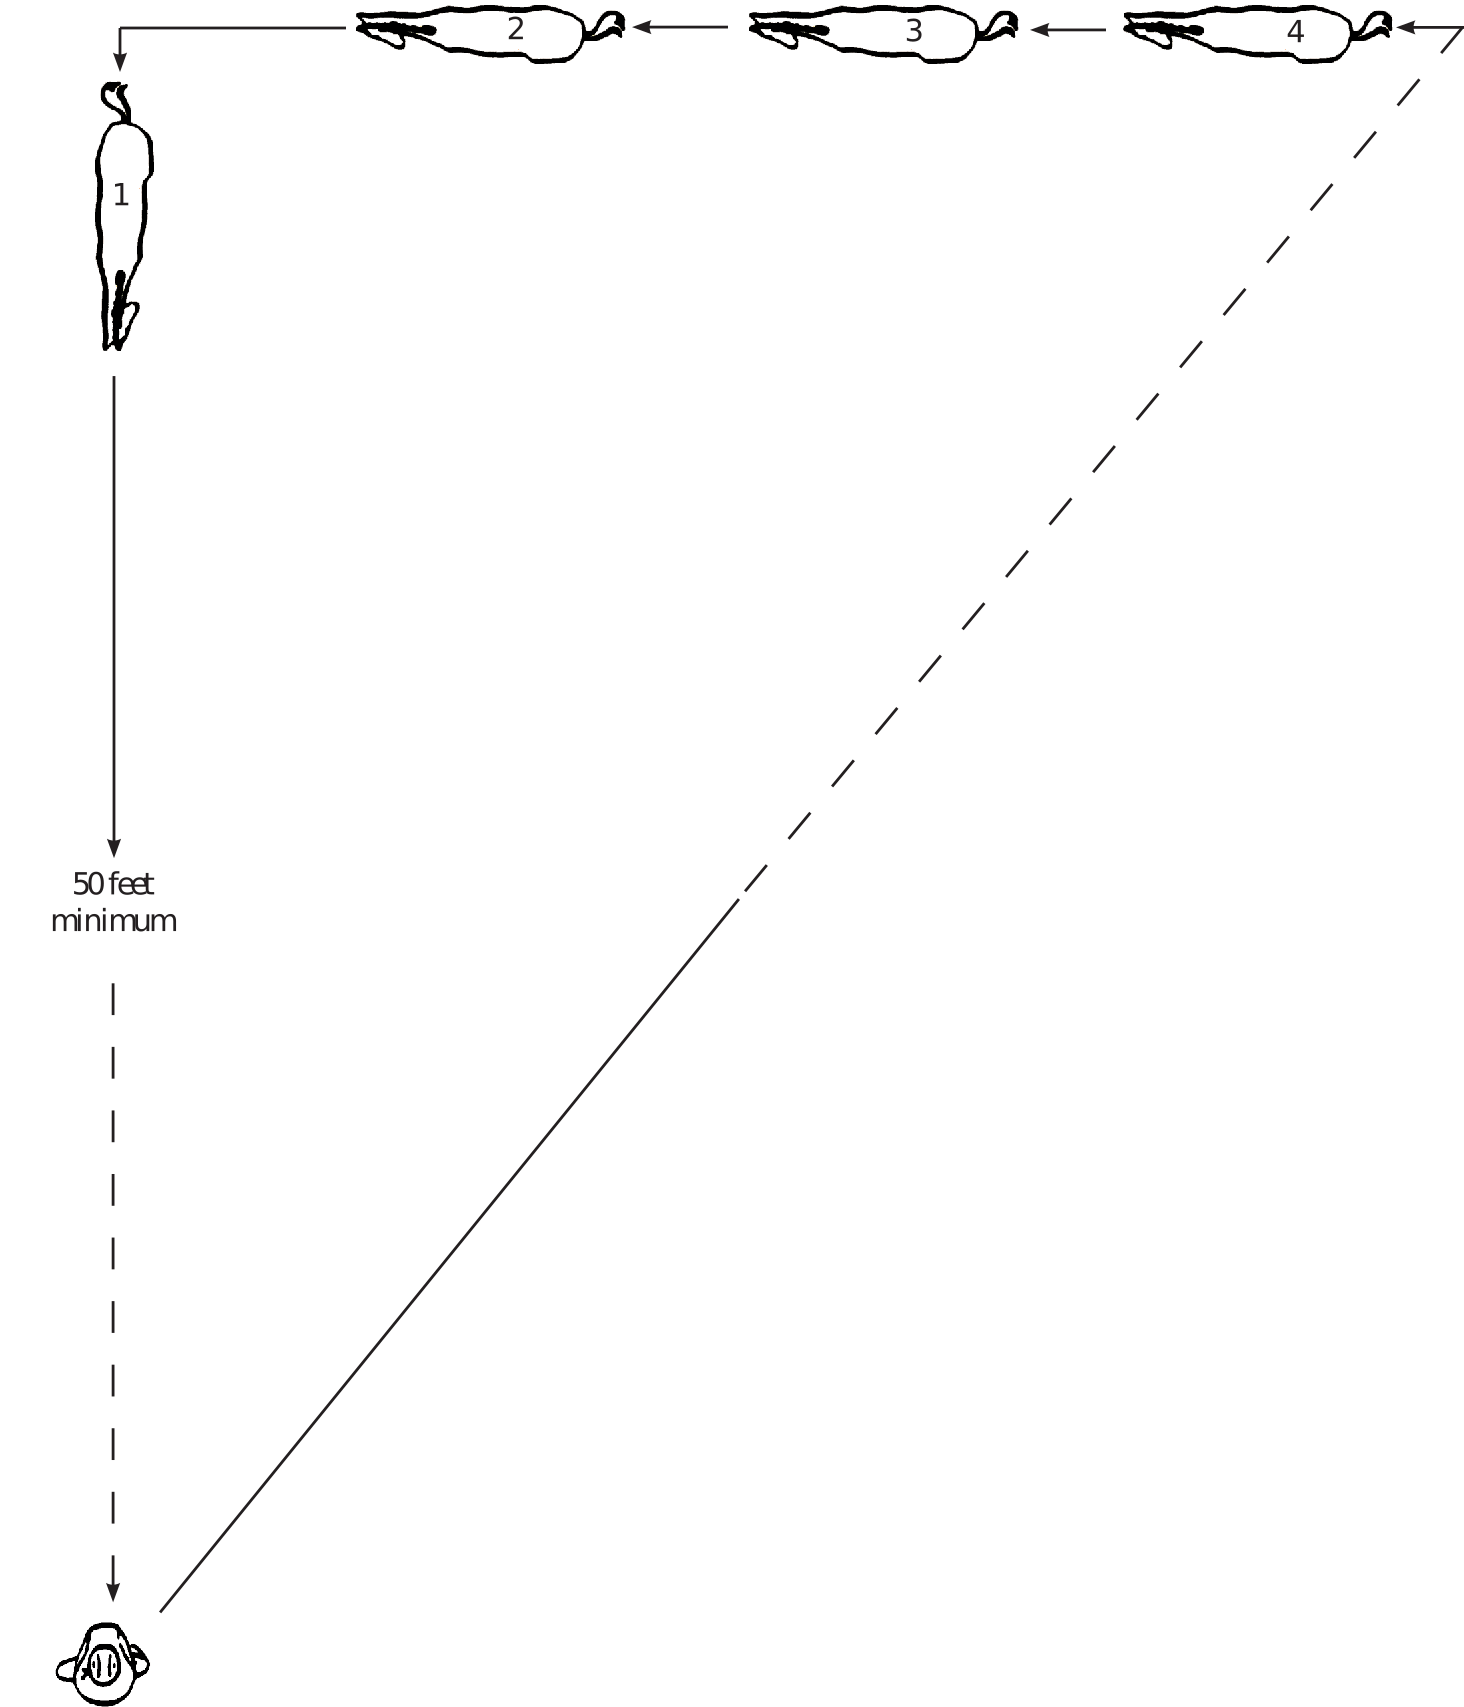
There are several patterns you can use to move horses to check their way of going. The one pictured here is easy and allows the class to move along rapidly. It is a simple rotation with each horse coming to you at the same spot. The distance traveled should be not less than 50 feet so you can get a good look at both the walk and the trot. In this example the solid line represents the walk and the broken line the trot.
In all views, watch the straightness that each foot travels, the rotation of the hocks, and whether the horse travels base narrow or base wide. Minor variations can be tolerated. It is only when a movement becomes so exaggerated that it leads to unsoundness or injury that we become concerned. Few, if any, horses will be perfect in their way of going.
If you wish to observe any or all horses from the side while traveling, simply have them walk and trot a 40-foot-diameter circle around you.
Placing the Class and Lining It Up
In a horse show, after deciding on your placing, the horses should be lined up in some order. They can be arranged in a single line as shown in example A. It doesn’t matter whether they stand head to tail or side by side.
4-H classes are placed by the Danish System. Example B shows how you might align a class according to ribbon groups.

3: First Place, 1: Second Place, 4: Third Place, 2: Fourth Place
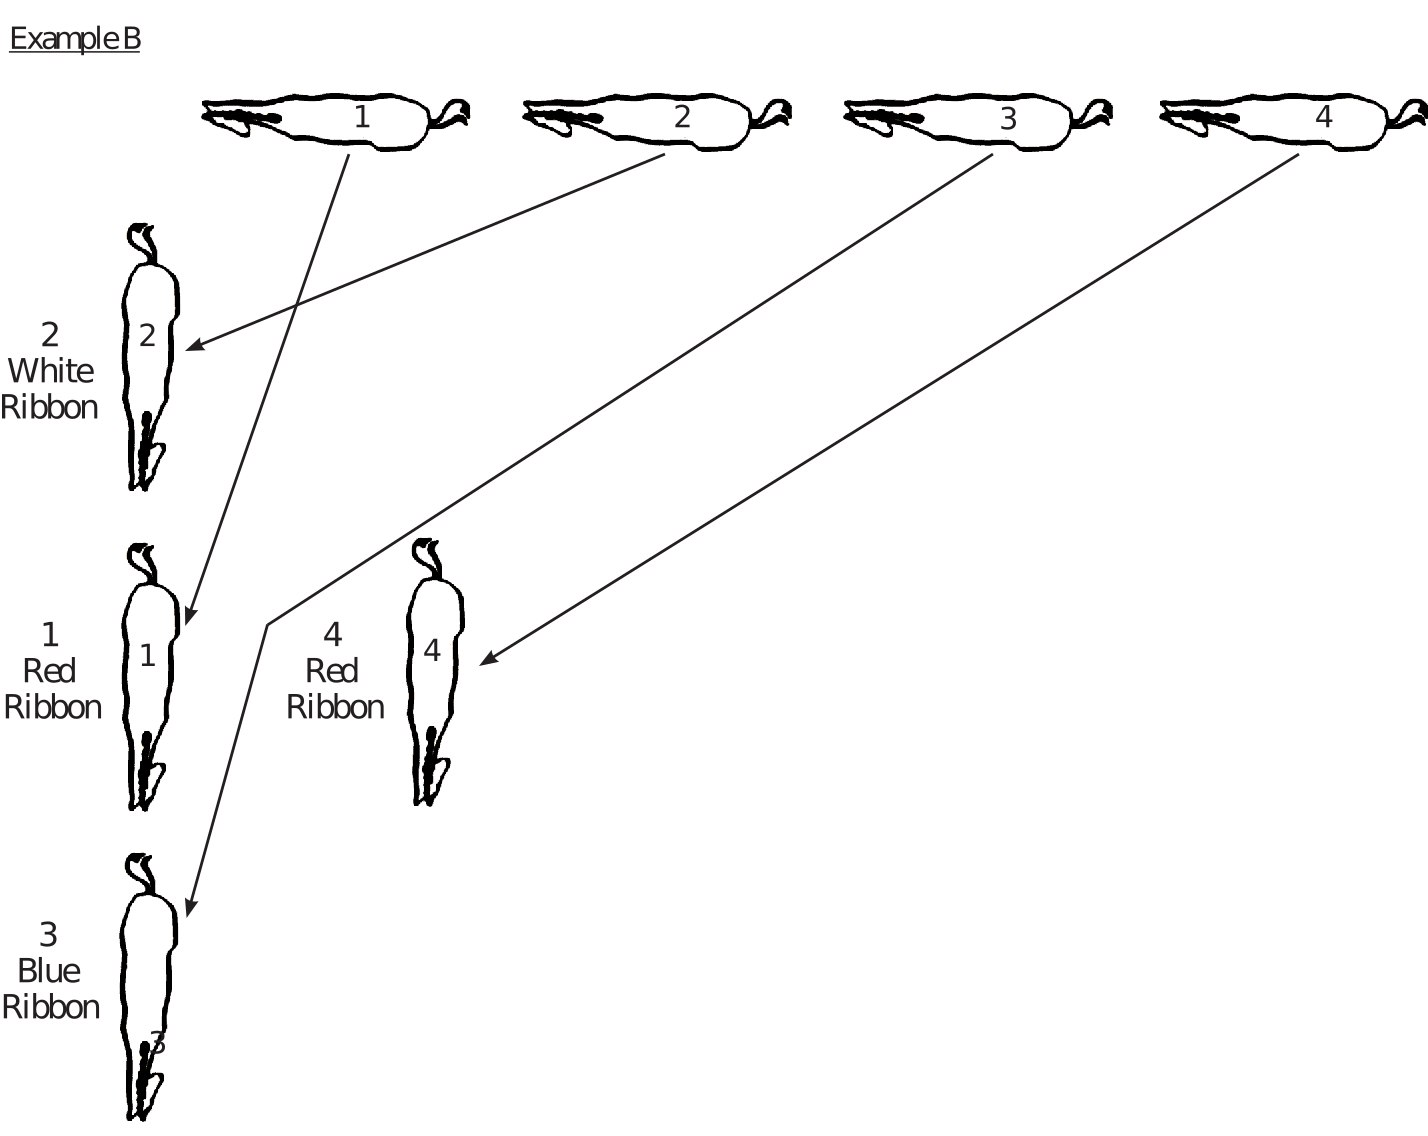
Your audience and showmen will be able to follow your work more easily if you use the same pattern in each class. You can be creative and save some surprises for the last moment to make the show more interesting. For example, rather than move the champion and reserve into obvious final position in each class, break your pattern and announce the placing from the mike. As with seasonings in a stew, surprises of this nature should be used sparingly.
Notes
Beginning and experienced judges alike can benefit from the use of notes kept while judging halter classes. By the same token, judges can burden themselves with note-taking paraphernalia and details. Most good judges use a pencil rather than a pen, which may not write in cold weather or may smear in the rain, and a small pocket-size note pad. Clipboards and large tablets provide more room to write but get in the way when one is handling animals or working in close quarters.
Note taking should be kept to a minimum. Excessive detail is not only unnecessary, is also time-consuming and, in the end, adds more confusion than it eliminates. Worst of all, judges who make lots of notes tend to get so involved in the process they lose track of the class. Beginners will find they can soon make do with only a few reminders about each class and the horses shown. The key is to note anything that will allow you to separate in your mind one horse from the rest. It may be a unique marking, a blemish or any one of several things. Once you get the horse back in your mind, you will automatically remember the reasons you placed it as you did.
Note, some shows may provide a scribe. If not and you would like one don't hesitate to ask for one. When using a scribe to take your notes it is important that you explain what you are looking for in notes before you start judging.
Oral Reasons
Oral reasons are helpful when judging either contests or horse shows. An informative, concise explanation of why you placed the class as you did helps the showmen and audience follow your line of reasoning. If you are participating in a contest you will be required to give oral reasons. If you are coaching a judging team, you will have the double responsibility of explaining why you placed the class as you did and teaching the team members to give their own oral reasons.
Formal “reasons” are very structured. They begin by stating which animal you placed first and why. State in very firm, confident and positive terms what the strongest points were in relation to the rest of the class, beginning with the most important characteristics and working through to the less important reasons. You need not elaborate on every single detail because that would make your reasons too long and boring. If the first-place animal has some faults, mention them, but explain that they were not serious enough to place him farther down in the class.
In most pairs within a class, the lower-placed animal will have some characteristics that are better than those in the animal placed above him. If this is the case in your top pair, you should say so: “I grant that number 4 was cleaner in his throat latch and had a more chiseled appearance to his head than number 2.” If you have explained the reasons why you placed the first horse in that position, it is not necessary to compare him to the second place animal beyond noting those characteristics of the second-placed animal that were superior to the one above him.
Move on to the second and third horses and talk about them in comparative terms, then proceed to the third and fourth horses. Finally, talk about why you placed the last horse at the bottom of the class. When “talking” your bottom horse, first dwell on the most important reasons why he was last and move to the less important reasons. There is no need to tear the animal completely apart, so don’t spend more time and effort than necessary defending its placing. Again, the last place horse will have some good points and these should be stated: “I recognize that the last place, number 3 horse, had the widest, deepest chest in the class, but this was not enough to place him higher in this class today.”
When you talk about your reasons, don’t be overbearing, but do be confident, firm and positive. Remember, for the moment — if not the day — you are THE authority. Use only positive terms: “Number 4 had a more prominent set of withers than number 1,” NOT “Number 1 was poorer in his withers than number 4.” Use descriptive terms such as “wider, thicker stifle” and avoid vague terms like “a nicer neck.” Terms like “nice” and “good” and “pretty” mean different things to different people. More definitive terms like “wider” and “thicker” and “straighter” can mean only one thing.
A good judge can explain the placing of a four-horse class in not more than two minutes. The key is to be organized and develop a system to remember the important features of the class. Do not fall into the trap of using “canned reasons” that are the same for every class. Remember, all classes are different and placed as they are for different reasons, so tell it that way.
While reasons given for a larger class at a horse show do not need to be so structured and formal, they do need to be logical and concise. You need not talk about every horse. In very large classes, you can group horses together in the bottom placings and discuss them as a group: “The last eight horses had a variety of problems that prevented them from placing higher. Some had structural unsoundnesses, were poorly balanced or simply lacked the overall quality of the rest of the horses in the class.” Bear in mind that someone may ask you later why you placed the brown gelding 17th in a class of 23 head. That will make you scratch your head a bit and even make you gray before your time. If you remember — and after you’ve judged a few years you’ll find you do remember more often than you might think — tell him so. If you just can’t remember, explain that you’ve looked at 239 head in the past six hours and either have him describe the horse a little more fully or bring the horse to you for another look. Chances are, when you see the horse you’ll remember him and the class as a whole.
You will occasionally be faced with a class for which there is no “right” placing. For instance, how would you place a class of 18 two-year-olds made up of five different breeds and two sexes? It’s like comparing the proverbial apples and oranges; this really happens in small horse shows. YOU have to call the shots. The best way to handle the situation is to compare each horse against its breed standard and sex and against each other in terms of the most basic characteristics, such as foot and leg soundness, then place them accordingly. Here’s where oral reasons can bail you out. Obviously this class placing is going to be controversial, so admit that right up front. Explain there is no way to place such a class to everyone’s satisfaction and then state how you went about making your choices. Tell the audience they may want to place the class differently, depending on their personal preferences and priorities, but you placed them the way you did based on what you felt were the most important traits each possessed in comparison to its breed standard and the other horses in the class. A good way to say it is: “You can be wrong (according to the official), if you are wrong for the right reasons.” Simply stated, that means different people have different feelings about what is important and desirable in a horse.
To summarize, audiences, especially youth, should know why you placed a class as you did. Folks who disagree with your placing are much more understanding and much less argumentative if you state your reasons logically and firmly and concede that a class may be placed differently if one does so because of different priorities from your own. If all else fails, remind them you were hired to be the official judge for the class and you’ve placed it as honestly as you could based on your professional opinion. Following is a sample set of formal reasons on a hypothetical class of three-year-old quarter horse mares. The placing was 3-1-2-4.
I placed this class of three-year-old quarter horse mares 3-1- 2-4 with an easy top and bottom and a close middle pair.
I placed number 3 on top because she was easily the best-balanced, smoothest-muscled horse in the class. She stood the straightest and was soundest throughout her foot and leg structure. Number 3 traveled the most correctly of the four horses with a long, smooth stride. She was correct in the slope of her shoulder and pastern; had the most prominent set of withers; the shortest, strongest back; and was wider and heavier-muscled through the stifle and gaskin than any horse in the class. Number 3 was cleaner and neater about her head and neck than the other horses, but I fault this bay mare for being slightly short and steep in her croup. I recognize that she has a blemish on her right hind cannon, but it is an old injury that I did not feel affected her soundness, and thus I did not consider it important enough to place her lower in the class.
I placed number 1, the black mare, over number 2, the palomino, in a close placing because she more nearly followed the type of my first place mare and was slightly straighter and more correct in the angulation of her feet and legs. Number 1 had a cleaner throat latch and higher neck attachment than number 2 and was more prominent in her withers. I grant that number 2 was a thicker, heavier-muscled mare with a slightly wider chest than number 1; however, I did not feel she had the refinement and soundness necessary to place higher in this class.
I easily placed number 2 over number 4, the chestnut mare, because she was heavier-muscled through the shoulder, loin and entire rear quarter, and traveled more correctly on a straighter set of feet and legs. Number 2 had a cleaner, more feminine head and was wider and deeper in her chest than number 4. I fault number 2 for being too straight in the slope of her shoulder and pastern and for not having more angle in her hock.
I placed number 4 at the bottom of this class because she was the lightest-muscled, poorest-balanced horse and was crooked from the knees down in both front legs. Number 4 lacked depth of heart and overall femininity. I grant that she had a high, smooth neck set and was prominent in her withers, but these were not enough to place her higher today.
For these reasons, I placed this class of three-year-old quarter horse mares 3-1-2-4.
Marla Lowder, 4-H and Youth Development Faculty. Originally prepared by Ken Krieg, former Extension Livestock Specialist.
Revised June 2021
