Drying Fruits & Vegetables
FNH-00745 View this publication in PDF form to print or download.
Drying
Drying foods is one of the oldest methods of preservation known to man. It preserves food by removing moisture to a point where growth of microorganisms cannot be supported.
Drying is one of the simplest methods of preservation, requiring little outlay of special equipment and expense. It can be done outdoors or indoors in an oven or specially built dehydrator. Most foods can be successfully dried. The quality is not improved by drying and drying does not preserve nutrients, so it is important to begin with foods at the peak of their quality.
Procedure
Moisture must be removed rapidly enough to prevent spoilage but slowly enough to allow migration of moisture from the inside of pieces of food to the outside. If drying is too rapid, a crust will form on the outside of the food, trapping moisture inside the food.
Foods
Most foods can be successfully dried. Some foods dry better than others. Those that dry best include:
- apples
- beans, all kinds
- apricots
- carrots
- cherries
- chile peppers
- nectarines
- onions
- peaches
- sweet corn
- plums
- sweet potatoes
Choose fruit that is fresh, sound and just right for eating. Vegetables should be fresh and in prime condition. Many drying methods are satisfactory.
Sun Drying
In climates where the daytime temperature reaches 90 degrees Fahrenheit, remains hot at night, and the humidity is relatively low, sun drying can be used for fruit and vine-dried beans. A good breeze is also helpful. It may be necessary to move food inside at night to avoid condensation of dew on the partially dried foods. It takes several days to dry food outdoors.
Foods that are sun dried should be moved to the shade as soon as they are no longer sticky. This helps prevent browning that results from direct light.
Pasteurize outdoor dried food to kill any insects and their eggs that may be on it.
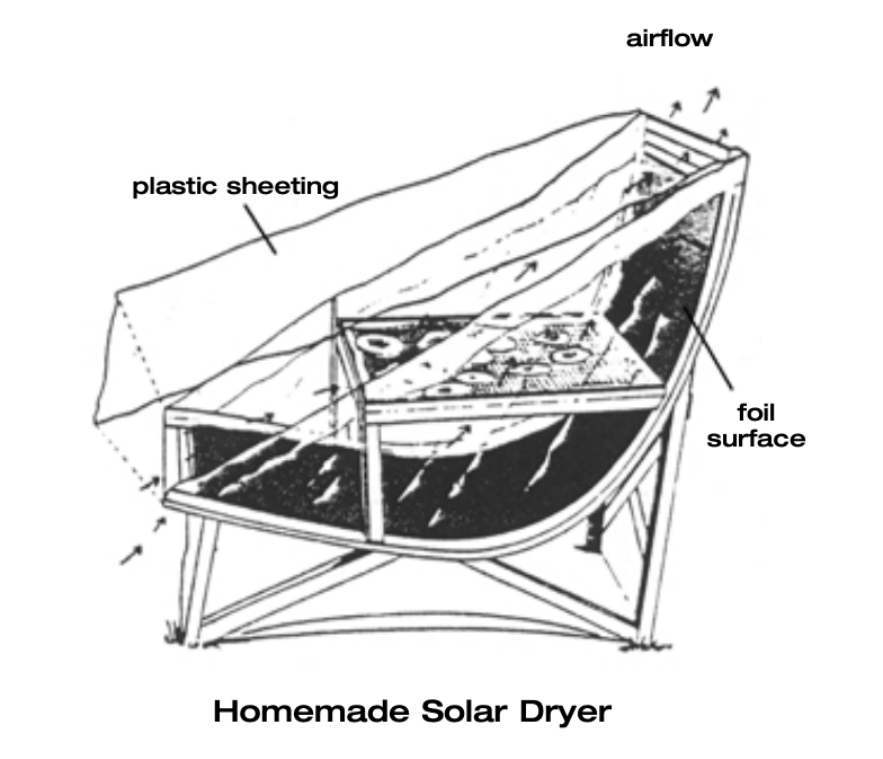
Solar Drying
The sun’s rays gathered in a setting with a foil surface helps increase the drying temperature. A vented setting allows the air flow to remove moisture and helps it dry in a shorter time. Cover the trays with netting to keep bugs out. Pasteurize after drying.
Oven Drying
Oven drying can be used for small amounts of food. The oven needs to maintain a temperature of 130 degrees F to 150 degrees F. If the temperature is higher than this, a dried crust can form on the outside of the food that prevents the inner moisture from escaping. Prop the oven door open, with a fan set beside the door to provide air circulation. Oven drying takes two to three times longer than drying in a dehydrator. A convection oven uses fans to circulate air inside, but must maintain the 130-150 degree F temperature to dry food. Microwave ovens are not recommended for drying. Microwave ovens are not adequately vented and moist air does not escape, making drying difficult. Because they are heated rapidly, microwave dried products are not only dry, but also cooked. Burning and scorching parts of the food also tend to occur.
Dehydrators
Dehydrators especially designed for drying food are available in many types. The natural-draft dehydrator contains no fan. In order for it to do an adequate job, it must be twice as tall as it is wide. In order to have satisfactory drying in the natural-draft dehydrator, the trays must be moved around frequently to avoid uneven drying.
Forced-air dehydrators are popular and are quite effective. They contain a fan and a heat source. The air movement capacity for the fan should not be more than 700 cubic feet per minute. Greater air flow than this causes a crust to form on the outside of the food so that moisture cannot escape easily. The thermostat on such a dryer should be accurate to within 10 degrees of the set temperature.
Preparations for Drying
Gently wash produce in cold water before drying to remove dirt, bacteria and insects. Do not soak them in water. Remove fruit stems, peel, core or pit, cut into uniform halves, quarters or slices. Trim away bruises or diseased spots. Most vegetables should be peeled, trimmed, then cut, sliced or shredded into uniform pieces. Remove fibrous or woody portions and damaged areas.
Peels may be left on apples, young zucchini and well-washed carrots, for example, though they tend to be tough when dried.
Vegetables
Most vegetables must be blanched prior to drying since the same enzymes that produce an off flavor in frozen vegetables will do the same in dried vegetables. The enzymes can be active even at a moisture content too low for microorganisms to grow.
Those vegetables that need no blanching are okra, onions, parsley, peppers, pimentos, mushrooms and horseradish. Herbs need no pretreatment before drying.
Fruits
Fruits, such as apples, apricots, pears and peaches require some sort of pretreatment to prevent browning and loss of vitamin C. Placing the cut-up pieces in an ascorbic acid dip, citrus juice, honey dip, salt solution, syrup blanching or sodium bisulfate solution for 5 minutes will reduce the browning. Note, some individuals, particularly those with asthmatic conditions, are highly sensitive to sulfites. Sulfite solutions may cause severe allergic reactions in those sensitive.
The Drying Process
Times for drying vary due to differences in temperatures, air flow and size of pieces of food. Generally, fruit at 1/4-inch thickness takes 6 to 12 hours to dry; fruit cut in half takes 24 to 36 hours to dry. This makes it necessary to judge dryness subjectively. When food appears dry, remove a piece. Cool completely, then test for dryness.
Vegetables are dry when brittle or leathery. Brittle vegetables such as carrots and peas, shatter when hit with a hammer. Leathery foods will be pliable and spring back if folded.
Fruits are sufficiently dry when pliable and leathery, with no pockets of moisture. Foods dry more quickly at the end of the drying period, so check frequently.
Pasteurization
Foods dried in the sun may become contaminated from the air or insects. Pasteurize these products before packaging.
Heat method: Place the dried foods loosely on a tray in an oven at 175 degrees F, vegetables for 10 minutes or fruit for 15 minutes. This heats the surface, where the contamination is likely to be, without cooking the food.
Freezer method: Seal dried food in heavy freezer containers. Freeze at 0 degrees F for 48 hours.
Conditioning: Though appearing to be dry, moisture may be different in pieces due to size or location in dehydrator. To distribute the moisture and reduce the risk of mold growth, place the food loosely in an airtight container; cover securely. Shake daily for two to four days for moisture to distribute evenly among the pieces. If condensation appears on the jar, return to the dehydrator.
Packaging
The packaging material provides a barrier between the food and the air. The food can pick up enough moisture from the air to support the growth of

microorganisms. The food will maintain best quality if not exposed to light. An opaque material shields out the light; if a clear plastic wrap is used, store in a dark place. Metal containers with plastic lids are satisfactory only if the food does not come in contact with the metal of the can. If dried food is stored in glass jars with metal lids, two layers of plastic should be placed between the lid and the jar.
Label each package with type of food, pretreatment step and date. This prevents opening it just to find out what it is and letting air or moisture in.
Keeping Quality
Most dried foods will maintain satisfactory quality for one year. The stronger flavored vegetables, such as onions and cabbage, maintain top quality for only six months. Store in a cool, dry, dark location.
Use of Dried Foods
Dried fruit may be eaten as is or rehydrated for eating. Dried vegetables are generally added to appetizers, soups or stews. Rehydration generally takes l½ to 2 hours in enough water to cover the food. Once the food is rehydrated, it is perishable and must be treated accordingly.
References
So Easy to Preserve. University of Georgia Cooperative Extension Service: www.uga.edu/setp.
Drying Fruits and Vegetables, PNW 397, https://www.uidaho.edu/extension/publications
Ball Blue Book. Ball Corporation, Consumer Products Division, Consumer Affairs, 345 S. High, Muncie, IN 47305-2326.
Fruit Leather, FNH-00228. University of Alaska Fairbanks Cooperative Extension Service.
Table For Drying Fruits and Vegetables
| Food | Preparation | Treatment | Dryness Test |
|---|---|---|---|
Fruit |
|||
| Apples |
Peel, core, slice 1/4 inch thick Or cut into rings 1/4 inch thick |
Anti-darkening solution for 10 minutes | Pliable, springy, leathery, no moist area in center |
| Apricots | Peel, cut in half | Anti-darkening solution for 10 minutes | Leathery, no moist area in center |
| Banana | Peel and slice 1/4 inch thick | Ascorbic acid solution dip | Pliable to crisp |
| Berries | Leave whole |
None |
No visible moisture |
| Blueberries | Remove stems | Scald 15 seconds, cool, drain | Shriveled, leathery |
| Cherries | Remove stems and pits, leave whole | None | Leathery, pliable |
| Grapes | Remove from stems, leave whole | Scald 15-30 seconds to crack skins, cool and drain | Leathery, pliable |
| Peaches | Halve, quarter or slice ⅛ inch thick | Anti-darkening solution for 10 minutes |
Pliable, leathery |
| Pears | Peel, core, slice | Anti-darkening solution |
Leathery, springy |
| Plums | Cut in half, remove pits | None |
Pliable and leathery |
Vegetables |
|||
| Beets |
Cook, peel, slice or dice |
Steam or boil 25-30 min. |
Dark, red, brittle |
| Cabbage |
Quarter, core, shred 1/8 inch thick |
Steam 2 minutes |
Crisp, pale yellow to green |
| Carrots |
Peel and slice 1/4 inch thick |
Steam 3 minutes |
Tough, brittle |
| Corn |
Cut off cob |
Steam 5-10 minutes on cob |
Dry, brittle, translucent |
| Green beans |
Cut 1-inch pieces |
Scald 3 minutes |
Brittle, dark green or brownish |
|
Mushrooms - commercially grown |
Peel and slice |
None |
Very dry and leathery |
|
Onions |
Peel, slice thin or chop |
None |
Very crisp |
| Peas |
Shell |
Steam 2 minutes |
Brittle |
| Peppers |
Remove seeds, slice or dice |
Steam 3 minutes |
Tough, leathery |
| Summer squash |
Slice 1/4-inch thick |
None, or steam 3 minutes |
Leathery to brittle |
Julie Cascio, Extension Faculty, Health, Home and Family Development. Originally written by Roxie Rodgers Dinstel, former Extension Faculty, Health, Home and Family Development.
Revised July 2024