Nagoonberries
FNH-00118 View this publication in PDF form to print or download.
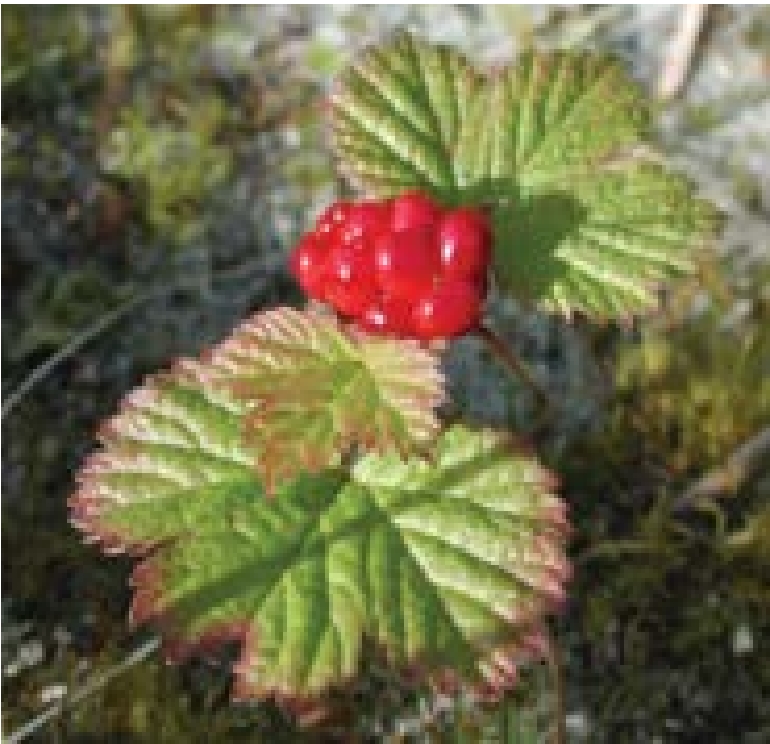
Nagoonberries grow close to the ground on erect stems arising from spreading, underground rootstock. Nagoonberry plants produce dark rose to red flowers and red fruit composed of many small drupelets resembling a round raspberry. Each leaf has three leaflets with sharp-toothed edges. The name of the berry comes from goon, a word in Tlingit that means “jewel.” Tlingit elders say the berries are like little jewels popping up from the ground.
Nagoonberries are found in damp or wet woodsy places in coastal and Interior Alaska. Except for a few closely guarded patches, they are not found in sizable quantities. They are soft and easily crushed, so it’s best to gather them in shallow containers. The fruit ripens in late summer. For the best flavor, berries should be fully ripe when picked.
The fruit is a superior tasting berry of good color that makes an excellent jelly.
Storage and Preservation
How to Clean and Store
Nagoonberries are very fragile. Unless they are exceptionally dusty, do not wash them. Eat them the day they are picked for best flavor. Nagoonberries should be stored in a covered container in the refrigerator, but they will not keep more than two or three days. Store in shallow containers to prevent crushing the berries.
How to Freeze
Spread nagoonberries in a single layer on a cookie sheet and place in the freezer. When frozen, transfer the berries to freezer bags or containers. Frozen nagoonberries stored in airtight containers below 0 degrees F will maintain quality for up to two years.
How to Dry
Nagoonberries are not recommended for drying because they are too seedy and slow to dry. Nagoonberry puree may be used to make fruit leather.
How to Extract Juice
Combine 4 cups cleaned nagoonberries with 1 cup water. Crush berries. Bring just to a simmer, cover and simmer for 10 minutes. Place in jelly bag or layers of cheesecloth in a colander. Let the juice drip into a bowl. For clear juice, do not twist or press jelly bag or cheesecloth. For long-term storage, the juice should be frozen or canned.
Yield: 2 cups
Hot pack for juice
Sterilize canning jars. Heat juice, stirring occasionally, until it begins to boil. Pour into hot jars, leaving ¼ inch headspace. Wipe jar rims. Adjust lids. Process in a boiling water canner.
- Quarts or smaller: 5 minutes
How to Prepare Puree
Cooked method: Add 1 cup of water to 4 cups of nagoonberries. Cook until softened. Crush berries. Press through sieve or food mill. Discard skins and seeds.
Yield: 2 cups
Uncooked method: Rinse 4 cups of nagoonberries, drain, put in a blender and blend until the consistency of a thick puree.
Yield: 2 cups
For long-term storage, the puree should be frozen: Pack into rigid containers leaving ½ inch headspace for expansion and freezing. Seal and freeze.
To can, fill hot jars with hot puree, leaving ¼ inch headspace. Process quarts or pints in a boiling water bath for 15 minutes. Purees can be processed in a dial gauge pressure canner for 8 minutes at 6 pounds pressure or at 5 pounds pressure in a weighted gauge canner. For more information on pressure canning, contact your local Cooperative Extension Service office.
Recipes
Nagoonberry Syrup
- 1 cup nagoonberry juice
- 2 cups sugar
- 1 teaspoon lemon juice
Combine nagoonberry and lemon juices and sugar in a saucepan and heat to 160 degrees F. Use a candy thermometer; do not boil. The syrup is ready to use over waffles, pancakes, hot biscuits, ice cream and other desserts. Syrup will keep up to six months in the refrigerator without crystalizing.
For long-term storage: Sterilize pint or half-pint canning jars and prepare lids. Immediately pour hot syrup into hot canning jars, leaving ¼ inch headspace. Wipe jar rims and adjust two-piece lids.
Process 5 minutes in a boiling water canner. (See next page for steps in using a boiling water canner.)
Yield: 2 cups
Nagoonberry Fruit Leather
- 2 cups nagoonberry puree
- 2 tablespoons honey or corn syrup
Combine puree and sweetener. For oven drying, line cookie sheet with plastic wrap. Spread puree mixture evenly about ¹⁄8 to ¼ inch thick over plastic, but do not push it completely to the sides of the cookie sheet. Oven dry at 140 degrees F for approximately 6 hours, leaving oven door slightly open so moisture can escape. If drying in a dehydrator, follow manufacturer’s directions for fruit leathers.
Yield: 1 sheet
Nagoonberry Jelly
- 5¾ cups nagoonberry juice
- ¼ cup lemon juice
- 6 cups sugar
- 3 ounces liquid pectin
Sterilize pint or half-pint canning jars and prepare lids. Open liquid pectin pouch and stand upright in a cup or glass. Combine nagoonberry and lemon juices and sugar in a large saucepan. Place on high heat; stir constantly and bring to a full rolling boil that cannot be stirred down. Add the liquid pectin and heat again to a full rolling boil. Boil hard for 1 minute, stirring constantly. Remove from heat and quickly skim off foam. Immediately pour hot jelly into hot canning jars, leaving ¼ inch headspace. Wipe jar rims and adjust two-piece lids. Process 5 minutes in a boiling water-bath canner.
Yield: 8 cups
- To sterilize canning jars, boil in water for 5 minutes.
- To prepare two-piece lids (rings and tops), wash, rinse set aside until ready to use. Follow manufacture’s directions for use.
- If less sugar is desired in recipes calling for pectin, be sure to use no-sugar-needed pectin and follow the instructions on the box.
- See later instructions on this page for how to use a boiling water canner.
Nagoonberry Sorbet
- 1 cup sugar
- 1 cup water
- 3 cups nagoonberry juice or puree
- 2 tablespoon lemon juice
In a medium saucepan, heat the water and sugar until dissolved. Bring to a boil, simmer 2 minutes; let cool. Stir the lemon juice and nagoonberry juice or puree into the cooled sugar syrup. Chill the mixture for several hours, then freeze the mixture in an ice cream machine according to the manufacturer’s instructions.
UAF Cooperative Extension Service Resources
Jams and Jellies, FNH-00730
Canning Overview, FHN-00705
Using Alaska’s Wild Berries and Other Wild Edibles ($), FNH-00120
Fruit Leather, FNH-00228
Canning Acidic Foods: Fruits, FNH-00710
Remaking Soft Jams and Jellies, FNH-00731
Fruit Spreads: Butter, Honey, Sauce, Syrup, FNH-00732
Drying Fruits and Vegetables, FNH-00745
- Fill the canner halfway with water. Preheat water to a low boil. Place filled jars, fitted with lids, into the canner on the rack. Add more boiling water, if needed, so the water level is at least 1 inch above jar tops. Turn heat to its highest position until water boils vigorously. When the water boils, set a timer for the recommended processing time indicated in the recipe. Cover with the canner lid and lower heat setting to maintain a gentle boil throughout the processing time. Add more boiling water, if needed, to keep the water level above the jars.
- When the jars have been boiled for the recommended time, turn off the heat and remove the canner lid. Using a jar lifter, remove the jars and place them on a towel, leaving at least 1 inch of space between the jars during cooling.
- After cooling jars for 12 to 24 hours, remove the screw bands and test seals. Press the middle of the lid with a finger. If the lid springs up when finger is released, the lid is unsealed. If a lid fails to seal on a jar, remove the lid and check the jar-sealing surface for tiny nicks. If necessary, change the jar, add a new, properly prepared lid and reprocess within 24 hours using the same processing time. Alternately, adjust headspace to 1½ inches and freeze or store in the refrigerator and use within three days.
- If lids are tightly sealed on cooled jars, remove screw bands, wash the lid and jar
to remove food residue, then rinse and dry jars. Label and date the jars. Store
in a clean, cool, dark, dry place.

Sarah R-P. Lewis, Extension Faculty, Health, Home and Family Development. Originally written by Roxie Rodgers Dinstel, former Extension Faculty, Health, Home and Family Development, and Marci Johnson, former Program Assistant, Health, Home and Family Development.
Revised January 2022