Composting With Worms
HGA-01020 View this publication in PDF form to print or download.
Composting and farming worms is an excellent way to improve soil structure and fertility
as well as a good way to convert kitchen scraps into compost for your garden, greenhouse or house plants. Worms eat and digest their body weight daily.
Parent soils that have been worked by worms have increased nitrate nitrogen (500%),
plant available phosphorus (700%), exchangeable potassium (1,200%), exchangeable calcium
(150%) and organic carbon (200%). While this may seem like an extraordinary boost
in soil fertility, worm castings provide soil nutrients comparable to a 1-1-1 well-balanced
organic fertilizer, which can be used for a number of garden uses.
Type and Size of Box
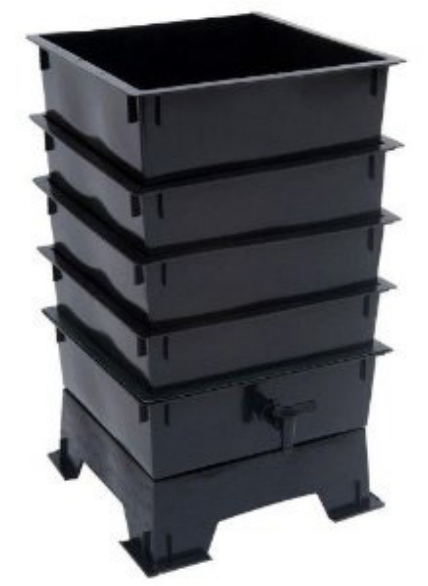
To get started, you'll need a container. Commercial earthworm boxes are available through many garden supply catalogs. Expect to pay between $80 and $120 for a commercial worm composter (not including shipping).
The chief advantage of a commercial system is its tiered design; worms migrate upwards through successive trays, allowing for easier (and worm-free) compost collection.
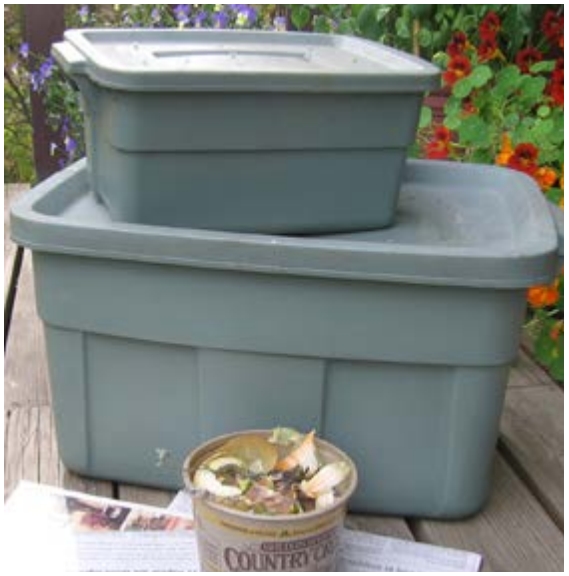
Inexpensive earthworm boxes may be improvised from household totes or constructed
from untreated wood or plastic. Whether you are constructing a bin or repurposing
a tote, be sure that the container is relatively shallow, with plenty of aeration
holes drilled in the lid. Never use a container that has been  used for chemicals.
The size of the box will depend upon whether or not you want to compost all of your kitchen waste with worms. One square foot of surface area is needed for each pound of garbage buried each week. If your family generates a lot of waste, build a bigger box or build two small boxes. Keep in mind that smaller boxes are easier to move and empty. An average family of four generates 6 pounds of kitchen waste per week. A box 2 feet by 3 feet, or 6 square feet, will work for the average family.
Enclosed wooden boxes can also be placed outside during late spring once soils reach approximately 55°F. Depending on your location, boxes could be placed in your outside garden or in a high tunnel. Wooden boxes are preferable for outdoor situations since they allow moisture to pass between the bedding, box and outer soil. Do not let worms escape their box. Although most parts of Alaska are too cold for worms to survive through the winter, as of 2016, 16 exotic species of earthworm have been found in Alaska. Be aware, and avoid introducing new species to an area. Worms should be brought back into a heated environment once soil temperatures begin to dip into the low 50s.
Starting an Earthworm Box
Good earthworm bedding should (1) retain moisture, (2) remain porous and resist packing, (3) consist mostly of organic matter, and (4) contain only a small amount of topsoil (mineral soil). In addition, it may or may not furnish food and any food present should be low in protein. An ideal worm bedding can be started from a base of aged horse manure. However, it is more convenient for many people to start worm beds from shredded newspaper, since it is easy to come by and requires little preparation.
Place 2 to 3 inches of bedding material loosely in your worm box. Cut or tear corrugated cardboard or newspaper into 1-inch-wide strips. Don’t use glossy magazine paper — the clay content is high and the inks used may contain heavy metals and other toxins, which are bad for worms. Moisten the bedding by adding about an inch or two of soil or a mixture of soil and leaf mold, horse or cow manure and/or peat.
While most of the bedding should consist of organic material, earthworms need grit to physically break down their food, so add a little sand or topsoil. Proper pH is a must. Be cautious using Alaska peat and natural soils, since these are usually too acidic for direct use in worm beds. Worms need a pH of between 6 and 7. Add approximately 1 teaspoon of garden lime (calcium carbonate) per box to help keep the mixture from becoming too acidic. Wider and deeper boxes will need more lime. Measure the pH of the bedding material once it is mixed. Red worms are top feeders, so put them on top. The worms will move down into the bedding.
Once the bedding has been prepared and the worms added, secure the lid to the box and let the worms do their thing. Make sure there is enough air to keep worms alive and happy. For example, if you use a small tote, you will need to drill air holes in the top. A large tote has enough air space as long as you don’t fill it to the brim and as long as you are regularly opening the tote to check on the worms. A box without fresh airflow will eventually become toxic for the worms. An airtight lid that is not regularly opened is a recipe for disaster.
Moisture
Moisture is just as important as food and fresh air. Worms and their bedding should have the same moisture content, between 75 and 90 percent. Earthworms will suffocate if the bedding is too dry since they breathe through their skin. Approximately 3 pounds of water for 1 pound of dry bedding, or a ratio of 3:1, is a good rule of thumb. Moisten the bedding so that it is wet but doesn’t drip water when squeezed. No more than five drops of water should drip from the moistened bedding when squeezed.

What Kind of Worms
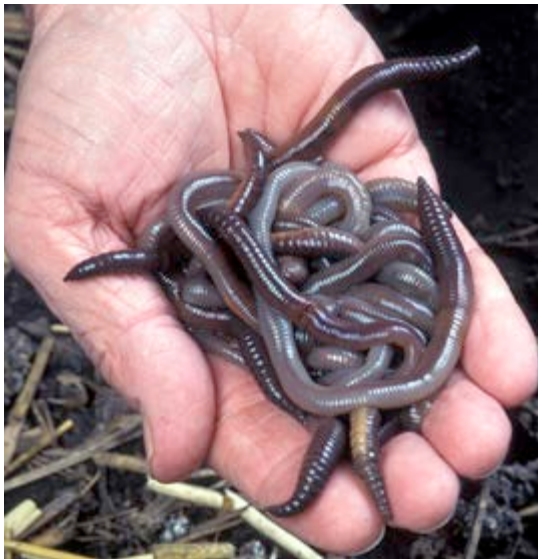
There are two species of red worms that successfully adapt to a box environment: Lumbricus rubellus and Eisenia foetida.
Nightcrawlers and other garden worms are very important for soil improvement but are not as adaptable to indoor conditions.
There are several online sources for composting worms, or check the classified ads of gardening magazines and catalogs and fishing magazines. Worms will cost between $30 and $40 per pound.
How Many Worms Are Needed
It's best to start with a pound of worms, or, as they are most often sold, 1,000 worms. Worms raised at the proper temperature will consume half their weight in kitchen waste per day, so 1 pound of worms will consume a half pound of food waste per day — a ratio of 2:1. On a weekly basis, 1 pound of worms should be able to process 3.5 pounds of waste. If the growing conditions are cooler or not ideal, the rate at which they consume will drop.
(3½ lb kitchen waste/week) / 7 days a week = ½ lb waste/day average
Where to Place a Worm Box
Put the earthworm box in a convenient spot where the temperature and moisture can be controlled. An ideal temperature for earthworms is 55° to 77°F. Air circulation is a must in and around the box. The box should be protected from direct sunlight and away from primary home heating sources to limit rapid changes in temperature. Worm boxes should also be placed on hard and easy to clean surfaces, not over carpeted areas. Lastly, be sure to locate your worms where you will be likely to have easy access to care for them.
Feeding the Worms
Worm bedding is different than worm food. Worm bedding provides a proper environment (air, moisture and organic medium), while worm food provides the nutrient-dense diet that worms need to grow and reproduce. Feed the worms once a week. Don't overfeed them; too much food will harm the worms, create odors and contribute to pest problems. Overfeeding may also lead to fermentation and related acidity problems. When your worm/food balance is right, your tote will smell like healthy garden or forest soil. During warmer temperatures, worms will need more food, and under cooler conditions, worms will be less active and require less food. Be sure to match your feeding according to the conditions of your worm bed.
If you are using a large tote that is half full of bedding, castings and soil, with about 500 worms, 1 or 2 quarts of scraps per week will keep your worms healthy. Of course, as your population grows, you will have to increase the amount of food supplied to your worms.
Additionally, overfeeding combined with very warm temperatures may lead to a population explosion of earthworms. When this happens, worms often attempt to leave their worm bin. Should overcrowding occur, simply remove one-quarter to one-third of the worms to create another new bed, or consider giving them to a gardening friend. If your supply of worms begins to grow, you may even consider selling them as a business and becoming a worm farmer.
Adding the Waste (Worm Food)
Place the waste on top and cover it with a thin layer of fresh, moistened bedding material. This will help minimize earthworm disturbance.
Don’t place your waste in the same place each time you feed. Divide the box into grids and start burying at one end. Feed your way to the other end over time. When all the locations have been filled, start your feeding over at the location where you first began. This rotational feeding pattern will limit problems of food accumulation and stimulate your worms to till the full length of your worm bed.
Worms like eggshells, coffee grounds, stale or moldy bread, tea bags, fruit and vegetable scraps. Grinding most kitchen waste is not necessary since it breaks down in a short time. Chop scraps and break up eggshells into small pieces to speed up worm processing. Worms will readily consume kitchen paper waste such as coffee filters, butter wrappers, etc. Over time, you will find that your worms consume quite a bit of paper in addition to food. Therefore, periodically add more shredded newspaper to the worm bin.
Harvesting the Castings
After 3 to 4 months, you will want to harvest the castings. Decomposition and composting have taken place. The bedding will become dark and earthlike. It should feel and smell like garden or forest soil. If there is a strong rotting or methane odor, this is an indication that there is too much food for your worms to process. Stop adding food for awhile, but continue to regularly check your worms for correct moisture content. Clean bedding, such as shredded newspaper, could be added at this time. However, realize that adding any additional material will extend the period of time needed for the worms to process the soil.
It is also important to periodically remove the castings, because they become toxic to the worms if left in the worm bin too long.
Worm Food to Add to the Box
- Vegetable leftovers
- Fruit rinds
- Egg shells
- Tea bags
- Coffee grounds
- Spoiled food
- Oatmeal
- Small meat scraps
- Cake
- Cheese
What Not to Add
- Non-biodegradable material
- Vegetable oils
- Cat litter
- Chicken bones
- Bones (unless ground)
- Fats
- Hair
- Feathers
- Liquids other than clean water
Changing the Bedding
Push the old material to one side of the box. Put fresh bedding material in the other side. Continue feeding only in the new bedding material. After a week or two, the worms should migrate to the new bedding material. Remove the old bedding material and earthworm castings.
What To Do With the Castings
Worm castings are an excellent source of nutrients and minerals for house and garden plants. Sterilizing is not necessary. An excellent potting mix may be made from one part castings, one part peat moss, one part perlite and one part sand.
Worm castings may be directly added to vegetable gardens and greenhouse beds. Just scatter and work into the soil as you would with any compost, or use as a side dressing for established perennials.
Again, whenever using worm compost, take care to keep your earthworms in their box. Do not release your worms outside.
Dividing the Worms
Earthworms multiply rapidly. At 4 to 6 weeks the worms mature, mate and produce cocoons. Two or more baby worms will hatch from each cocoon. Realistically, each adult can give rise to 150 offspring per year. Overpopulation should be avoided. The extra worms could be used to start a new earthworm box or shared with a friend.
Troubleshooting
Overfeeding along with too much moisture or acidity can create conditions that cause pest problems. Some insects are beneficial, such as springtails and white worms. Fruit flies, fungus gnats and excess mites can become a nuisance. If you have a small tote with air holes drilled in the top, you may notice an increase of black gnat-like bugs in your house. These are fungus gnats, which are harmless to people but can kill certain houseplants.
Insect pests can be controlled by a combination of methods. Burying all food waste when you feed worms is the best way to control flies and gnats. Using a large tote that doesn’t need air holes is another. Insect traps can reduce high pest numbers but do not remedy the problem. Temporarily stop feeding and mix in dry bedding and a sprinkling of garden lime when pests are suspected. Cover the top with at least 2 inches of moist bedding.
If liquid starts to collect in the bottom of a tote, you are putting too much water and/or rotting vegetable material in the tote. Established totes rarely need water added to them because plastic doesn’t breathe; if you find that your worms are too wet, you may want to drill holes in the top and upper sides to increase air circulation and help the bedding material stay drier.
Common Questions
Where is the earthworm's mouth?
It is in the first segment. There is a small protruding lip just over the mouth. When foraging, this lip will be stretching out for sensing his food.
How does a worm grind his food?
Earthworms do not have teeth; they have a muscular gizzard. Small parts of food, mixed with some grinding material such as sand, topsoil and limestone, is ingested. Contractions from muscles in the gizzard compress particles against each other, mix it with fluid and grind it to smaller pieces.
Can an earthworm see?
No, earthworms don't have eyes. They are sensitive to light and try to hide when exposed to light.
Do earthworms need air?
Yes, gaseous oxygen diffuses across the moist tissue of their skin, from the region of greater concentration (air) to that of lower concentration (inside the worm). A constant supply of fresh air is needed by the earthworms.
References
Appelhof, Mary. 1982. "Worms Eat My Garbage." Kalamazoo, Michigan: Flower Press.
DeWitt, Eloise. 1985. "A Beginner's Guide to Successful Gardening in the Fairbanks Area." College, Alaska.
Gaddie, Ronald E. Sr. and Donald E. Douglas. 1977. "Earthworms for Ecology and Profit," Vols. I and II. Ontario, California: Bookworm Publishing Co.
Home, Farm and Garden Research Associates. 1954. "Let An Earthworm Be Your Garbage Man." Elgin, Illinois: Shields Publications.
Minnich, Jerry. 1977. "The Earthworm Book." Emmaus, Pennsylvania: Rodale Press.
Payne, Binet. 2003. "The Worm Cafe: Mid-Scale Vermicomposting of Lunchroom Wastes." Klamazoo: Flower Press.
Casey Matney, Extension Faculty, Agriculture and Horticulture. Originally prepared by Michéle Hebert, former Extension Faculty, Agriculture and Horticulture, with material from "Worms in a Tote" by Mara Bacsujlaky, Extension Faculty, Natural Resources and Community Development. Thanks also to Marsha Hancock, Master Gardener and Master Composter, for her assistance and guidance in preparing this publication.
Reviewed October 2022
