Collecting Feed Samples for Testing
FGV-00243 View this publication in PDF form to print or download.
Why Test Feeds
Efficient feeding of all classes of livestock requires a feed testing program that provides reliable estimates of the nutritive value of available feeds. The nutritive value of feed, especially forages, is quite variable and is highly dependent upon many factors, including species, stage of maturity at harvest, curing, storage, handling and weather. Since feeding efficiency is related to feed nutritive value, you should know exactly what is being fed in terms of energy, protein and fiber. You can accomplish this by testing the feed.
How To Take a Feed Sample
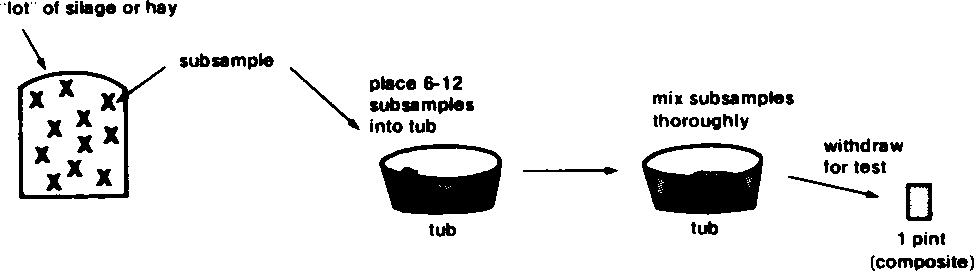
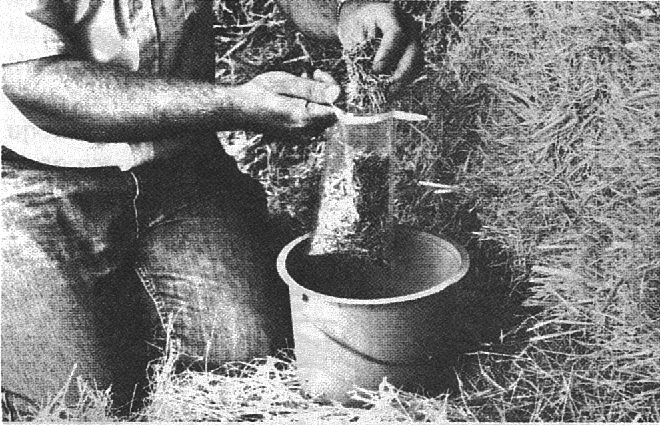
To obtain an accurate estimate of the nutritive value of feed, take a representative sample from each “lot.” A “lot” is defined as feed from a single species (or known mixture) harvested from one field within a 5- to 7-day period. This assumes similar curing and handling procedures. Mixtures of feeds used in a single ration are also considered a “lot” as long as the composition of the components remains relatively the same. You can take a subsample using a small quantity of feed drawn from a “lot.” Because of the possible variations within a “lot,” you should obtain several subsamples. Place the subsamples in a clean plastic or rubber container. Mix thoroughly and place two to three grab samples (about 1 pint) in a plastic bag for shipment (this is considered the composite sample). See Figure l.
The feed test results are based upon the analysis of the 1-pint composite sample. Remember, this small sample represents several tons of feed, therefore, you should take several subsamples from each “lot” to obtain a composite sample which accurately represents the total “lot” of feed. The number of composite samples need ed and the frequency of sampling depends upon the potential for variation in feed quality.
Sampling Hay
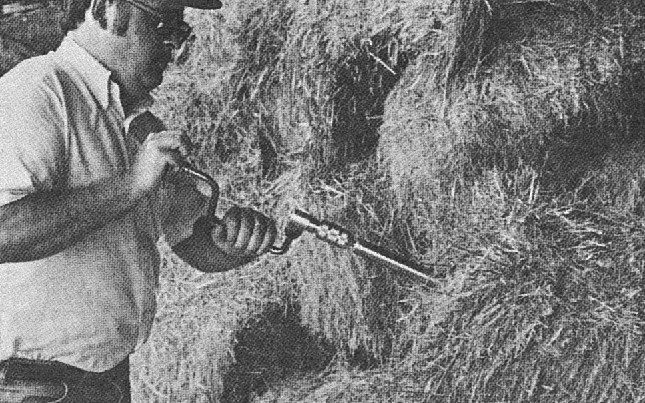
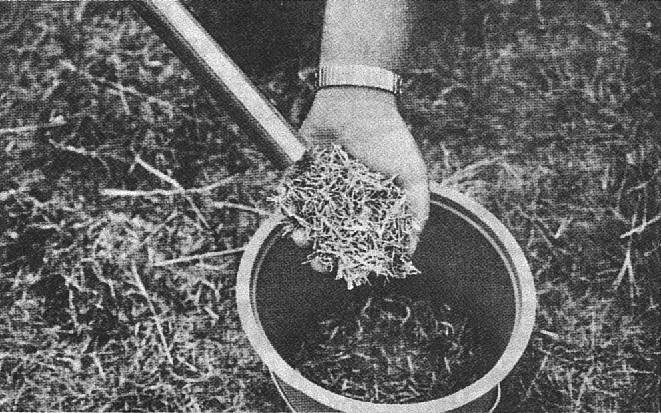
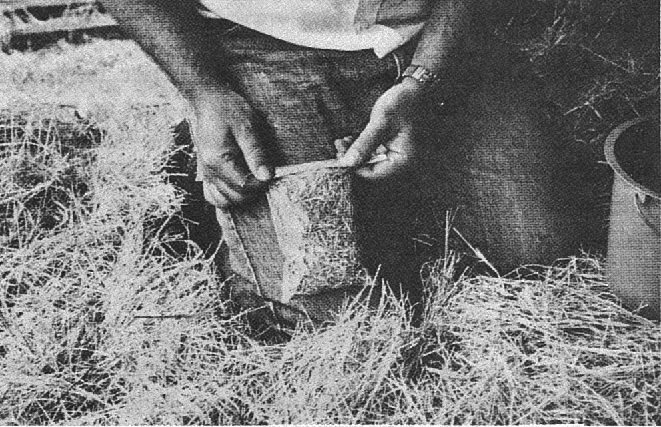
The core-type forage sampler is best for collecting subsamples from packaged hay. A representative cross-section of stems and leaves can be obtained, if the bales are sampled at right angles to the way that hay is wrapped or baled. (Figures 2 and 3). Coring samplers are widely available and are powered with a hand brace or electric drill. Place each subsample in a clean container (Figure 4) and collect a composite sample in a plastic bag containing approximately 1 pint of hay for shipment (Figures 5a and 5b). If moisture content is suspected to be abnormally high, ship in an air-tight bag. Grab samples may be taken from hay but due to shattering of leaves and the inability to grab a true cross section from a bale, this method is least desirable. To reduce leaf shattering, break open the bales before taking grab samples. Use scissors to chop the stems into 1-inch pieces for more uniform mixing prior to taking the composite sample.
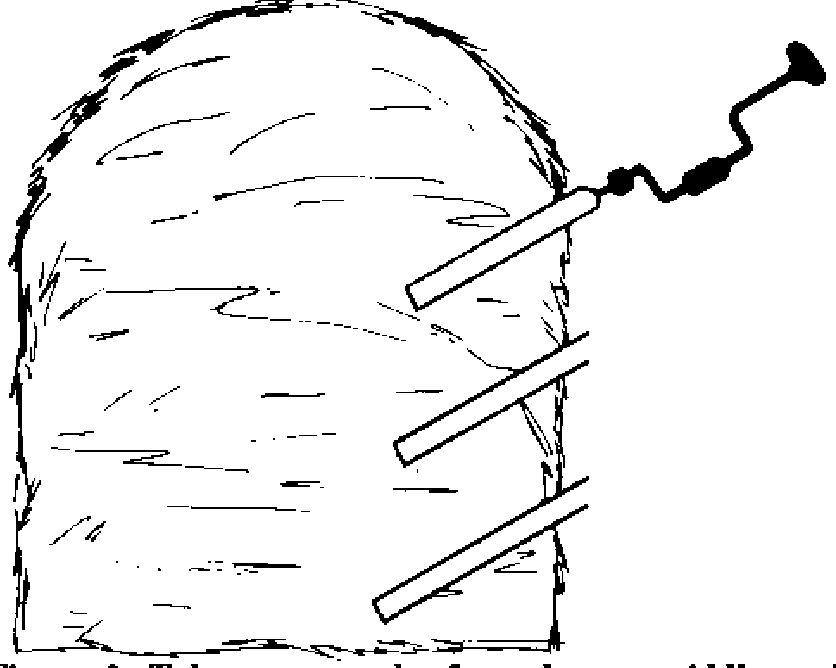
Conventional Bales—Square bales are normally stored under cover and, therefore, all “lots” should be identified for sampling purposes. Do not sample hay that has been stored for less than 4 to 6 weeks, since the moisture level and/or heat damage may change during that period of time. Subsample 10 to 12 bales from each “lot.” Sample conventional bales by boring into the end of the bale (Figure 2). After collecting the subsamples, mix thoroughly and collect a composite for testing.
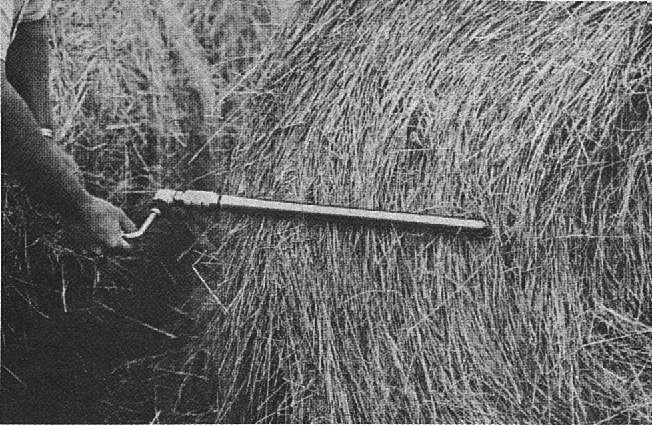
Round Bales—Since weathering reduces forage quality, sample bales stored outside about 2 to 4 weeks prior to feeding. Randomly select 10 to 12 bales for subsampling each “lot.” Take a core sample across the layers of hay as illustrated (Figure 3). Always sample the full depth of the core sampler; an extension may be needed to reach the center of the bale. Mix the subsamples and select about one pint for the composite sample.
Loose Machine-Made Stacks—Loose hay stacks are stored outside and should be sampled within four weeks of feeding. Randomly select six to eight stacks for a particular “lot” and collect three core subsamples from the side of each stack (Figure 6). Take the core sample perpendicular to the way the hay is layered in the stack. Sampling straight into the stack will not give a representative sample.
Sampling Pellets or Cubes
Pellets are easier to sample than other forms of forage, but representative sampling is just as important. Just because every pellet is the same size doesn’t mean that a truckload contains forage from the same “lot.” Therefore, you should take 10 to 12 random grab samples from each pile or from as many bags.
Sampling Grain or Concentrates
Although the quality of these feeds does not vary as much as forage, it is important to test them in order to determine the nutritive value. Sample at least 8 to 10 bags or from that many locations in a bin of bulk feed. A grain sampling tube is ideal for collecting samples, but a coring sampler may be used. Mix 10 to 12 subsamples from each lot and obtain a composite of one pint for analysis. If individual grains are to be used for blending feed, sample each one separately and use the analysis for making the blended feed.
Sampling Pastures
Sampling pastures can be difficult since it is impossible to sample the same age and quality of forage that the animal is grazing each day; pasture forage quality changes with the phenological stage of the plant; and gathering a representative sample from a large land area is difficult. Sampling from the pasture should be done at a time and from plants that represent those that are being grazed from animals at the time of sampling. Sampling can be done using the plucking/cutting method of sampling. This method consists of walking across the pasture and periodically taking a handful of forage by plucking or cutting plant samples. The plucked forage should be air dried by spreading in sunlight in a way similar to drying hay. After the forage is dried, cut it into 1-inch pieces, mix thoroughly and collect a one-pint composite sample for analysis the same as for hay or silage. A minimum of 13 plucks or cuttings per composite sample is recommended.
Sampling Silage
For accurate feed testing results, silage samples require special handling after being removed from the silage containment area. Always place the sample in an air-tight plastic bag and press as much air out of the sample bag as possible to minimize spoilage. To help minimize spoilage, refrigerate or freeze samples immediately, and avoid mailing samples when they might be held up over the weekend. Also check with the laboratory you intend to sell your sample to in order to determine their preferred procedures.
Sampling at Ensiling—Silage may be sampled as you collect the forage. This will enable you to have a relative idea about feed value in advance of feeding. Since poor silage-making practices can result in significant changes in the quality of silage between ensiling and feeding, use good judgment at feeding time to determine if retesting is necessary. If seepage or heat damage has occurred, you should sample again before feeding.
Collect a half-gallon subsample from every four to eight loads of silage throughout the day or days for which a “lot” is being harvested. Immediately place each subsample in an air-tight bag (press all the air out of the bag) and refrigerate until you mix the subsamples of a particular “lot.” Withdraw a 1-pint composite sample and place it in an air-tight bag for shipment (see Figure 1).
Each “lot” of silage must be identifiable at feeding time; therefore, it has to be identified at ensiling. You can do this by sending a few brightly-colored strips of plastic “streamers” through the blower after the last load of each “lot” is ensiled or by marking the outside silo wall or silage container with paint.
Sampling at Feeding—Sampling silage from the silo after it has been opened gives the best estimate of feed value. The biggest disadvantage is that certain “lots” of silage may be fed before test results are received from the lab. When sampling the silo at feeding time, consider the following:
Do not sample the top 2 to 3 feet of silage from a silo or around the edges of horizontal silos because there is more spoilage in those areas.
Sampling at both morning and evening feedings gives a subsample representative of more feed. Keep subsamples in refrigerated air-tight containers until they can be mixed for the composite sample.
For accurate moisture tests and to reduce daily spoilage, collect subsamples from fresh silage (at least 3 to 6 inches below the surface of exposed silage).
Identify the position of each “lot” within the silo so you will know how often to take samples for testing.
Sampling the Silo
Upright Silo—Take at least 12 subsamples at the morning and evening feeding periods. To obtain a uniform sample, visualize the surface area of the silo as being divided into six to 12 pie slices. Obtain a subsample from each segment by boring into the unspoiled surface or catching from the unloader. As the silage is blown out of the silo, be careful to avoid subsampling of segregated particles. When the silage falls from the blower, the large and lighter pieces (leaves) tend to separate, which can cause unrepresentative subsamples. It is best to collect all material that is blown out for a few seconds before mixing and subsampling. Repeat this until six to 12 “slices” have been sampled. When sampling from the feed bunk, separation of coarse and fine particles may be a problem, especially when augers are used to move the feed. Divide the bunk into at least four sections. Collect silage from a 1 to 2 square foot section and mix the segregated particles by hand before a subsample is taken. Collect the samples as soon as possible after feeding.
Horizontal Silo—Sample the horizontal silo by the grab method. Take the sample only after silage depth becomes constant (Figure 7). Select at least 12 grab subsamples from several unspoiled areas of the face of the silo (Figure 8). Collect silage at least 3 to 6 inches behind the exposed surface to avoid daily moisture loss and potential spoilage. Sampling silage “lots” within a horizontal silo is difficult because they are usually layered and all “lots” are fed simultaneously. If silage “lots” are placed into the silo in layers of uniform depth from front to back, they are likely to be fed in about the same proportion since a slice of silage is taken from top to bottom of the silo (Figure 9a). The number of grab subsamples taken from each “lot” should be in proportion to the amount of silage it represents.


An alternative method is to do extensive subsampling out of the feed bunk where the different “lots” have been uniformly mixed by the loader and/or mixer wagon. Take three to six grab subsamples from each front-end loader bucket after it has been dumped into the bunk. If mixer wagons are used, sample after mixing the silage but before adding other feed. The merits of filling horizontal silos in layers of uniform depth from front to back are illustrated in Figure 9a. When more than three to four lots of silage are placed unevenly in one horizontal silo (Figure 9b), it is difficult to know how much of each is being fed and how much mixing has occurred. Therefore, more frequent sampling is desirable.

Reminders
- Feed test results are useful only if the sample is representative of the whole feed “lot.”
- Feed testing can help make correct management decisions when used to formulate rations or plan a fertilization program.
- To obtain feed testing mail kits and other information, contact your local Extension office.
To simplify information, trade names of products have been used. No endorsement of named products by the University of Alaska Fairbanks Cooperative Extension Service is intended, nor is criticism implied of similar products that are not mentioned.
Casey Matney, Extension Agriculture and Horticulture agent. Originally prepared by James T. Green, Jr. and J. Paul Mueller, Crop Science Extension Specialists. Adapted with permission from North Carolina State University by Ken Krieg.
Revised March 2023