How To Cut Down a Tree: Safe and Effective Tree Felling, Limbing and Bucking
FWM-00200 View this publication in PDF form to print or download.
Many Alaskans use chainsaws around their homes and properties. In this publication, basic techniques used to cut down a tree and render it into logs and firewood will be presented. The term “sawyer” will refer to the person cutting down, or “felling,” the tree and making products from it, including firewood, cabin and saw logs.
Private forest landowners often harvest timber to manage and improve their woodlot and make use of trees that have been windblown, killed by insects or selected for removal. In forested regions of Alaska, the chainsaw may be the most common power hand tool, and it is also recognized as the most hazardous power hand tool. It is imperative that the operator/ sawyer and those working close by pay special attention to safety. Chainsaws are inherently dangerous power tools.
Chainsaw use includes timber cutting for landscaping, land clearing, making firewood, clearing trails, tree trimming, log home building and more.
According to the federal Occupational Safety and Health Administration (OSHA), “More people are killed while felling trees than any other logging activity.” A minor chainsaw cut can be dangerous and hard to treat in the field. Safety must be the top priority when operating a chainsaw for any use. More dangerous than injuries caused by the running chainsaw itself are those injuries caused when the sawyer or a helper are struck by something that falls out of the tree or is catapulted into the air by the act of the tree being felled. Again, safety first.
Tree cutting can be dangerous whether done by a homeowner or by commercial tree cutters. A chainsaw can injure the occasional user in the same way it can injure the experienced professional sawyer, more so in fact because the experienced professional chainsaw user is well aware of the inherent risks of chainsaw operation. The occasional, nonprofessional sawyer will greatly benefit by learning the basic methods used in tree felling and cutting.

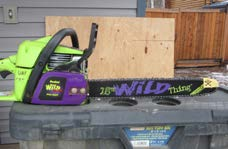
Chainsaw maintenance and start up is covered in the owner’s manual that comes with every new chainsaw. It is important that chainsaw owners and operators become thoroughly familiar with the owner’s manual, including the sections on operation, care, maintenance and the safety features on a particular chainsaw.
Knowing how to safely and efficiently operate a particular chainsaw will save the owner time and money and help prevent injury. Each operator should become intimately familiar with his or her chainsaw. If operating a used or borrowed chainsaw, you can often find the owner’s manual online. Again, thoroughly understand your chainsaw by reading the owner’s manual before starting and operating it.
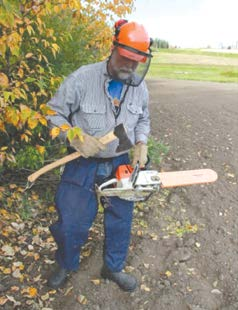
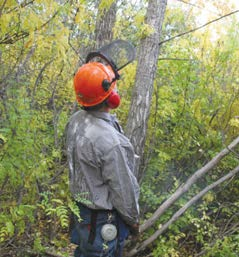
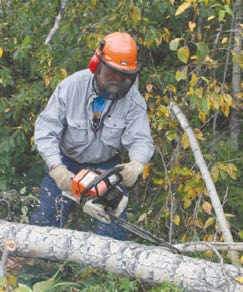
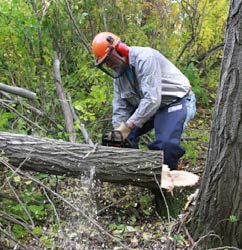
Safety equipment and clothing
Personal Protective Equipment (PPE)
Whether your project is large (using the chainsaw for many hours in a day) or small (operating it for only a few minutes), it is highly recommended that you wear personal protective equipment (PPE).
The OSHA regulations (1910.266) require that employed chainsaw operators wear and use the following PPE when operating any chainsaw:
- Head protection: Use an approved hard hat or helmet to protect you from falling branches and flying debris that may be encountered when cutting/felling trees.
- Eye and face protection: Use the face screen that comes attached to many hard hats or helmets. This device provides the sawyer with eye protection from sawdust, branches and chainsaw kickback. Safety glasses are another way to protect the eyes and are valuable when the operator is not wearing a helmet that already has integral face, eye and hearing protection. On many commercial jobs, supervisors require double protection: safety glasses and the face shield, as long as its use doesn’t hamper the otherwise safe operation of the chainsaw on that particular job.
- Hearing protection: For hearing protection when running a chainsaw, use a hard hat with attached earmuffs or unattached protective earmuffs or earplugs. Using these devices is crucial for protecting the operator’s hearing from long-term and irrecoverable hearing loss that can result from the noise encountered with extended chainsaw operation. Earmuffs or approved earplugs are relatively inexpensive and very effective when for some reason the operator is not wearing a protective hard hat with integral earmuffs. Some earmuffs not attached to the hardhat can be used if they fit around behind the operator’s head instead of over the top of the head.
- Protective chaps or pants: Use protective chainsaw chaps or pants. These are indispensable when operating a chainsaw, even for small, quick cutting projects. Chaps protect the operator from injuries that can occur when a minor slip causes the saw to contact the operator. Even a slight cut can be difficult to manage in the field.
- Protective footwear: Per OSHA standards, commercial chainsaw operators are required to wear a heavy-duty boot that is waterproof or repellent, covers and supports the ankle and is made of material that protects against possible cuts from a running chainsaw. At a minimum, the noncommercial user should wear protective-toed boots to keep minor injuries to the feet and toes to a minimum. Logs and firewood chunks can roll back on the feet and cause injury. Use steel-toed boots in summer and fiberglass-toed boots in winter to protect toes and feet. Rubber-insulated boots with a fiberglass protective toe work well in winter and are readily available.
- Protective nonslip gloves: Use special leather gloves to protect your hands during chainsaw operation and help you hold on to the saw while running it for many minutes at a time. Tough leather gloves protect hands when sharpening, removing or installing the chainsaw chain. Bulky gloves are less desirable as the operator loses dexterity, but in cold weather they may be essential.
Personal protective equipment can last many years, so it is worth the investment. Personal protective equipment, which is required for professional chainsaw operators, also will protect the occasional user, who may be more prone to accidents and incidents while using a chainsaw. This equipment is long-term insurance that is well worth the cost given the potential for injury using a chainsaw. Make it a habit using the PPE listed above and it will become second nature.
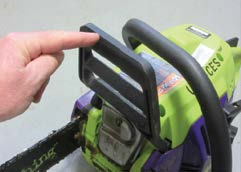
Chain brake
An important safety feature on most modern chainsaws is the chain brake. This feature either locks the saw chain from turning or, in the off position, frees the chain to move on the saw bar and allow it to cut. The chain brake is located just in front of the top handle, which the sawyer uses with the left hand. In the event of a “kickback,” which is cause by the moving saw chain encountering a solid object at the very upper tip of the saw bar (see kickback further on), the running saw bar may instantly flip back uncontrollably at the sawyer. In this case, the chain brake usually flips on (in the forward position) as the unmanageable saw flies back at the sawyer or operator. The chain brake strikes the sawyer first and instantly stops the moving saw chain, preventing serious injury. Always make sure that your saw’s chain brake is fully operational. If it is not, take your saw to an authorized chainsaw repair place and have it fixed.
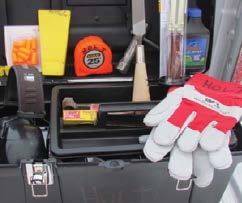
A firewood cutter’s gear list
Additional chainsaw tools for wood cutting may include the following:
- Saw gas: Mix with 2-cycle oil according to specifications written on the chainsaw or provided in the owner’s manual.
- Bar oil: Commercially available bar oil has additives that manufacturers recommend to enhance the life of your saw chain and bar. Always fill the bar oil reservoir each time you fill the gas tank. This will prevent running out of gas and oil in the middle of a tree felling operation.
- First-aid kit: Include finger bandages, eye wash, etc.
The chainsaw should be field-ready before you use it. A well-maintained, well-running, sharpened chainsaw will be safer and easier to use and you will accomplish more during cutting sessions.
- Scrench: This is a combination tool made for chainsaws that has a wrench on one side and a screw driver on the other. Keep this tool with you to adjust the saw chain and saw bar. It is also useful for opening gas and oil caps in the field.
- Extra spark plug: Have an extra spark plug in case the one already installed quits working.
- Extra loop of saw chain: Have an extra sharpened loop of saw chain that fits the saw. Use it to replace dull chain in the field using the scrench tool. It is quicker to change the saw chain than to sharpen the existing one.
- Bar tip greaser: Use a bar tip greaser for chainsaw bars that allow bar tip greasing. Grease the bar tip each time the saw chain is sharpened.
- Chainsaw sharpening tools: These usually consist of two files: a round cutter-tooth sharpening file and a flat file to take down the raker teeth that regulate how deeply the saw chain cuts. Sharpening is ideally done at the end of the day indoors where it is warm, but sometimes field sharpening is necessary.
Other tools to facilitate tree felling include:
- Felling wedges: Plastic felling wedges are obtainable at chainsaw shops and are important tools used to prevent saw pinch and assist in directional felling.
- Ax or hatchet: Use to set and drive felling wedges into the final felling cut.
- Extra bar: In the event the saw becomes pinched and a second saw is not available, the engine can be removed and the spare bar and chain attached in order to free the stuck one.
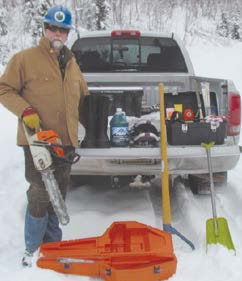
- Tape measure: Use to measure the length of logs and firewood.
Other recommended safety measures:
- Another person to help and assist with safety measures
- A cell phone, charged and ready in case of emergency (if within a cell phone covered area)
Optional winter firewood cutting tools:
- Snow shovel to clear snow and create an escape route when tree felling
- Snowshoes to stomp out access trails and escape routes in the snow
- Plastic sled to transport saws, gas and oil and pull out firewood
Additional summer items:
- Insect repellent to keep pesky bugs to a minimum
- Small fire extinguisher in case of a chainsaw fire in the woods. The muffler on a chainsaw can get very hot and cause serious burns or cause dry brush to catch fire. Caution is advised during hot, dry weather.
Clothing
Wear sturdy, long-sleeved clothing. Make sure that it is not loose fitting or flapping so it won’t get in the way when sawing or stepping through brush and slash. It is important to keep from hanging up in brush and logging slash when operating a running chainsaw.
Safely operating a chainsaw requires constant vigilance and awareness of your surroundings, all possible hazards and the presence of others nearby. Watch out for dead treetops, rotten trees, loose or detached branches, falling debris and snow, electrical wires and other people standing too close as you use the chainsaw.
Getting ready to cut
 Prior to starting the chainsaw, put on all your personal protective equipment. Use
a well-maintained chainsaw that won’t run out of gas halfway through felling a tree.
Make sure the air filter is cleaned, nuts and bolts are tight, the engine caps are
tight and it is full of properly mixed gas and bar oil. Start the chainsaw according
to the operating manual. Be familiar with the saw’s safety equipment, especially the
chain break system. Make sure the chain brake feature on your saw works properly.
Prior to starting the chainsaw, put on all your personal protective equipment. Use
a well-maintained chainsaw that won’t run out of gas halfway through felling a tree.
Make sure the air filter is cleaned, nuts and bolts are tight, the engine caps are
tight and it is full of properly mixed gas and bar oil. Start the chainsaw according
to the operating manual. Be familiar with the saw’s safety equipment, especially the
chain break system. Make sure the chain brake feature on your saw works properly.
Lock the chain brake before starting. Set the chainsaw on the ground in a cleared space, making sure there is nothing under the saw bar to tangle it. Hold the saw firmly on the ground with your left hand on the top
Chainsaw ‘kickback’
Be aware of the elements and potentials that lead to chainsaw kickback. Chainsaw kickback can cause serious injury when the running saw chain comes into contact with any solid object at the tip of the bar. When this happens, the forces of action and reaction come into full play, and an unmanageable reaction is for the bar tip to rebound out of the cut and back in your direction. Always make sure your head is not right in line with or over the running saw chain. Check what is on the other side of the cut being made to make sure there is nothing that the running chain could contact at the upper bar tip.
Chainsaw kickback is most common when limbing and bucking a cut tree, when it is often
difficult to see where the bar tip is located relative to the brush on the tip side
of the cut or when the limb or log being cut might be under tension that could cause
the bar to become pinched.
handle and put your right foot toe in the rear handle, not touching the throttle. Make sure the starter mechanism engages by pulling a little on the starter rope. Turn on the ignition switch and set the choke for starting according to the owner’s manual. Pull the starter rope sharply with the right hand, keeping a firm hold on the top handle bar to keep the saw on the ground.
Starting a chainsaw
When the saw catches and runs, rev the engine briefly to deactivate the choke and throttle control and let the saw idle. When the saw has warmed up for a few seconds and you are ready to begin sawing, release the chain brake so the chain spins freely on the saw bar.
Check the chain oiler by revving the saw a bit and watch to see if oil flies off the end of the bar. Note the presence of oil on a flat surface just in front of the bar tip as the chain whirls around the bar. Do not allow the top one-quarter of the saw bar tip to touch anything when the saw chain is moving. This is how chainsaw kickback can occur.
Make sure the saw chain is not hanging loosely on the saw bar. The chain should be snug but free to spin. If needed, tighten the saw chain according to instructions in the owner’s manual.
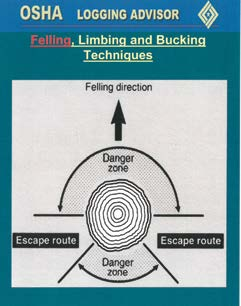
Tree felling
Tree felling is inherently hazardous. The sawyer should go at the task in a methodical manner, approaching it in much the same way every time so that all evaluations of whether to and how to cut the individual tree are met and the aspects of safety and successful felling are accomplished.
Tools specific to tree felling and their use
The sawyer should approach each tree to be felled as a task with its own set of challenges. Prior to felling the sawyer should have the following:
- A fully fueled chainsaw ready to run. This is important when felling larger timber that requires lengthy chainsaw operation. Smaller trees may be felled with a single tank of gas, as long as the sawyer knows how long the saw will run while actively cutting. Having a chainsaw run out of gas while felling can be hazardous.
- Plastic felling wedges and a hand ax are important to use when the final felling cut on a tree is deep enough to accommodate a wedge. The felling wedge is inserted into the final cut to keep the tree from settling back on the chainsaw bar. Wedges are tapped firmly into the cut space (kerf) with the hand ax after the saw has gone far enough in to keep from contacting the saw chain. Felling wedges are critical for maintaining tree position as the felling cut is made, especially if the tree is rotten at the stump or the tree lean has been slightly misinterpreted or a gust of wind blows against the direction of felling. The sawyer may tap it in farther to keep the wedge firmly in the cut and to keep the tree from leaning back on the saw and pinching the bar. Wedges are used so the cut may be finished and the saw removed as the tree goes over. They should not be used to “wedge” the tree over but to keep the saw from being pinched if the tree leans back against the cut.
- In addition to the personal protective equipment described above, the sawyer should have a tape measure to measure logs and carry the screwdriver/wrench tool (scrench) to make on-the-spot adjustments.
Potential hazards
Whether in a yard or a forest, size up the tree to be felled, the setting, the prevailing wind direction and other trees around it. Look out for the presence of overhead wires, buildings, vehicles and other safety hazards located within the circle of tree fall. The tree to be cut should be safely away from everything it could inadvertently fall on.
Expert sawyers have the experience and tools to force a tree to fall in the intended direction. Some sawyers use block and tackle and tree jacks, etc. to make difficult cuts in tricky situations. All others need to gauge their personal felling experience as well as conditions when deciding whether a tree should be cut. Novice cutters should select trees that are away from hazards. A good rule of thumb is to make sure any hazards are at a distance of twice the height of the tree being felled. Tree felling hazards include, but are not limited to, the following:
- Power and phone lines.
- Buildings, high-use areas, vehicles and other hazardous trees
- Roadways and blind spots where it is impossible to tell whether someone else may travel at the time the tree is being felled
- Windy conditions (gusty winds can overcome the direction a sawyer chooses to fell the tree toward).
Never fell a tree into or against the wind.
Dead tops and branches = widow makers
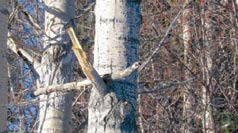
Avoid rotten trees, those that have a dead top and those trees with large dead or hanging limbs. These trees can come apart when sawing or loose their tops or branches as the tree is felled. Falling tops and branches are termed “widow makers” because of their propensity to fall on the sawyer and kill or maim them.
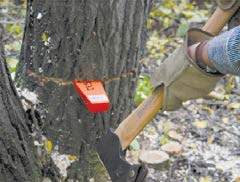
Select the tree to fell
Select a tree to cut that is leaning slightly toward an opening or clearing and will fall freely into it. As the tree goes over, remember to look up at its top for falling branches as it goes over.

Only attempt to fell a tree you know you can safely cut based on your experience. It is best for the beginner to cut trees on flat, level ground. Hilly or sloping terrain makes it more difficult to determine the lean of a tree. It is a good idea to cut a tree so that it falls in the direction of the side that has the most of the branches on it — as long as that direction isn’t against the wind or against the natural lean of the tree.
After selecting the tree to cut from a distance, walk up to it and again ascertain which way it is leaning. Look again for dead tops and dead or hanging branches that could be a hazard when felling.
Make sure to cut a tree that is well away from others who may be working in the area. Sawyers should be at least twice the distance the tree is tall from each other when felling timber. The sawyer needs to check the area constantly to make sure of safe surroundings with plenty of room to work. Safety first!
Clear around the tree and make an escape route
Clear out brush, branches, smaller trees and downed logs right next to the stump of the tree to be cut. Remove the debris and branches, placing them well away from the work area and have plenty of room to work without hang-ups.
Clear snow from around the tree. Use a shovel or stomp it down to make a cleared area where you can move without becoming entangled or trapped in deep snow.
At the same time clear an “escape route” from the tree, back and to the side, so that when the tree goes over you can safely move away. Never step directly behind a tree that is tipping over.
Often stomping the snow around the tree so safe cuts can be made and an escape route established is all that is needed. Cutting into the snow without being able to see what is beneath it is risky since you cannot actually see what the saw is cutting into at the tip. Blindly cutting into snow or brush could lead to kickback as described previously.
Making the cuts
Methodology is important. Basic tree felling using a standard method is presented here. Standardization is good so that the sawyer learns the correct methods. Cutting a tree with poorly executed cuts and methodology is dangerous and inefficient.
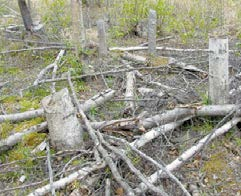
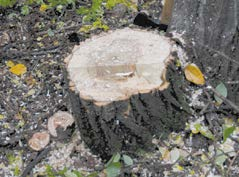
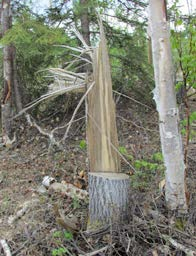
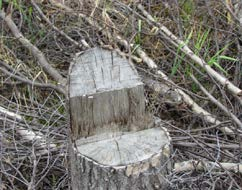
Keep stumps low
Tall stumps are wasteful and dangerous and they make it more difficult for forest machinery to navigate through the woods. Often the most valuable log in a tree is the first one closest to the stump. It is the largest and, if rot free, has more volume than the other logs from a tree of a similar length. Cutting the tree low on the stump, just above the root or stump swell, is best. A professional will try to do this unless there is a safety problem that requires cutting the tree from higher up the tree trunk.
If the tree is rotten at the base or hazardous in other ways, the sawyer may decide to high stump it. The tree cutter should recut the stump low to obtain the extra firewood and enable other uses of the harvested area.
If, for whatever reason, a higher stump is cut, the sawyer should recut the stump after the tree is felled. Tall stumps indicate an inexperienced sawyer, but they may occasionally be necessary for safety’s sake.
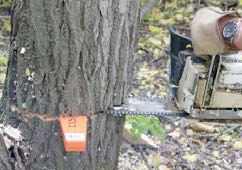
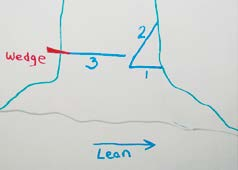
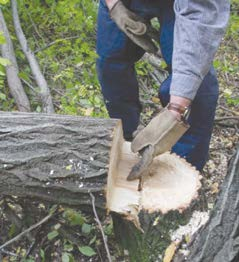
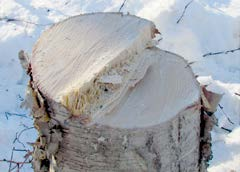
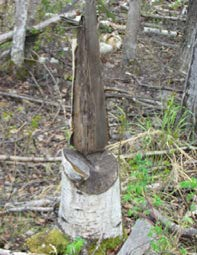
The first cut of the “face-cut”
The first cut in tree felling is made on the side of the tree toward which it will fall. There are two cuts made that make up what is termed the “face-cut” and both of these face the direction in which the tree is to fall. Most first cuts are made just above any swelling at the stump. Some people choose to make the cut higher up the trunk for convenience.
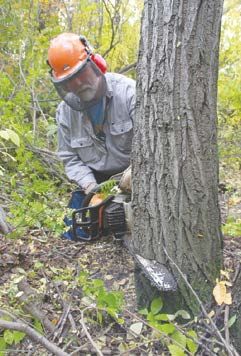
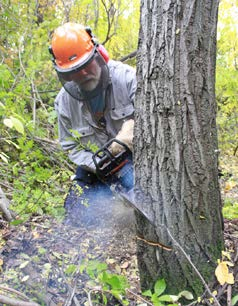
The standard face cut is most often done by cutting flat in to the trunk of the tree on the side toward which the tree should fall. Cut no more than 20 to 30 percent of the way through the tree.
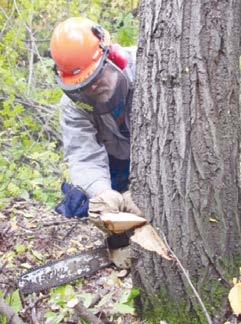
The second cut of the face cut
The second cut of the face cut should angle down at least 45 degrees to exactly meet the first cut. Remove the wedge of wood formed by making these two parts of the face cut.
Logging as an industry is one of the top most hazardous occupations, particularly the activity of tree felling with a chainsaw.
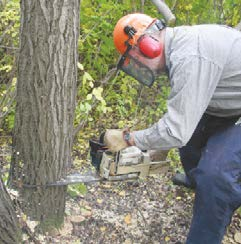
The ‘felling cut’
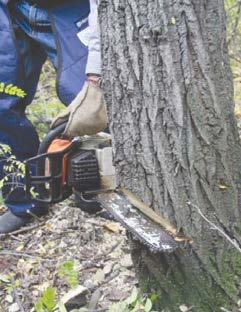
The “felling cut” is the third and final cut in felling a tree and it is made on the opposite side of the tree from the face cut. The proper felling cut is made flat and approximately one inch above the point of the wedge that was removed when the face cut was made. Don’t cut into the tree at any angle when making the felling cut.
As the felling cut is being made, make sure that the top one-fourth of the tip of the chainsaw bar does not touch another tree or branch on the opposite side of the cut. Chainsaw kickback can result when the top quarter of the saw tip bar touches something solid, causing the running chainsaw to instantly kick back toward the sawyer. This can cause serious injury to the operator. Clear brush away from the opposite side of the tree being cut to prevent this situation.
Using the felling wedge
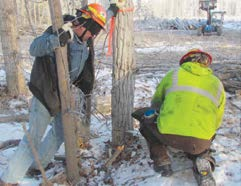
On larger trees that will allow it, use a plastic felling wedge when it can be driven in to the felling cut and not touch the saw chain. The felling wedge will keep the tree from leaning back on the saw and pinching it. A pinched saw bar will not cut. Before the felling cut goes halfway through the tree, use a had ax to firmly tap a plastic felling wedge into the felling cut (kerf) made by the chainsaw. This works best on trees that are larger than 10 inches in diameter at the stump.
On smaller trees it will be impossible to drive a felling wedge in and still cut the tree. In this instance it may be desirable to have an assistant help put pressure on the tree by pushing it in the desired direction. This is dangerous! Both the sawyer and the helper need to be careful to avoid the chainsaw blade. They need to work well with each other to avoid injury.
Do not cut all the way through the tree to the face cut. Leave an inch or so of uncut wood as a “hinge” between the felling cut and the slightly lower positioned face cut.
Again, the felling cut should be made one inch above the point of the V formed by the face cut. The felling cut should not cut through to meet the face cut. The one-inch hinge is all that is needed to help keep the falling tree in position as it goes over in the desired direction. It is important to note how far in toward the face cut the saw is proceeding. The hinge should be equal on both ends if the tree is to fall straight away from the felling cut.
As the tree begins to topple the sawyer should shout “timber,” pull the saw out of the felling cut and turn it off and, with the chainsaw, step away from and to the side of the falling tree on the cleared path made to exit the area. Don’t move away directly behind the tree in case it springs back. As the tree is going over or falling, watch its top and the tops of trees near it as it goes over. Look out for falling branches and snowy debris as the tree goes over. Branches and treetops can break out of a falling tree or from trees nearby and injure the sawyer. When the tree is safely on the ground, restart the chainsaw and begin processing it into logs or firewood.
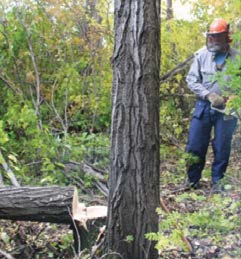
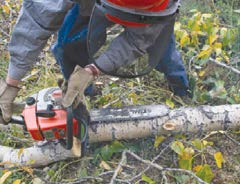
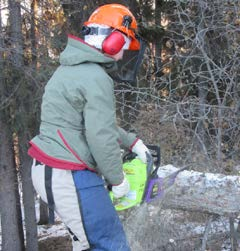
Limbing

Cutting branches from the felled tree is called “limbing” and this should occur progressively from the stump toward the treetop. The sawyer often has to clear a way through the limbs and adjacent brush to accomplish the task. Limbing should be done in an unhurried and methodical manner to prevent injury. Watch out for branches snapping back and for saw pinching. Limbing is often the time when kickback is most likely to occur, so make sure the top quarter of the saw bar tip won’t touch branches or other debris.
Cut hanging branches from the top of the branch. Branches touching the ground or that are under tension from adjacent debris may pinch the chainsaw bar or kick back at the sawyer. It is often a good idea to cut branches off in stages, cutting a large branch more than once to sever it from the tree. Progressively move branches out of the way as the tree is limbed. Don’t rush the task of limbing.
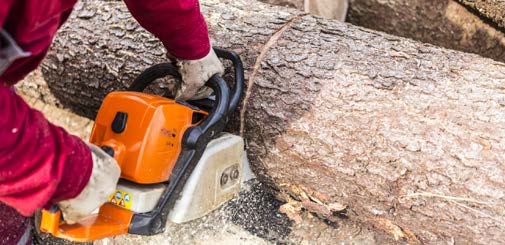
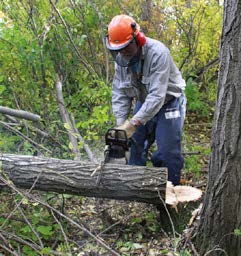
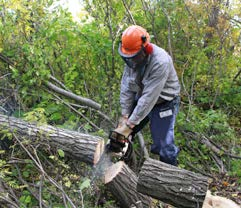
Bucking logs and cutting firewood
Bucking logs or firewood out of the limbed tree is the final step in tree felling. Begin by checking the stump end of the log for rot. Cut any rot out in firewood lengths until the rot is gone. When the butt end is clear of rot, measure the length of the first log based on what is needed for cabin logs or dimensional lumber. Be sure to add at least 6 inches as overrun for board or log trim purposes.
When cutting firewood or logs to a desired length, it is best to measure the wood for accuracy.
A tape measure comes in handy to measure logs. If a 12-foot log is needed, add an extra 6 inches to allow for a minimum amount of trim that the carpenter may need for building purposes.
When bucking logs or firewood, many of the same principles apply as when cutting off branches. A hanging log may be cut from the top of the trunk. It is often wise, if possible, to start the cut on a hanging log from beneath, cutting up just an inch or two into the trunk from beneath. Then, on the top of the log, finish the cut, severing it from the tree. This method helps eliminate splitting at the bottom, which is common when cutting longer, heavier logs. Be sure not to stand directly over the cutting chainsaw bar as you are cutting.
Some trees may still be attached at the stump after felling. To flatten the base of the first log, cut out a short section of the butt log, removing the wedge-shaped part formed when making the face cut. When bucking logs out of felled timber, carefully watch the gap/saw kerf formed by the cutting chainsaw blade. As soon as it starts to narrow or pinch the saw, pull the blade out and finish the cut from beneath. Care must be taken to exactly match the top and bottom cuts and keep the saw out of the dirt beneath the log.
When the tree is supported on both ends, it may be compressed in the middle. This will tend to pinch the saw when cutting from the top. It may be best to cut as far through the log or piece of firewood as possible and finish the cut by rolling the log over and going at it from the other side. Putting a log section or firewood piece beneath the tree helps prevent pinching.
Other tips
Hold the saw close to the body to reduce fatigue and maintain control. Don’t cut with the chainsaw blade in line with your head. Hold your head to the inside of the saw in case it kicks back. Watch what the saw cut is doing all the time. If fatigue sets in, take a break. Try to make each cut as perpendicular or square to the end as possible. This helps make good lumber and firewood that is easier to split.
What NOT to do when tree felling
Summary
Timber felling or tree cutting requires skills gained by knowledge and experience. Using a chainsaw only occasionally doesn’t help the operator maintain the skill set and practice required to maintain proficiency, which is why using personal protective equipment becomes doubly important. It only takes one chainsaw cut to cause serious injury.
If you don’t think you can cut a certain tree safely or with the desired results, cut a different tree or contact a professional licensed and insured tree felling company.
For additional information on tree cutting, obtain a DVD from the local chainsaw shop about chainsaw safety, use and maintenance.
Phillip Kaspari, Extension Faculty, Agriculture and Horticulture. Originally prepared by Glen Holt, former Extension Eastern Alaska Forester
Revised October 2021