PI Dashboard - User's Guide
The PI Dashboard is a google sheets budget management tool for active researchers at IAB and CNSM. This tool allows you to see an overall summary of your projects, a listing of your current and pending awards, and a detailed view of each of your active projects. Additionally, by installing an add-on you will be able to add projections and view a burn rate chart for each of your projects.
Requirements: To use the PI Dashboard, you need to have an internet connection, be a member of the UAF-IAB-PAD@alaska.edu google groups for active IAB and CNSM researchers (and support staff), and install the PI Tools add-on.
What you get: Access to a google drive folder that contains your monthly PI Dashboard updates. Around the 8th of each month, you will receive an email with a link altering you that a new update has been generated.
Navigation
There are 3 main components to the PI Dashboard, which are broken out into google sheets tabs. Click on the below headings to find out more:
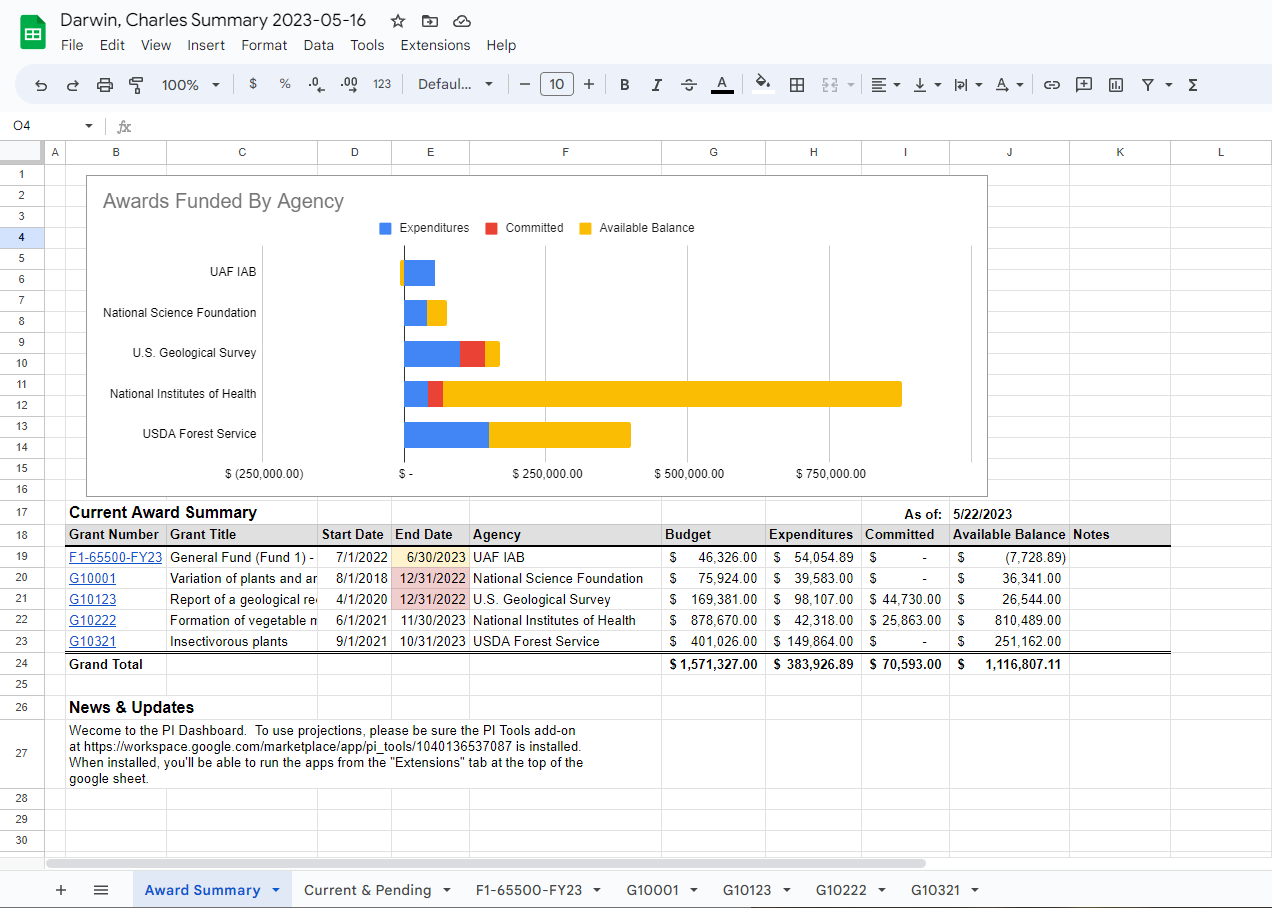
This is your main landing page. It displays a snapshot of all your awards and is meant to give an overall picture of your current funding. The graph displays funding grouped by agency (not award) so you can see at a glance your funding sources on the bar chart. The detail inside each bar shows how much has been expended (blue), how much is committed (red), and your available balance (yellow). If your award is overrun, it will show a yellow bar to the left vertical axis!
The finer details are in the table below the bar chart and lists your individual projects, to include grants (G#'s), Recharge Centers (F14#), and fund 1 accounts (F1#), which includes startup accounts, PI overhead accounts (aka F1, salary savings accounts), and other special projects or internal awards.
The table headings include:
- Grant Number: The is the number assigned to your project. The cell contains a hyperlink that will take you directly to the respective project page when clicked on.
- Grant Title: Your project title. For grants, this title matches with what's on your award documentation. They can be long, so the cell width will truncate the full title, but can be viewed in its entirety in the formula bar if you click on the cell.
- Start Date: The start of your project. For grants, this title matches with what's on your award documentation.
- End Date: The current end. Cells will turn yellow when your projects is within 90-days of the end date; projects that have expired will turn red. Expired grants will eventually be removed but will remain in the updates for at least 90-days after the award has ended because most agency allow for final billing 45-60 days after the project has ended. This will allow you to review the final charges and notify us if there are any necessary adjustment or cost transfers needed if an error is detected before we certify final close out.
- Agency: The entity funding your project.
- Budget: The current authorized budget. For grants, if you are awarded pre-award spending, it will list the amount authorized; otherwise this will be the award amount to date.
- Expenditures: The inception to date sum of charges that have posted to your account.
- Committed: Also known as Encumbrances, this is the amount of expenditures that have been reserved for purchase orders (PO) and subawards to other entities.
- Available Balance: What you currently have left to spend. For grants, this includes direct and indirect costs.
- Notes: Any important notes that your Grants Manager or you wish to include here. It could list reporting due dates, pending incremental award announcements, no cost extension (NCE) updates, etc...
The last section is under the "News & Updates" heading. Important information, updates, notices will be announced here. It's likely you'll also see some news and updates in emails too, but this will hopefully make it easier to find.
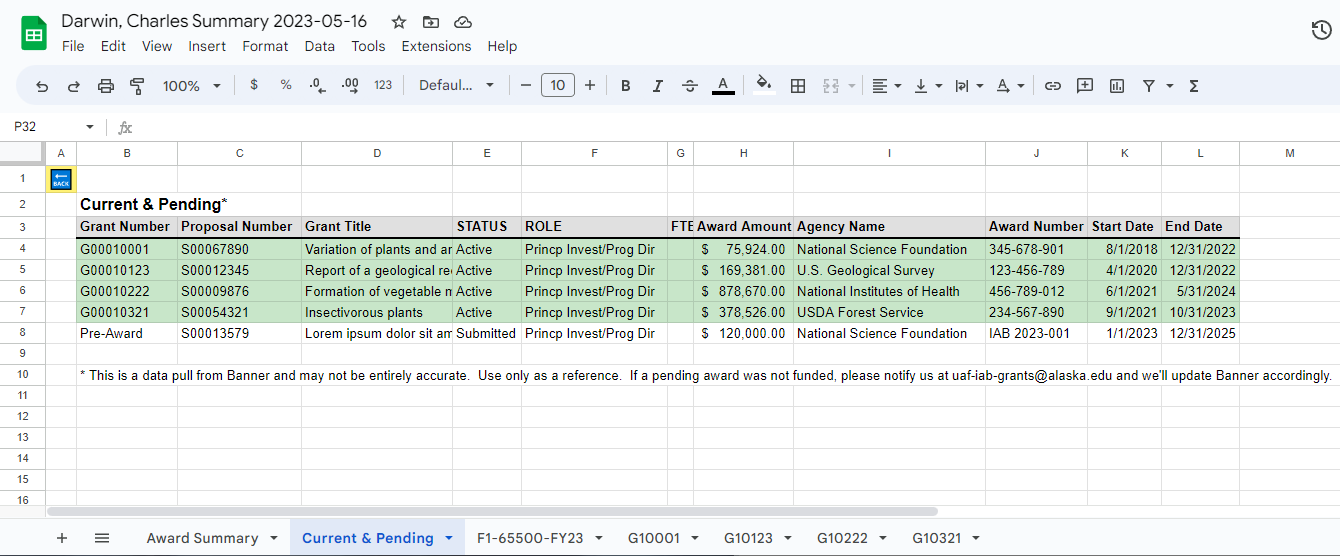
Your Current & Pending (C&P) only lists your sponsored projects and does not necessarily include internal awards. Projects that generate a proposal number (S#) will be recorded in Banner and show up on this tab. Note: The cells highlighted in green are active projects and should be accurate. The cells not highlighted are proposals that have been started or submitted. If a proposal is not awarded or started and not submitted, please let us know and we'll update it in Banner. You can either email uaf-iab-grants@alaska.edu with the S# and status OR notify your Grants Manager.
The C&P table headings are:
- Grant Number: If awarded, this is the G# number assigned to your project. If the status is not active, it will list "Pre-Award"
- Proposal Number: The proposal number assigned to the project during the pre-award phase.
- Grant Title: Your project title. They can be long, so the cell width will truncate the full title, but can be viewed in its entirety in the formula bar if you click on the cell.
- Status: Your proposal status.
- Role: Your role on the proposal or award (PI/PD or Co-PI/Co-I/Co-PD)
- FTE: Full-Time Equivalent effort on the project. This field may be empty if FTE is not a requirement for a proposal.
- Award Amount: If you have a G#, this is the amount awarded. If this is pre-award, the amount shown is the anticipated award amount.
- Agency Name: The sponsor of the project.
- Award Number: If you have a G#, this is the agencies assigned award number. If pre-award, this is the internal unit tracking number.
- Start Date: If you have a G#, this is the official start date of the project. If pre-award, this is the anticipated start date if funded.
- End Date: If you have a G#, this is the current end date of the project. If pre-award, this is the anticipated end date if funded.
Project Tabs (a tab for each project you manage)
Each of the project tabs contain greater details with the ability to manipulate a burn rate chart and enter projections. These project sheets are organized to show you award details in the general layout shown below (Screen Shot of an actual Project Tab). Use the hyperlinks in each of the sections of the below table for more details.
| Burn Rate Chart |
Extension Panel Tool used for: 1) Projections 2) Burn Rate Chart |
|
| Transactions | ||
| Effort Summary | ||
| Projections | ||
Extensions Toolbar

If you have the PI Tools add-on installed, you will have an option in the Extensions Menu called "PI Tools". These tools will open up a side panel in google sheets and allow you to manipulate the Burn Rate chart and add projections to the Projections table.
Burn Rate Chart
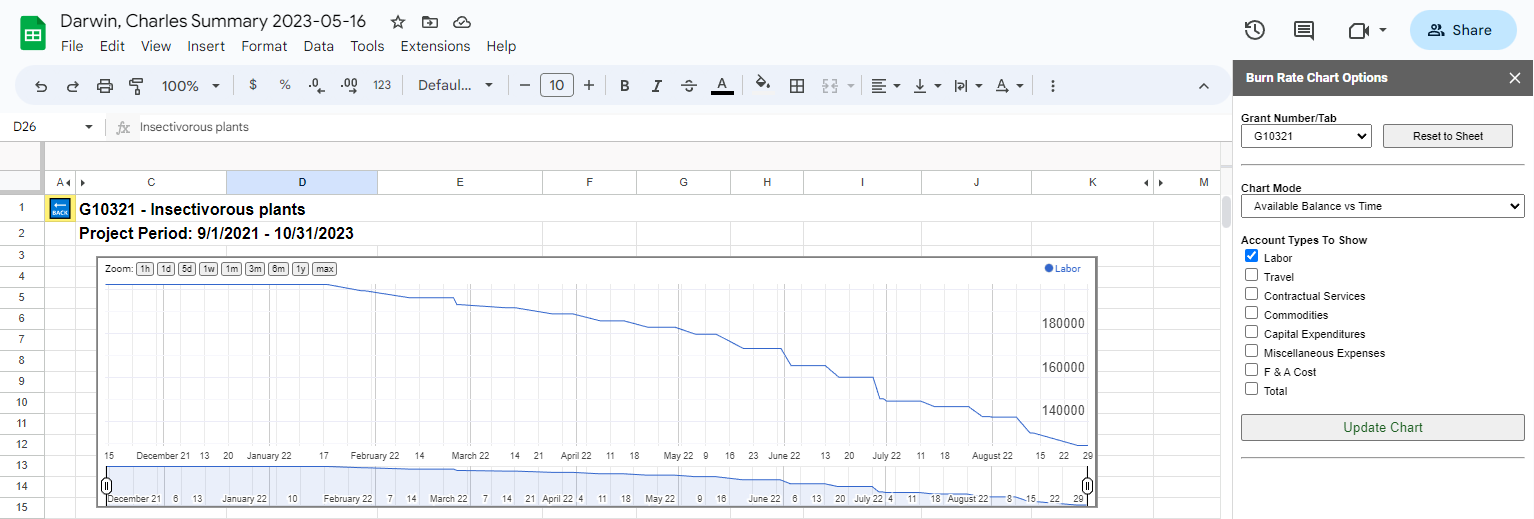
Selecting "Burn Rate Chart Options" from Extensions > PI Tools > Burn Rate Chart Options will open a side panel on the right side of the google sheets. On first open, it will display the project tab number in the "Grant Number/Tab" for the project you're currently viewing. If you change Project tabs, click the "Reset to Sheet" button to update the "Grant Number/Tab" for the project your viewing in the side panel. Optionally, you can change projects from the side panel by selecting the project from the "Grant Number/Tab" drop down menu and then click the "Reset to Sheets" button next to that menu.
There's two different charts that can be selected from the "Chart Mode" drop down box in the side panel:
- Expenditures vs Time: This is a running total of transactions charged to the project over time. It starts at zero and incrementally increases the amount charged to the project each day.
- Available Balance vs Time: This is a running total of transactions that are subtracted from your available budget over time. It starts with the awarded amount and incrementally decreases the available budget for each day a transaction posted to your award.
After you select your chart type, you can select which budget categories you want displayed by selected the check boxes under "Account Types to Show" and then clicking the "Update Chart" button at the bottom.

The Burn Rate chart is a timeline chart that has some integrative features:
- Mouse over the chart to the see the value at a certain date, right click the chart to freeze that date (values are displayed at the top of the chart).
- Zoom in by a specific time period by selecting the preset "Zoom" button in the top left of the chart.
- Custom zoom by dragging the date range selectors at the bottom left and right of the chart.
- Copy or save your chart by clicking the 3 vertical dots in the top right corner of the chart and selecting one of the options from the menu.
Inception to Date Summary

This is the current budget snapshot of your project and it displays the active fund(s) and org(s) associated to it in Banner at the time the report was generated. The table headings include:
- Fund-Org: Each project fund-org is listed.
- Fund Title: The title assigned to each fund.
- Account Type: This is your budget categories. Only account types with budget, transaction, or projected activity will be displayed.
- Budget: The current authorized budget for each "Account Type". For grants, if you are awarded pre-award spending, it will list the amount authorized under "Miscellaneous Expenses"; otherwise this will be the awarded amount to date.
- Expenditures: The inception to date sum of charges that have posted to each "Account Type".
- Committed: Also known as Encumbrances, this is the amount of expenditures that have been reserved for each "Account Type". This includes commitments for purchase orders (PO) and subawards to other entities.
- Available Balance: What you currently have left to spend for each "Account Type".
- Projections: This will display your projections that were entered using the Projections side panel.
- Projected Balance: This is your projected spendable balance. This does not include indirect costs (aka F&A Costs), so the total you see at the bottom of this column is what is currently unspent. Keep in mind that this number is based off of your projections and what has posted to Banner. If for example an order has been made with a vendor who does not charge your ProCard until the item has shipped, it will not be reflected in this report unless you add it to your projections.
Effort Summary

This is the current summary of all effort that has been charged to your project. It is as of the latest payroll run which posts about a week after timesheets are due. The table headings include:
- Employee: Name of the person charging effort to your project.
- Fund-Org: Funding charged. This is useful if you have multiple fund numbers on your project and if so, you may see an employee listed twice if they've charged multiple project funds.
- UA ID: This is the employees University ID number.
- PCN: This it the employees Position Number for the job they were hired into.
- ECLS: This is the Employee Classification for their position.
- Rate: This is the employee's rate of pay. This is normally listed as hourly, but it could be the bi-weekly pay amount for graduate student stipends or faculty additional assignments.
- Units Recorded: This is the total number of units recorded by the employee to this project. Units are normally listed in hours, but it could be the number of pay periods paid for graduate student stipends or faculty additional assignments.
- Pay with Benefits: This is the total amount of pay charged to the project.
Projections
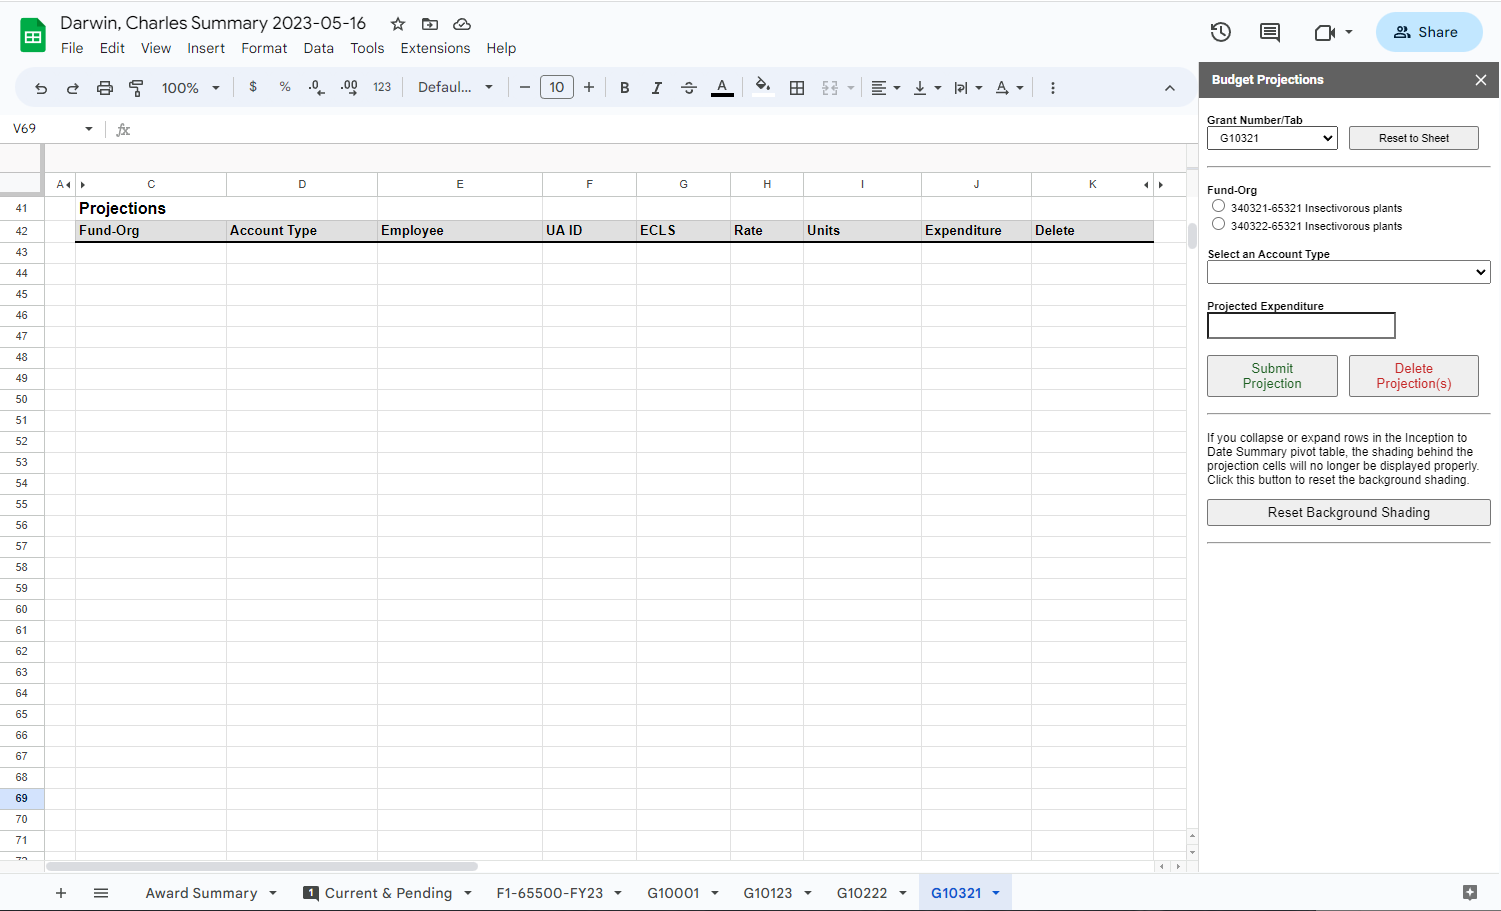
Selecting "Projections" from Extensions > PI Tools > Burn Rate Chart Options will open a side panel on the right side of the google sheets. On first open, it will display the project tab number in the "Grant Number/Tab" for the project you're currently viewing. If you change Project tabs, click the "Reset to Sheet" button to update the "Grant Number/Tab" for the project your viewing in the side panel. Optionally, you can change projects from the side panel by selecting the project from the "Grant Number/Tab" drop down menu and then click the "Reset to Sheets" button next to that menu.
The Projections side panel works in conjunction with the Projections table (the bottom-left section of the google sheets). On first open, the table will be blank. The Projections table headings include:
- Fund-Org: Funding projected.
- Account Type: Budget categories.
- Employee: Name of employee, used for labor projections.
- UA ID: The employees University ID number, used for labor projections.
- ECLS: The Employee Classification for their position, used for labor projections and determining benefits rates calculated.
- Rate: The employee's rate of pay, used for labor projections.
- Units: This number of hours or pay periods being projected. Units are normally listed in hours for most ECLS, use pay periods for graduate student stipends (GN or GT ECLS) and for faculty additional assignments (F9a ECLS).
- Expenditure: Amount projected.
- Delete: To delete a projection by clicking the check box and then select "Delete Projection(s)" from the side panel. You'll receive a pop-up to confirm, click yes to continue.
To make a projection using the Projections side panel:
- Select the "Fund-Org" you want to work with
- From the "Select an Account Type" drop down, select which budget category you would like to add a projection to.
- Enter in the "Projected Expenditure" in the relevant box
- Click on "Submit Projection" to add this projection to the Projection table.
The below example shows that $2,000 was added for Travel. $2,000 shows up in the Projections table, and is also added to your Inception to Date Summary.
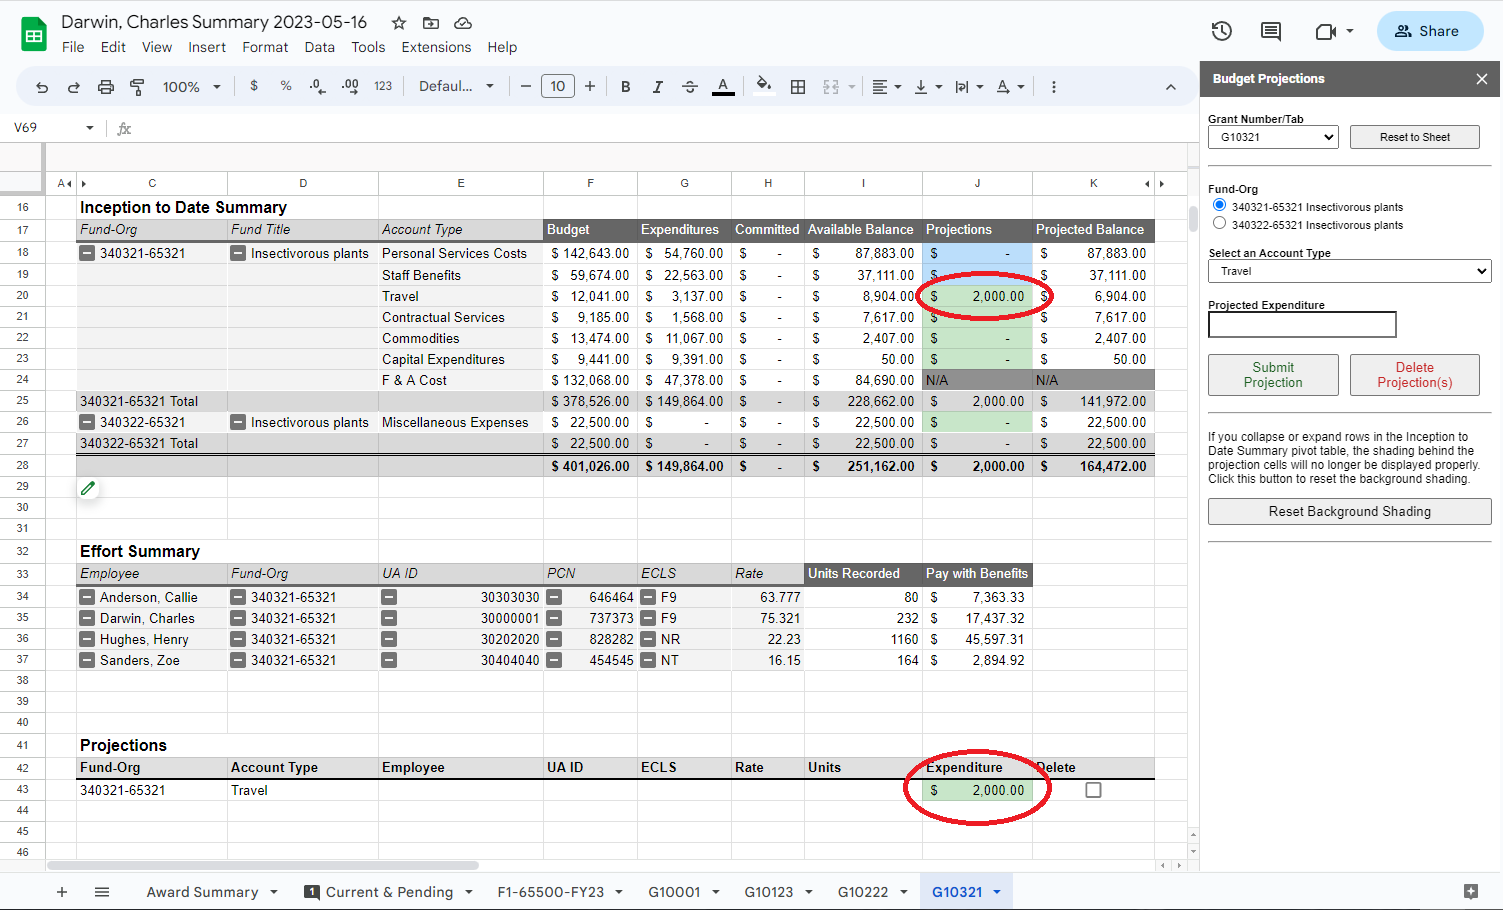
- If you later decide that you underestimated your projection and it should $3,000 instead, you could either add another projection for $1,000 or update the number directly in the Projections table by replacing $2,000 with $3,000. Either option will update your Inception to Date Summary accordingly.
- If your trip was cancelled and you no longer need to project $3,000; click the check box in the "Delete" column and then select "Delete Projection(s)" from the side panel. You'll receive a pop-up confirmation, click yes to continue. Your projection is now removed from the Projections table and the Inception to Date Summary.
Examples Projecting Salary:
Scenario 1: You would like to project 6-months of effort to this project.
- Select the "Fund-Org" you want to work with
- From the "Select an Account Type" drop down, select "Salaries & Benefits".
- You will be presented with a list of employees under the heading "Employee Name [filtered
| all]" followed by their current ECLS and rate of pay in parenthesis).
- If you select filtered, it will show all employees who have charged effort on this award
- If you select all, it will show all employees who have charged effort on any of your Project tabs
- Select: Darwin, Charles (F9, $75.32/hr)
- The following boxes will be populated: UA ID, ECLS, and Rate. You may make changes to what is defaulted in these boxes if you anticipate any charges (i.e. - increase in pay or maybe the ECLS will be an additional assignment instead)
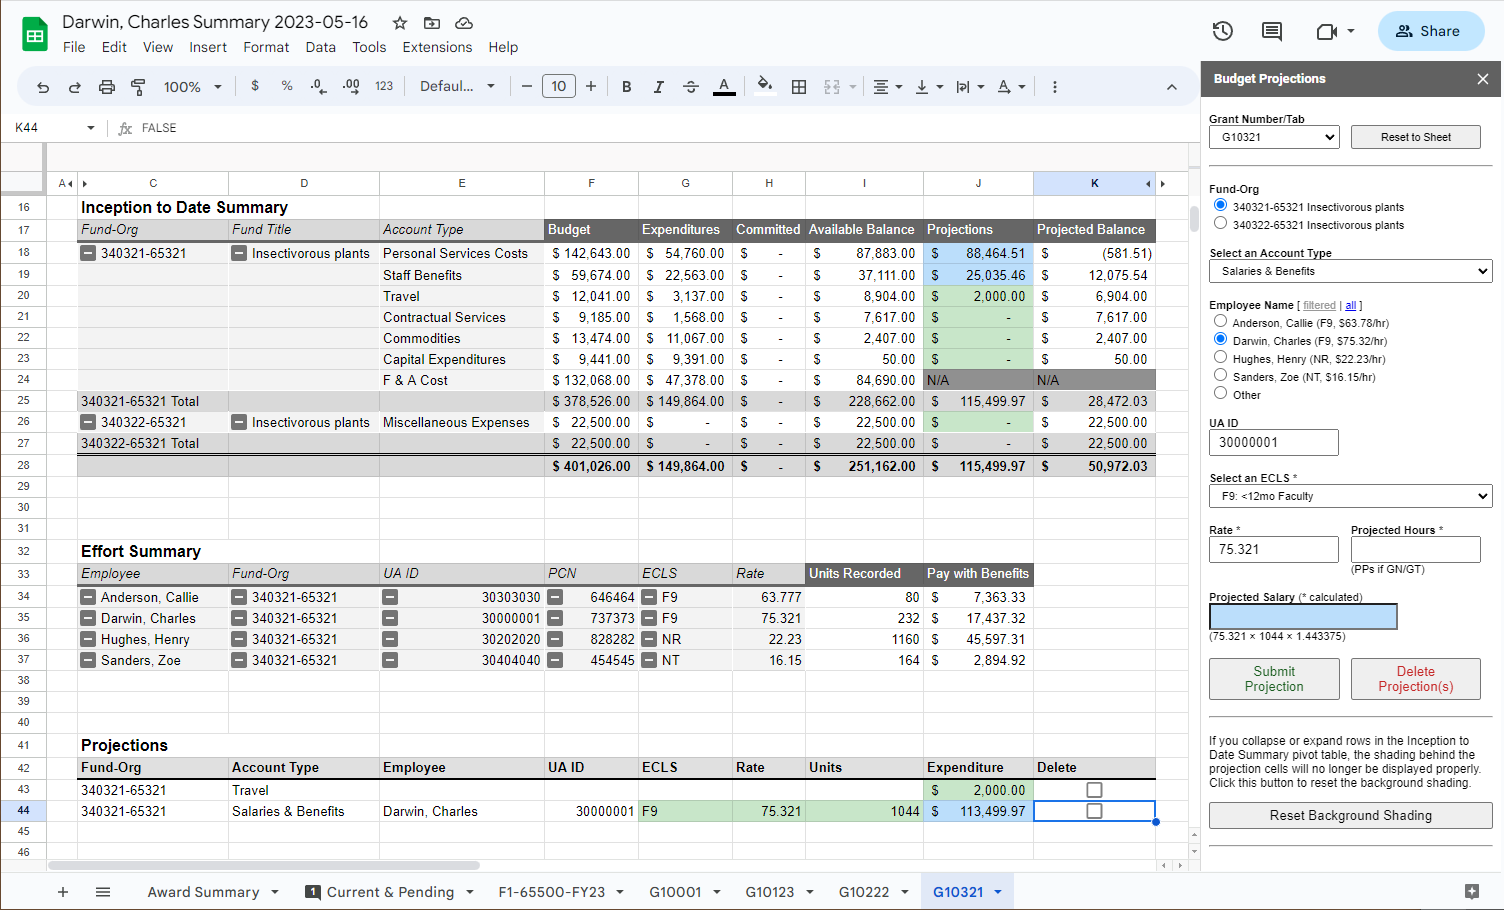
- Enter the equivalent of 6-month in hours (1,044 hours) in the "Projected Hours" box.
- The "Projected Salary (* calculated)" box will turn blue and display the projected salary & benefits. Below that box is the formula used to calculate this number, which is "Rate" x "Projected Hours" x a constant for leave and fringe benefits for the ECLS selected.
- If you're happy with this number, click "Submit Projection". Otherwise make any adjustment to the salary and then submit.
- Below is how the projection turned out
Scenario 2: You, Charles Darwin (PI), would like to hire a new undergraduate student to work part-time on your award during the Fall semester.
- Select the "Fund-Org" you want to work with
- From the "Select an Account Type" drop down, select "Salaries & Benefits".
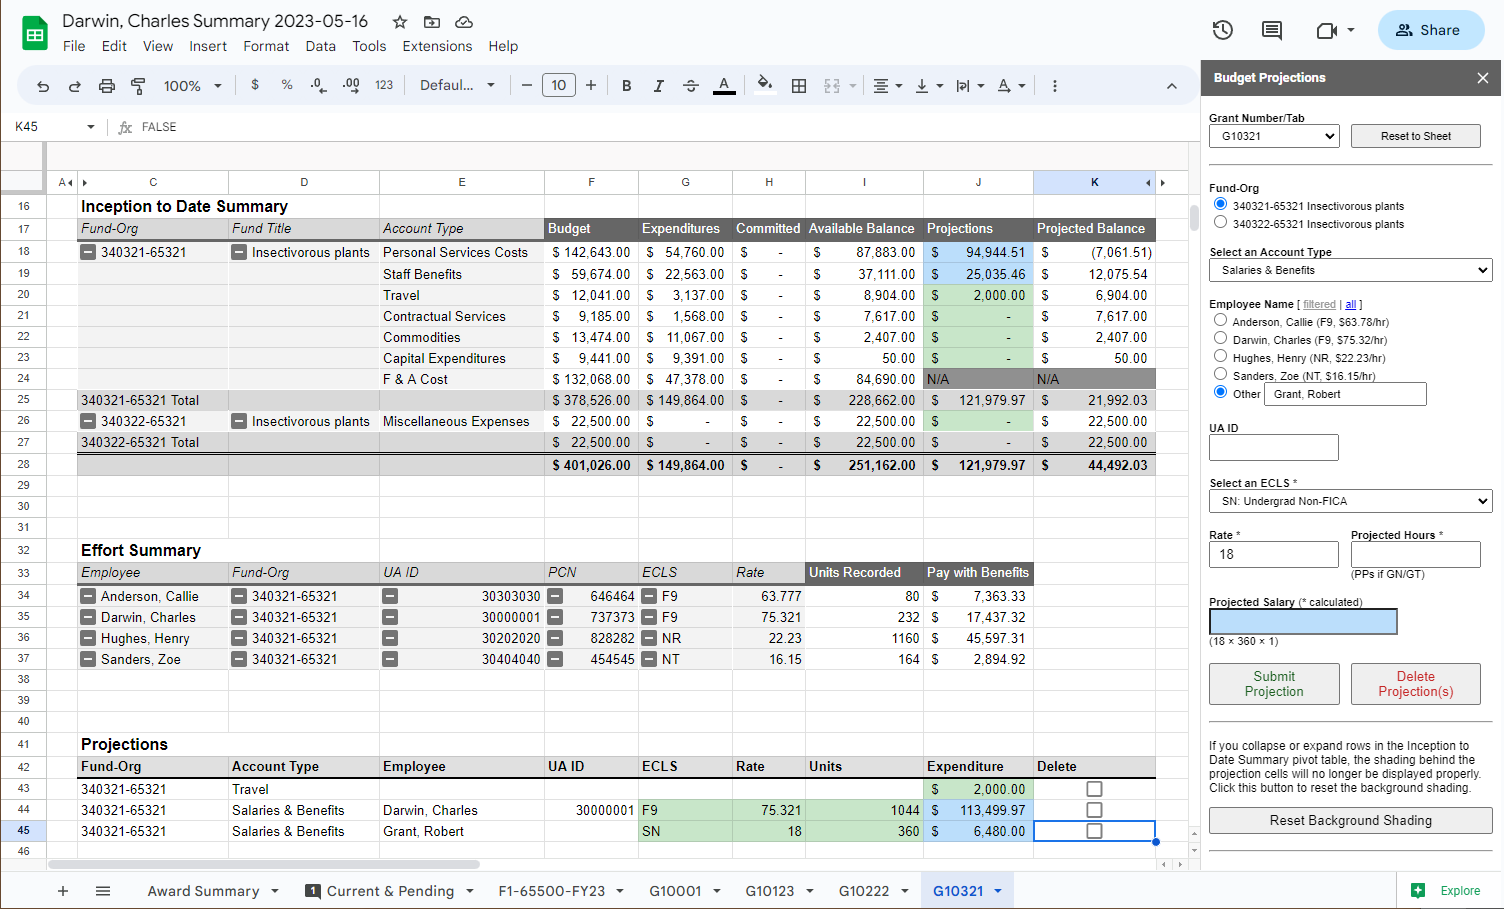
- Under the "Employee Name" heading, select Other and enter the Student's name. If you haven't identified a student yet, you could add TBD or something to that affect to identify the projection. For this example, we're hiring Robert Grant.
- Enter the student's UA ID if known, otherwise you can leave it blank.
- Select "SN" for their ECLS
- Enter their anticipated rate of pay. For this example, the stellar student we hire will be paid $18/hr.
- Enter their "Projected Hours". For this example, there's 9 pay periods (18-weeks) in the Fall semester and student's can only work 20-hours per week during the academic year (18 x 20 = 360 hours)
- "When Submit Projection" is clicked, the below projection is added to the Projections table and Inception to Date Summary.
Scenario 3: Instead of hiring a Fall Semester undergraduate student, due to project delays, you need to shift that student's effort to the whole summer and full-time.
- You could delete the SN entry for Robert Grant and re-enter a new projection OR do the much quicker method of updating the fields in the Projections table. The green fields in the Projections table are editable and will update the projection in both this "Expenditures" cell of the Projections table and the "Projections" column of the Inception to Date Summary.
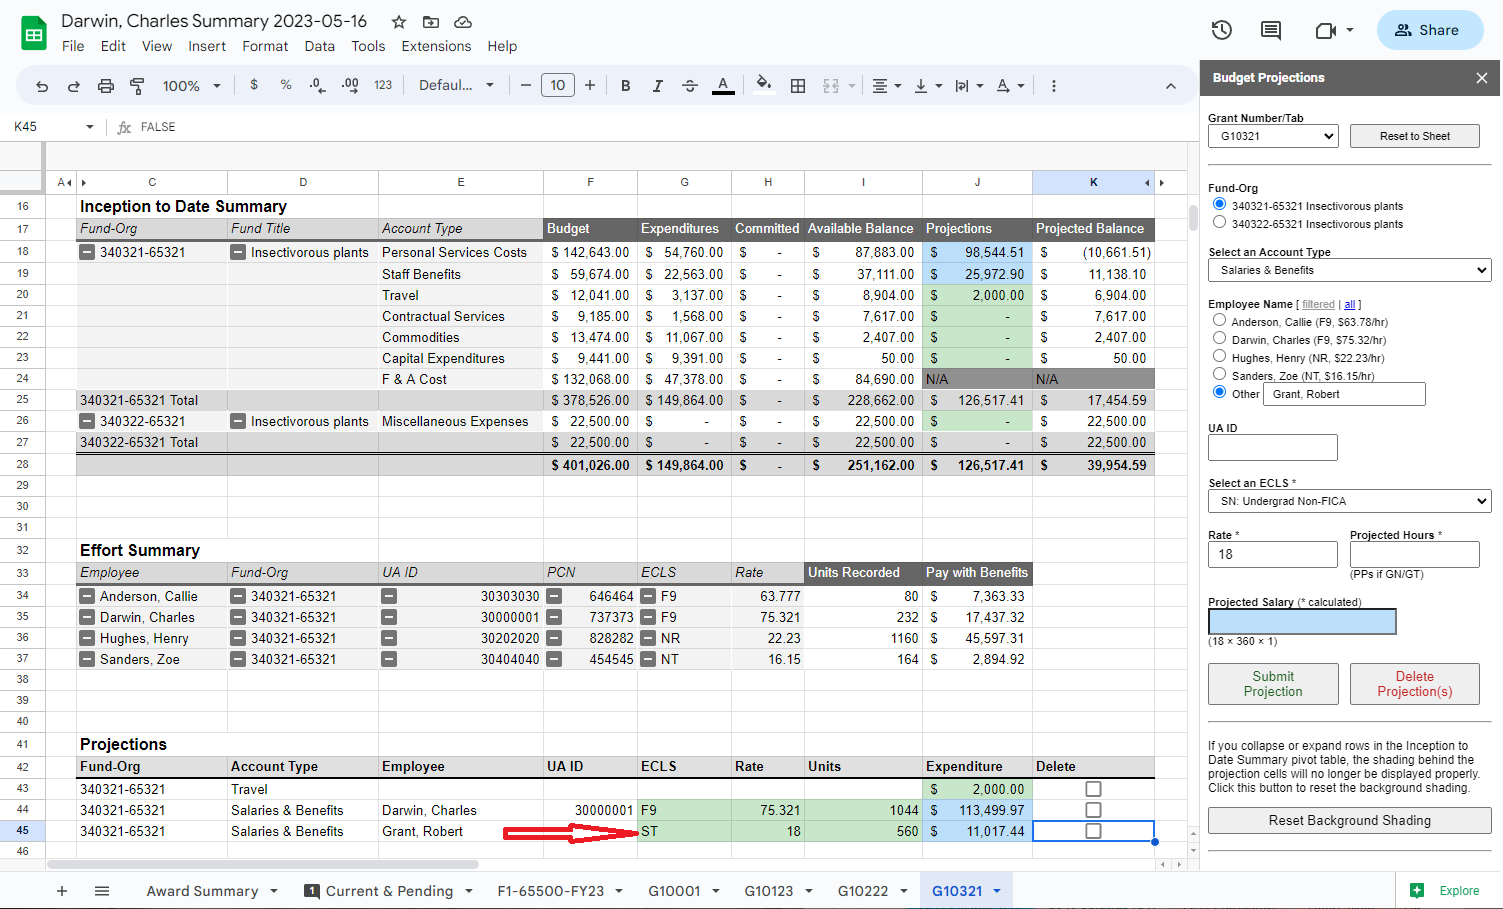
- Update the student's "ECLS" from SN to ST. If you don't know right off what ECLS to use, you could reference the "Select an ECLS" dropdown menu in the side panel. But for this example, you know that ST is for summer, so you would update that cell accordingly.
- You could update the "Rate" cell too, but you fear an overrun, so you will leave that cell unchanged for now.
- Update the "Units" cell from 360 to 560 (14 weeks in the summer at 40 hours per week).
- Making these changes results in the below updated projections.
Transactions

This table lists the transactions that have posted to your award by budget categories. By default, the table will be collapsed under "Account Type". To see individual transactions with more detail for a budget category, expand the table for the selected "Account Type" by clicking the plus button. The table headings include:
- Fund-Org: Funding charged.
- Account Type: This is your budget categories. Only account types with budget, transaction, or projected activity will be displayed.
- Transaction Date: This is the date the charge posted to Banner; it is not necessarily the actual date the charge was made.
- Acct: This is the transaction's account number.
- Description: A short description of the transaction. This is usually a vendor or in the case of labor, the payroll run.
- Document Number: An internal number used by Banner to identify the type of transaction (i.e. - Purchase Order number).
- Employee: Name of the person charging effort to your project. This only displays information in the labor budget categories.
- ECLS: This is the Employee Classification for their position. This only displays information in the labor budget categories.
- Pay Run: This is the payroll run number for the effort charged to this project. This only displays information in the labor budget categories.
- Units: This is the total number of units recorded by the employee for a "Pay Run". Units are normally listed in hours, but it could be the number of pay periods paid for graduate student stipends or faculty additional assignments. This only displays information in the labor budget categories.
- Expenditures: The transaction charge, or if "Account Type" section is collapsed, the total charges for that budget category.
- Committed: Also known as Encumbrances, this is the amount of expenditures that have been reserved for the transaction, or if "Account Type" section is collapsed, the total charges for that budget category. This includes commitments for purchase orders (PO) and subawards to other entities.
- Total: This is the sum of "Expenditures" and "Committed" transaction, or if "Account Type" section is collapsed, the total charges for that budget category.
FAQs
How often will I get an update?
If you have the PI Tools add-on installed, you will have an option in the Extensions Menu called "PI Tools". These tools will open up a side panel in google sheets and allow you to manipulate the Burn Rate chart and add projections to the Projections table.

The below is taken from the above Navigation Guide under the sub heading Project Tabs
- Select a project you want to work with by either navigating to the Project's tab or selecting the "Grant Number/Tab" in the Projections side panel and selecting "Reset to Sheet"
- Select the "Fund-Org" you want to work with
- From the "Select an Account Type" drop down, select which budget category you would like to add a projection to.
- Enter in the "Projected Expenditure" in the relevant box
- Click on "Submit Projection" to add this projection to the Projection table.
The below example shows that $2,000 was added for Travel. $2,000 shows up in the
Projections table, and is also added to your Inception to Date Summary.
- If you later decide that you underestimated your projection and it should $3,000 instead, you could either add another projection for $1,000 or update the number directly in the Projections table by replacing $2,000 with $3,000. Either option will update your Inception to Date Summary accordingly.
- If your trip was cancelled and you no longer need to project $3,000; click the check box in the "Delete" column and then select "Delete Projection(s)" from the side panel. You'll receive a pop-up confirmation, click yes to continue. Your projection is now removed from the Projections table and the Inception to Date Summary.
The below scenarios are taken from the above Navigation Guide under the sub heading Project Tabs
Scenario 1: You would like to project 6-months of effort to this project.
- Select the "Fund-Org" you want to work with
- From the "Select an Account Type" drop down, select "Salaries & Benefits".
- You will be presented with a list of employees under the heading "Employee Name [filtered
| all]" followed by their current ECLS and rate of pay in parenthesis).
- If you select filtered, it will show all employees who have charged effort on this award
- If you select all, it will show all employees who have charged effort on any of your Project tabs
- Select: Darwin, Charles (F9, $75.32/hr)
- The following boxes will be populated: UA ID, ECLS, and Rate. You may make changes to what is defaulted in these boxes if you anticipate any charges (i.e. - increase in pay or maybe the ECLS will be an additional assignment instead)
- Enter the equivalent of 6-month in hours (1,044 hours) in the "Projected Hours" box.
- The "Projected Salary (* calculated)" box will turn blue and display the projected salary & benefits. Below that box is the formula used to calculate this number, which is "Rate" x "Projected Hours" x a constant for leave and fringe benefits for the ECLS selected.
- If you're happy with this number, click "Submit Projection". Otherwise make any adjustment to the salary and then submit.
- Below is how the projection turned out

Scenario 2: You, Charles Darwin (PI), would like to hire a new undergraduate student to work part-time on your award during the Fall semester.
- Select the "Fund-Org" you want to work with
- From the "Select an Account Type" drop down, select "Salaries & Benefits".
- Under the "Employee Name" heading, select Other and enter the Student's name. If you haven't identified a student yet, you could add TBD or something to that affect to identify the projection. For this example, we're hiring Robert Grant.
- Enter the student's UA ID if known, otherwise you can leave it blank.
- Select "SN" for their ECLS
- Enter their anticipated rate of pay. For this example, the stellar student we hire will be paid $18/hr.
- Enter their "Projected Hours". For this example, there's 9 pay periods (18-weeks) in the Fall semester and student's can only work 20-hours per week during the academic year (18 x 20 = 360 hours)
- "When Submit Projection" is clicked, the below projection is added to the Projections table and Inception to Date Summary.

Scenario 3: Instead of hiring a Fall Semester undergraduate student, due to project delays, you need to shift that student's effort to the whole summer and full-time.
- You could delete the SN entry for Robert Grant and re-enter a new projection OR do the much quicker method of updating the fields in the Projections table. The green fields in the Projections table are editable and will update the projection in both this "Expenditures" cell of the Projections table and the "Projections" column of the Inception to Date Summary.
- Update the student's "ECLS" from SN to ST. If you don't know right off what ECLS to use, you could reference the "Select an ECLS" dropdown menu in the side panel. But for this example, you know that ST is for summer, so you would update that cell accordingly.
- You could update the "Rate" cell too, but you fear an overrun, so you will leave that cell unchanged for now.
- Update the "Units" cell from 360 to 560 (14 weeks in the summer at 40 hours per week).
- Making these changes results in the below updated projections.

What if I don't see one of my projects in the PI Dashboard?
Please email Matt Seymour with your project details (G# and/or fund number).
Who do I contact to report a bug or make a suggestion?
Please contact Matt Seymour.
A specials thanks to Ed Debevec for his programming mastery and help in creating the side bar tools, scripting, and saying yes to,"Is it possible to...?"


