CLSS Help Guide
CourseLeaf Dashboard
Easy access to ALL CourseLeaf tools from one landing page
- Including Courses, Programs, Scheduling (CLSS) and Special Topics/Trial Courses
- Ability to see all CourseLeaf related items you have submitted to the workflow.
- No more need for separate bookmarks for every site!
CLSS Basics & FAQs
Basic Steps:
If you need to request CLSS access for the first time or need access to edit another department, please fill out the Request to Add or Remove a CLSS Scheduler. Although users can see all schedules, an individual is only able to edit the schedules they have access to.
Log in using your UAF SSO. If encountering difficulties logging in it's possible that the individual doesn't have a CourseLeaf user account. Contact the Curriculum Management Team at UAF-curriculum@alaska.edu to verify user account status.
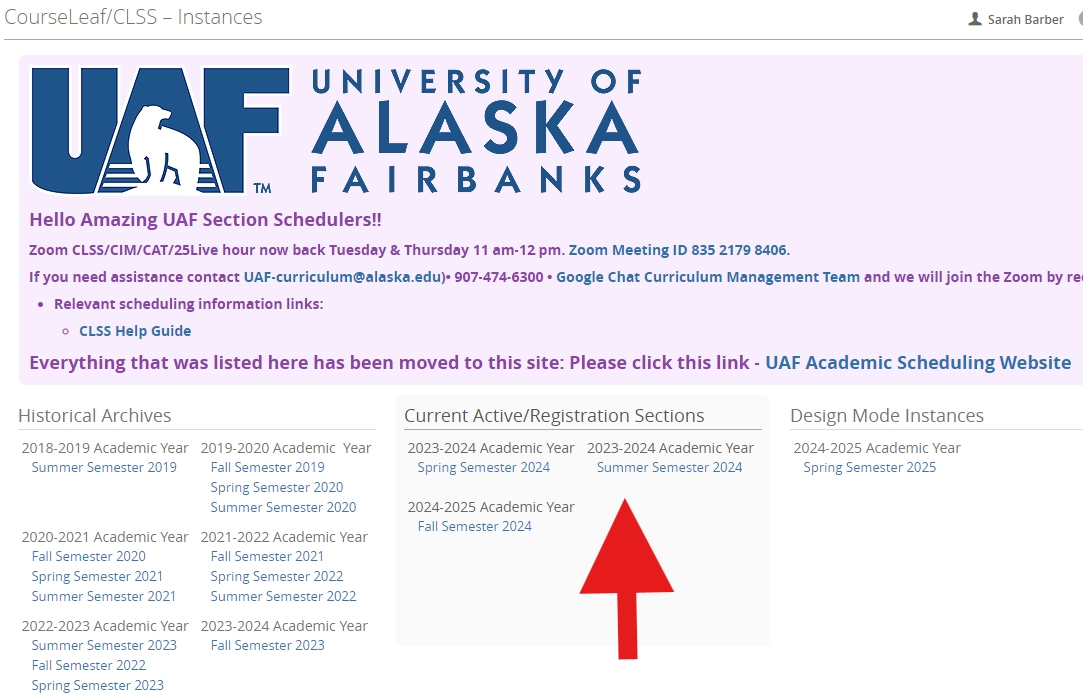
CLSS contains historical terms, current terms, and future terms. Historical terms are archived as non-editable. Current terms are published in UAOnline.
Choose the instance (semester) to be edited.
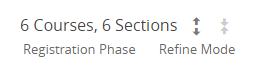
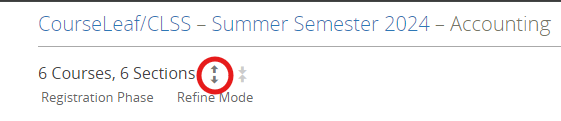
The next line shows how many courses you have scheduled, and how many individual sections are scheduled. These numbers include non-owned courses. Next, you will see what Phase and Mode your schedule is in. If the schedule is in Design Mode.
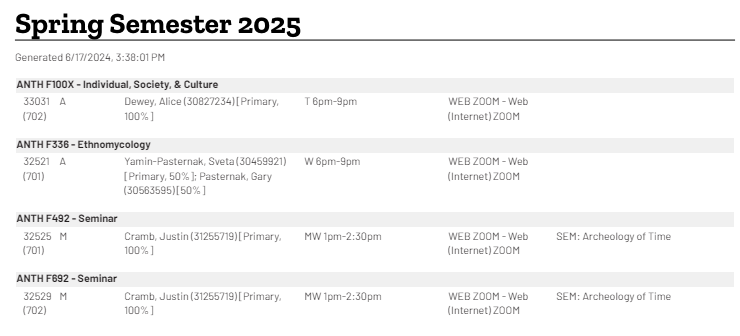
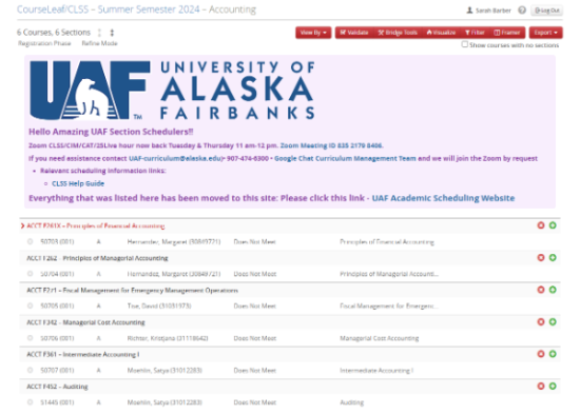
Each course show the subject and catalog number and the long title.

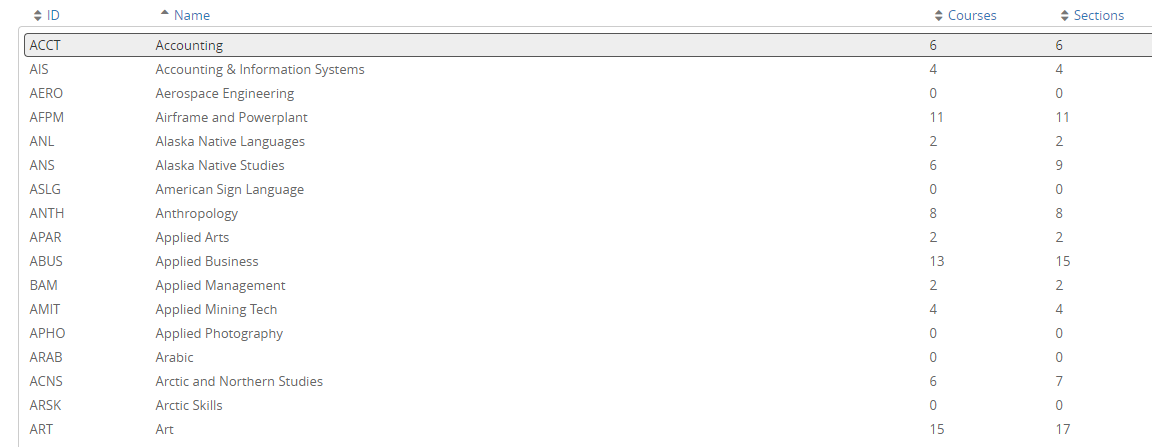
The scheduling unit screen shows a list of courses with existing sections. By default,
the list only shows courses with sections. To view sections of a course double-click
on the course shell. In the image below, ACCT is the course shell, and the sections
are nested below, each displaying the CRN, section number, instruction type code,
instructor, and schedule.
To expand all courses with scheduled sections, click the opposing arrows near where the number of courses and sections in the unit are displayed - the converging arrows next to it will collapse all the lines again.
To view all active courses available to a scheduling unit, including those without
sections, check the box labeled "Show courses with no sections" in the top right corner.
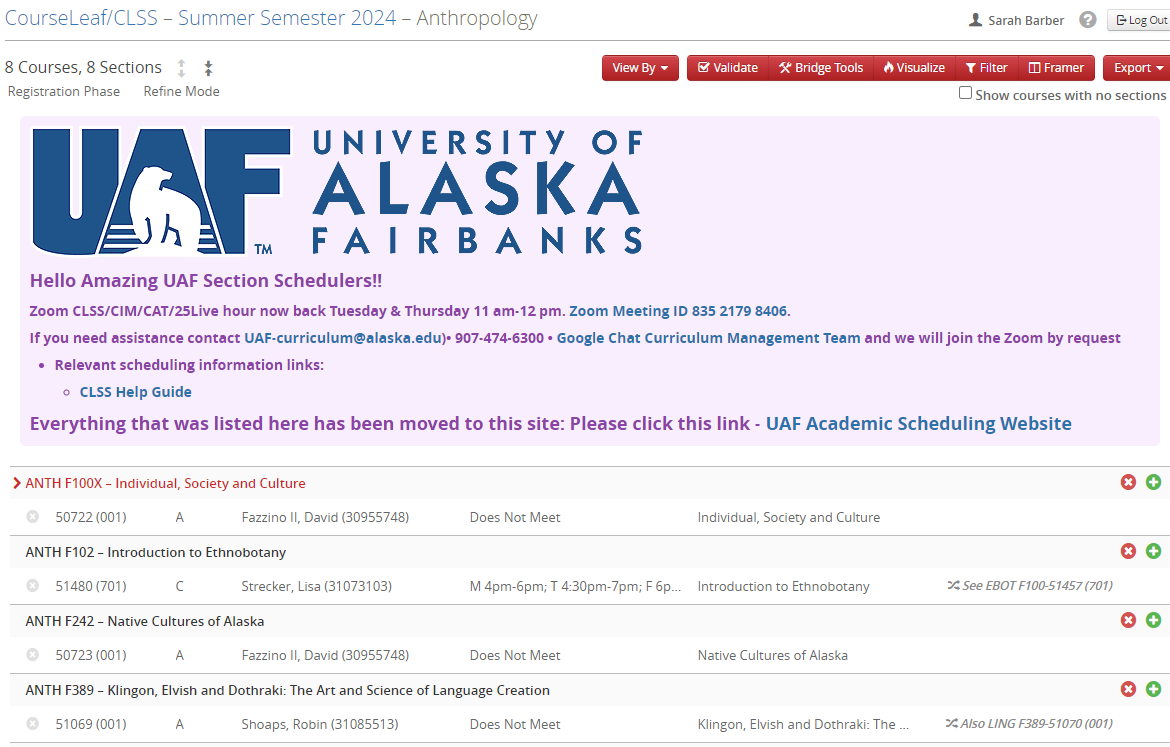

Double-click a section to view or edit an existing class.
Click the green plus to the right of a course to add a new section.
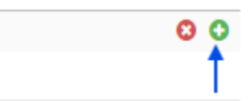
The Create Section pop up will appear.
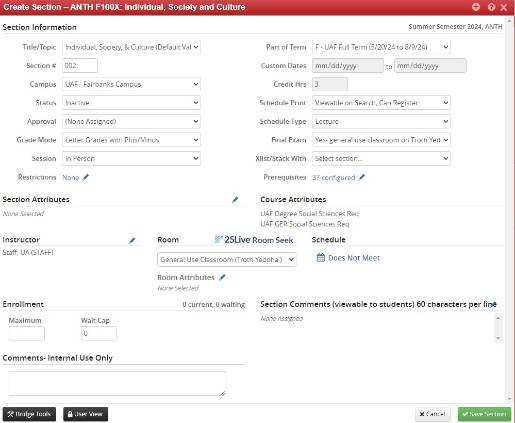
Details for completing each field are below under Adding a Section (Detailed Instructions).
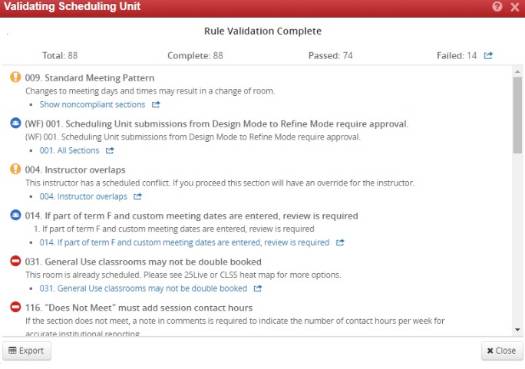
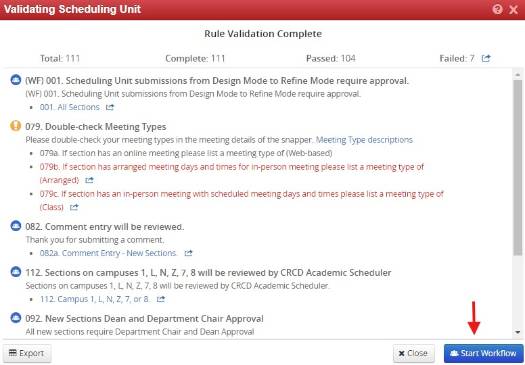
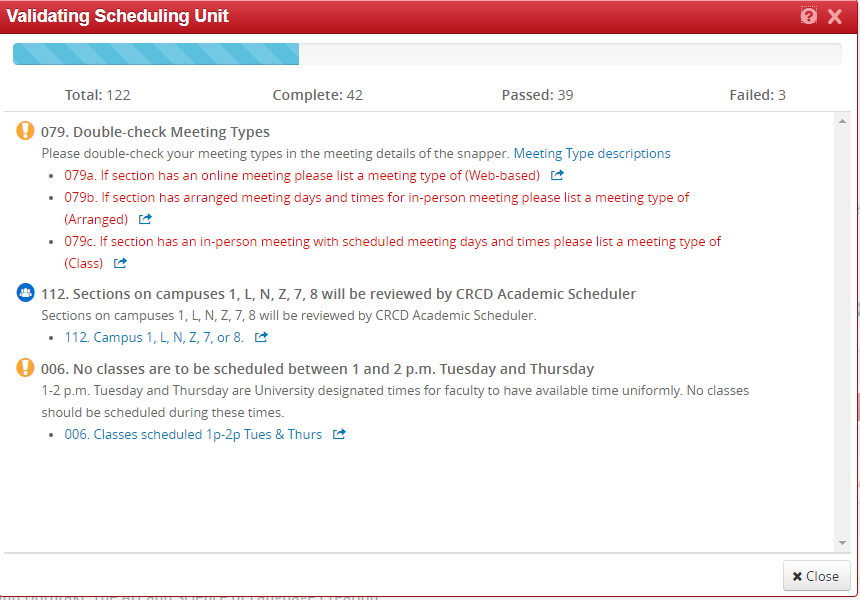
If submitting a schedule for the first time, click "Validate" to complete the submission. The Class Scheduling team and Approvers will not be able to see the schedule unless this step is completed. Additionally, new sections and any changes to existing sections will not be sent to Banner unless they are validated. If the schedule is rolled back for any reason, validation must be done again.

Once CLSS runs its rule validation process and all errors have been fixed if any, a button called Start Workflow. Click it to send the schedule to the Class Scheduling Team and Approvers.
FAQS:
If still not visible, it may not be in the catalog. If a proposal was recently submitted please check the CIM to see if the Status is Registrar. If in the status Registrar reach out to the Curriculum Management Team. Once added to Banner it will show in CLSS the day after they have been processed.
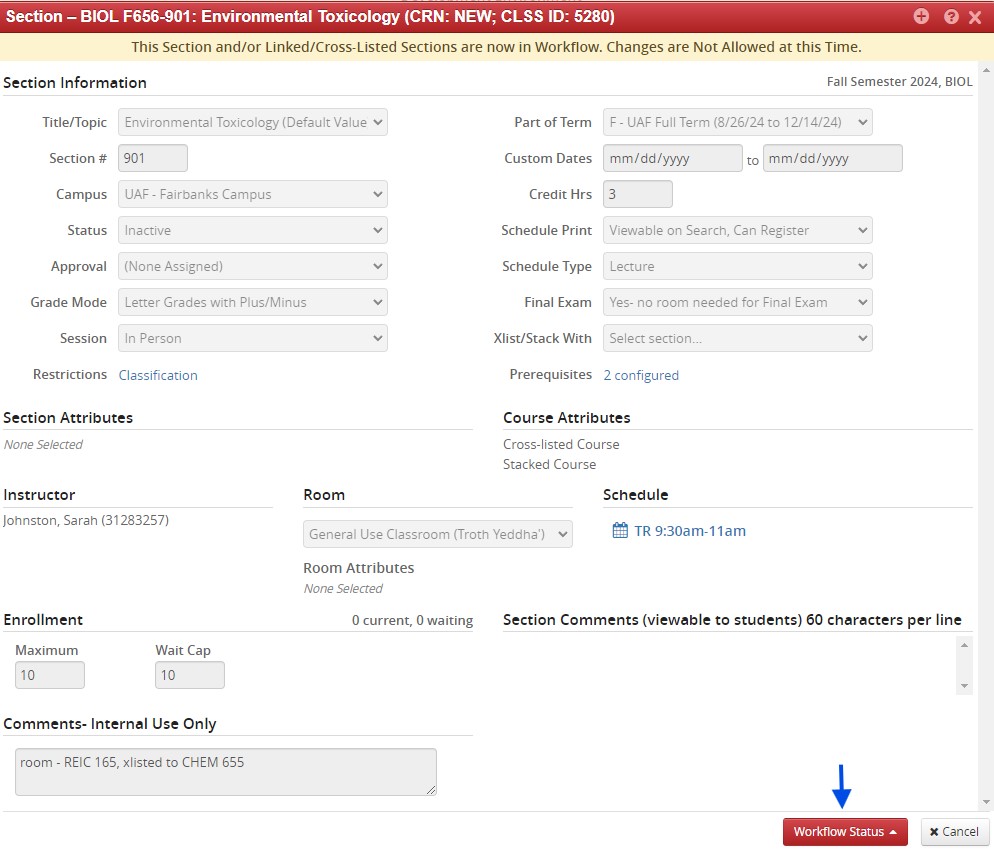
Design Mode: You can find where an item is in the workflow at the top of the unit's page.

Refine Mode: You can find where an item is in the workflow at the bottom of the form.
To view who is in the role of the workflow, hover over the role and the individual(s) email will present itself in the bottom left hand corner of the screen.
The dropdown list of instructors only show those assigned to the unit. If they are
not in the dropdown, click Other... and search again. This will search all instructors
at UAF.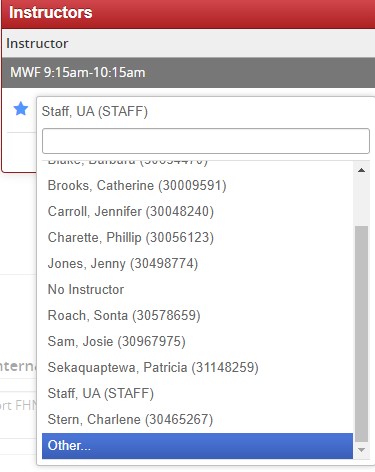
Instructors must be added to the instructor/advisor table. If this is the first time they are teaching, fill out and submit the CLSS Missing Instructor Approval Form.
- All error messages include instructions on how to fix the rule being broken. Please read the instructions carefully.
Rule 118. Double booking Rooms not allowed
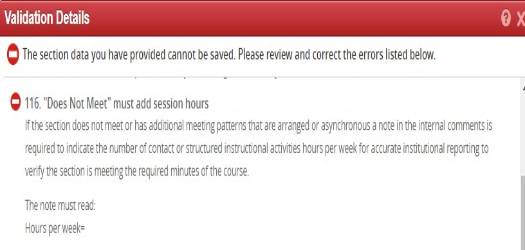
Rule 116. "Does Not Meet" must add session hours
CLSS has two modes: Design Mode and Refine Mode.
Schedules will be in Design Mode when working on an upcoming semester. In Design Mode,
all units will be submitted as a whole unit. All edits, deletions and additions are
made before validation and starting the workflow. None of the submissions will sync to Banner
until they are out of the workflow.
Schedules that have made it through the workflow in Design Mode will then be in Refine
Mode. All schedule edits will be submitted one at a time to the workflow and all changes
will sync in realtime to Banner and UAOnline.
CLSS has several phases: Plan/Proof, Room Assignment, Registration, Post Registration,
Locked, and Archive.
The phase is viewable at the top of the unit:
Unlike Modes, all schedules must be in the same Phase at the same time. They are controlled at the university level, not the department level.
- Plan/Proof Phase - CLSS starts in Plan Phase, during which changes to all units are permitted. This Phase is only in Design Mode.
- Room Assignment Phase - Room Assignment Phase is used to temporarily limit changes while the Academic Scheduling Specialist assigns general-use classrooms to any sections missing or requesting a general-use classroom that wasn't assigned by the unit. Room Assignment Phase typically lasts less than one day; CLSS is then moved into Review Phase.
- Review Phase - This phase is in Refine Mode only. After this time, sections can't be deleted (only cancelled).
- Locked Phase - No edits are permitted. Locked Phase is only used when needed by the Academic Scheduling Specialist when trying to trouble shoot an issue in CLSS.
- Archived Phase - No edits are permitted, and CLSS no longer checks for updates to these terms as the semester has ended.
Warning can Save, but proceed with caution:
Workflow Save for Approval:
- The location does not exist in which the Missing Location in CLSS Form will need to be filled out. Typically the location will be created in one to two business days and will show up in CLSS the next day after creation in Banner.
- The location is offline due to maintenance for the semester.
Editing a Section (Detailed Instructions)
The drop-down menu usually shows the default value and "Other/Long Title/Subtitle." For Varying Topics courses, Seminars (F-92), Special Topics, and Trial Courses, previous titles used for the section may also be viewed.
- To change the title, select "Other/Long Title/Subtitle." The transcript title is a short title (30-character limit) that appears on a student's transcript. The long title area is for adding a subtitle or long title for Varying Topics courses, Seminars (F-92), Special Topics, and Trial Courses.

- The beginning digit will correlate with session codes (see number 7).
- The ending digit of a section number indicates the number of sections for a course and are to never end with a zero.
Always Double-check Campus
- All new additions automatically default to Fairbanks Campus.
The Status field is student-facing and is used to allow or deny registration.
All new sections not assigned a CRN are required to stay Inactive, the Bursar's Office is the one that activates CRNs for new sections.
Selection of Cancelled is only allowed in Refine Mode.
Examples:
- Instructor Approval Required
- Closed (Restricted) Enrollment
"Grade Mode" pulls from the Catalog, it is best practice to also check the grade mode
in CIM. Selecting Student Choice allows students the ability to audit. Grade modes are never
altered in the schedule.
For example, a course that is listed as a letter grade cannot be changed to pass/fail
in the schedule.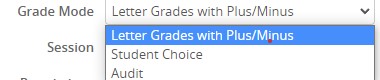
A course cannot be both pass/fail and letter grade per Board of Regents Policy R10.04.090.
| Section Number | Title | Description |
|---|---|---|
| 900's |
In Person |
Instruction is in person at a physical location, i.e a classroom. |
| 000's | Online - No Set Time | Asynchronous. Fully online instruction with no set meeting times. |
| 500's |
In Person "AND" Online (Hybrid)
|
Mandatory in person "And" online instruction combined. Has one CRN. Meeting patterns must specify the dates when students will work on the asynchronous material. |
| 300's |
In Person "OR" Online (HyFlex) |
Students can attend scheduled class sessions either in person "OR" online, as long as the meeting days and times are the same. Has one CRN. |
| 700's |
Online - Set Time |
Synchronous. Fully online instruction with mandatory meeting times. |
It sets the duration of class meetings and the time span a student must engage with the class content. This affects scheduling to meet contact hours and how CLSS applies rules to a section. The drop-down menu shows the default start and end dates for the term, but these dates are just an indication and do not necessarily determine the meeting pattern dates for a section.
Part of Term Regulations:
The start dates for a semester must always fall within the instructional period of that semester and must never start after the last day of instruction for that semester.
F - Full Semester (15 weeks total)
- Sections are required to meet for the full 15 weeks
FP1 - 1st half of semester (8 weeks total)
- Sections are required to meet for the full 8 weeks
FP2 - 2nd half of semester (8 weeks total)
- Sections are required to meet for the full 8 weeks
F01 - 1st Week Start
- Sections start the first week of the semester but end before or on the last day of the semester
F02 - 2nd Week Start
- Sections start the second week of the semester but end before or on the last day of the semester
F03 - 3rd Week Start
- Sections start the third week of the semester but end before or on the last day of the semester
F04 - 4th Week Start
- Sections start the fourth week of the semester but end before or on the last day of the semester
F05 - 5th Week Start
- Sections start the fifth week of the semester but end before or on the last day of the semester
F06 - 6th Week Start
- Sections start the sixth week of the semester but end before or on the last day of the semester
F07 - 7th Week Start
- Sections start the seventh week of the semester but end before or on the last day of the semester
F08 - 8th Week Start
- Sections start the eighth week of the semester but end before or on the last day of the semester
F09 - 9th Week Start
- Sections start the ninth week of the semester but end before or on the last day of the semester
F10 - 10th Week Start
- Sections start the tenth week of the semester but end before or on the last day of the semester
F11 - 11th Week Start
- Sections start the eleventh week of the semester but end before or on the last day of the semester
F12 - 12th Week Start
- Sections start the twelfth week of the semester but end before or on the last day of the semester
F13 - 13th Week Start
- Sections start the thirteenth week of the semester but end before or on the last day of the semester
F14 - 14th Week Start
- Sections start the fourteenth week of the semester but end before or on the last day of the semester
F15 - 15th Week Start
- Sections start the fifteenth week of the semester but end before or on the last day of the semester
FM - Manual Part of Term
- The meeting days for sections are outside of F, FP1, FP2, F01 - F15 parts of term
- Custom start and end dates for FM part of term must be within the semester in which a section is scheduled and is required to follow the academic calendar.
FDE - High School/Dual Enrollment/Tech Prep
- Sections taught in high schools for secondary students.
FYS - Full Year Spring
- Sections that meet for 6 months or more starting in the spring
FYL - Full Year Summer
- Sections that meet for 6 months or more starting in the summer
FYF - Full Year Fall
- Sections that meet for 6 months or more starting in the fall
- Earn an Accosiate of Arts in a Year sections only
- Veternary Medicine section only
- FM - Manual Part of Term
- F01 - F15 (only if custom dates are entered in the meeting patterns.)
- FDE- High School/Dual Enrollment/Tech Prep
- FYS - Full Year Spring
- FYL - Full Year Summer
- FYF - Full Year Fall
The variable credit range appears in light gray as "# to #". To let students choose their credit amount within this range, leave the field as-is. To set a specific credit amount, enter that number in the field. Sections can't be offered for credits outside the range of what is listed in the Catalog, and the range can't be shortened, only locked at a specific amount or left open as the full range.
Non Variable:
Variable:
If "Not Viewable on Search, Cannot Register" is selected the section will not be viewable and students will not have the ability to register through UAOnline.

There are three options:

- Yes - general-use classroom on Troth Yeddha' campus needed (only use this one if the instructor truly needs a general-use classroom for the final)
- Yes - No room needed for final (use this option if the section is not already scheduled in a general-use classroom and the instructor doesn't require one for the final exam)
- No Final Exam - Section does not have a final exam
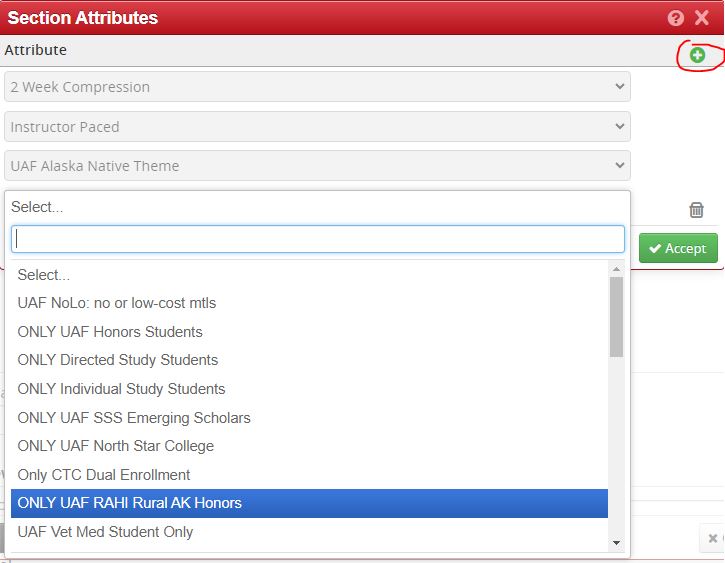
| CLSS Name | Description |
|---|---|
| UAF NoLo: no or low-cost mtls | To show this section has no or low cost materials |
| ONLY Directed Study Students | To indicate that only students taking the course as a directed study can enroll |
| ONLY Individual Study Students | To indicate that only students taking the course as a individual study can enroll |
| ONLY UAF SSS Emerging Scholars | To indicate Student Support Services Emerging Scholars Academy |
| ONLY UAF North Star College | To indicate it is a UAF Middle College Section |
| Only CTC Dual Enrollment | To indicate CTC Dual Enrollment sections |
| UAF CLA Co-Sponsored | To indicate if this course is a CLA Co-Sponsored |
| UAF- Anchorage | To indicate if a section is taught in Anchorage |
| UAF- Juneau | To indicate if a section is taught in Juneau |
| ONLY UAF Honors Students | To indicate this is an honors section to students and to code accordingly |
| CRCD Tech Prep | To indicate if this course is a CRCD Tech Prep |
| CTC Tech Prep | To indicate if this course is a CTC Tech Prep |
| Co-requisite | To Show schedulers this course has a co-requisite |
| Instructor Paid for by CRCD | Internal when eCampus course has an instructor pain for by CRCD |
| Instructor Paid for by CTC | Internal when eCampus course has an instructor pain for by CTC |
| UAF CRCD Co-Sponsored | To indicate if this course is a CRCD Co-Sponsored |
| UAF CRCD Cross-regional | To indicate if this course is a CRCD Cross-regional |
| UAF CTC Co-sponsored Course | To indicate if this course is a CTC Co-Sponsored |
| Only UAF Dual Credit Course | To indicate if this course is a Dual Credit Course |
| UAF Eielson AFB | To indicate if a section is taught at Eielson Air Force Base |
| UAF Ft Greely | To indicate if a section is taught at Ft Greely |
| UAF Ft Wainwright | To indicate if a section is taught at Ft Wainwright |
| ONLY UAF RAHI Rural AK Honors | Indicate if a section is part of UAF RAHI Rural AK Honors Inst |
| UAF SOE Sponsored | To indicate if this course is a UAF SOE Sponsored |
| UAF Summer Sessions Sponsored | To indicate if this course is a UAF Summer Sessions Sponsored |
| UAF Vet Med Student Only | To let students know it is for Vet Med Students Only |
| Bristol Bay Tech Prep Credit | To indicate if this course is a BB Tech Prep |
| Chukchi Tech Prep Credit | To indicate if this course is a Chukchi Tech Prep |
| I-AC Tech Prep Credit | To indicate if this course is a IAC Tech Prep |
| Kuskokwim Tech Prep Credit | To indicate if this course is a Kuskokwim Tech Prep |
| Northwest Tech Prep Credit | To indicate if this course is a NW Tech Prep |
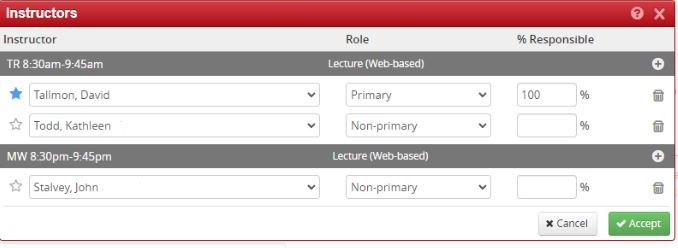
To edit, delete, or add an instructor click the blue pencil icon.
The dropdown list of instructors only shows those assigned to the unit. If they are
not in the dropdown, click Other... and search again. This will search all instructors
at UAF.
-
Searching for Instructors:
- Preferably search by UA ID number.
- If the ID number is unknown, search by last name, first name.
-
Adding Instructors:
- Ensure all instructors are in the instructor/advisor table.
- For first-time instructors, submit the CLSS Missing Instructor Approval Form.
-
Instructor Roles:
- Primary Instructor:
- Only one per section.
- Manages grading and student overrides.
- A blue star marks the primary instructor in CLSS scheduling.
- The Snapper tool uses this to show their occupied times with a red bar.
- Primary Instructor:
-
Primary Role and Blue Star:
- An instructor can have a blue star without being the primary.
-
Calculating Percent Responsibility:
- Instructors' total responsibility must sum to 100%.
- Assign any combination of percentages as long as they total 100%.
-
Assigning Instructors to Meetings:
- Meeting patterns appear at the top of the Instructors window.
- By default, all instructors are assigned to all patterns.
- To designate responsibilities, click a meeting pattern line to separate them.
- Ensure total responsibility across all patterns equals 100%.
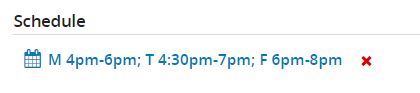
The Schedule area provides a summary of the section's meeting patterns and serves as a link to the Snapper. Every section has at least one meeting pattern, even if it's labeled "Does Not Meet."
To open the Snapper, click on the displayed meeting pattern. To remove all scheduled meeting patterns, click the X. Various aspects of a section affect the schedule; refer to the quick links below for related pages and processes.
Snapper
The Snapper is the scheduling interface for CLSS. It displays the section being scheduled along with related sections. Named for its ability to "snap" sections into standard meeting times when hovering over the time grid, its default view shows all sections of the same course, but you can add other courses of interest as well.
Heat Map

The fire icon in the Snapper functions just like the Visualize/Heat Map tool (see tools) from the schedule view.
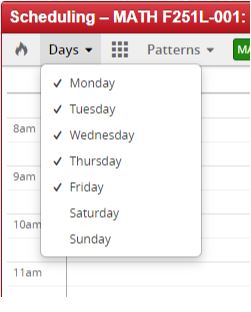
Days
The Days drop-down allows the addition or removal of days from the schedule. By default, weekends are excluded they will need to be selected. To include weekends go here and select them.
Patterns
The Patterns drop-down displays potential meeting schedules for a section. These schedules depend on the Type of Instruction and the credit count listed on the course shell at the catalog level, excluding credit distribution. Understanding the course distribution is crucial for ensuring adequate contact hours when scheduling courses.
Meeting Patterns appear in this format:
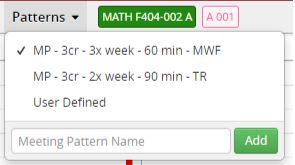
MP stands for meeting pattern, next is the number of credits, followed by the distribution
(lecture hours |lab hours) then the days and the minutes per pattern.
Day Initials are as follows:
M = Monday T = Tuesday W = Wednesday R = Thursday F = Friday S = Saturday U = Sunday
Selecting a meeting pattern then clicking on the calendar will schedule a meeting
pattern for the section. To view the meeting type, room and dates for the pattern
just created, or to add a second meeting pattern click on “Meetings” in the lower-left
corner.
User-Defined Meeting Pattern:
If a section cannot fit into standard meeting blocks, a user-defined meeting time can be set. Follow these steps to assign a User Defined Meeting Pattern:
- In the Patterns dropdown, select "User Defined." The menu may close and reopen.
- Enter the desired meeting pattern in the "Day initial, start time - end time" format in the Meeting Pattern Name text box at the bottom. For example, for meetings on Monday and Wednesday from 8:00 am to 4:00 pm, enter "MW 8:00 am - 4:00 pm."
- Click Add to apply the pattern.
For further management of meeting details:
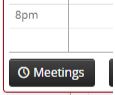
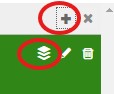
- Click the Meetings button to view meeting details for a section.
- Use the green plus icon to add new meeting patterns, the pencil icon to edit existing ones, and the trash icon to delete them. The pattern highlighted in green is the one being edited or deleted.
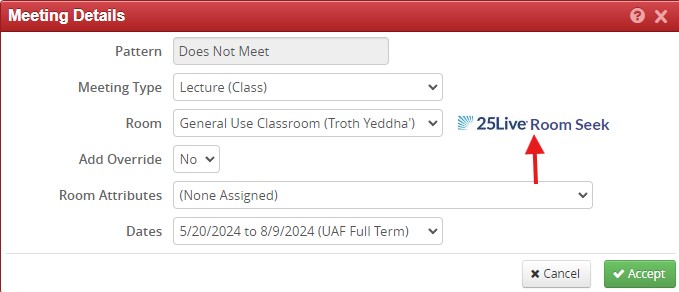
- To adjust Type, Room, and Dates, click the pencil icon to open the Meeting Details window.

- To change the pattern itself, select it and use the calendar or the User Defined Meeting Pattern tool.
Normally, meeting patterns use Default Dates, which match the standard start and end
dates for the section's Part of Term. To specify specific dates, use the Meeting Details
tool after selecting a pattern.
Note: Multiple meeting patterns may be required for sections with more than one delivery method. Ensure the Meeting Type matches the delivery method or Schedule Type from the catalog.
After entering meeting patterns, do not click the red X at the top of the snapper, as this will discard changes. Instead, click the small grey x, then click Accept
at the bottom right-hand corner of the snapper to save your changes.
Meeting Types:
The meeting type lists how a section will be delivered. Schedulers must specify a meeting pattern and select the appropriate meeting type for each delivery method. To update the meeting type:
- Click the Meetings box.
- Click the pencil edit icon.
- In the meeting type drop-down, select the option ending with (meeting type will be listed).
- Click Accept.
- Click the small grey X next to the green plus sign.
- Click Accept again.
- Save your section.
Note: For multiple delivery methods, create a separate meeting pattern for each. The
meeting type must match the Schedule Type from the catalog.
List of meeting types:
- (Class): Meeting is held Face-to-Face.
- (Arranged): Meeting is Arranged.
- Seminar (no parentheses): Schedule type is a seminar.
- (Audio Conference): Meeting is held via Audio Conference, distinct from Zoom.
- (Video Conference): Meeting is held in a specific location like a classroom; students must attend in person (not distance learning).
- (Lab): Meeting type is a Lab, and Schedule Type is Combined Lecture/Lab.
- Lab (no parentheses): Schedule type is a Lab.
- (Web-based): Meeting is held online, either synchronously or recorded for asynchronous viewing.
- Studio (no parentheses): Schedule type is a Studio.
- (Field): Meeting type is fieldwork.
- Field (no parentheses): Schedule type is Field.
- Thesis (no parentheses): Schedule type is Thesis.
- Research (no parentheses): Schedule type is Research.
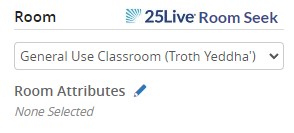
The Room section of the Section Edit window includes the Room Selection drop-down
and integrates with 25Live Room Seek.
Classroom scheduling protocols must also be followed when requesting locations at UAF.
Selecting a Room:
- The Room Selection drop-down displays eligible locations for each scheduling unit. Information is sourced from Facility Services, departments, and colleges. If a room's ownership is incorrect or needs updating, fill out the Missing Location in CLSS form.
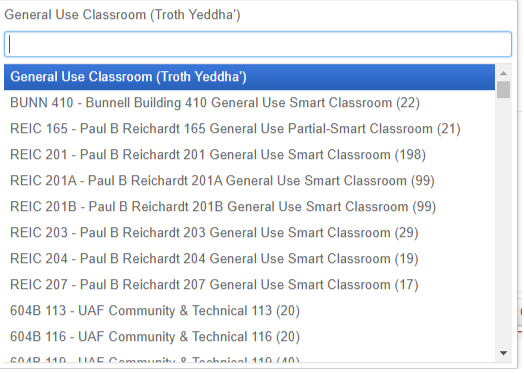
- In addition to departmental rooms, the drop-down includes general-use classrooms available to all units.
- Note: Avoid listing a General Use Classroom at Troth Yeddha` Campus if it's unnecessary to prevent automatic assignment by the Registrar’s Office. Contact the Curriculum Management Team if you can't find a location.
Room listings show Building Code, Room Number, Room Name, and maximum capacity from Banner. Ensure section capacity doesn't exceed Design and Construction's occupant load for locations. If a room is assigned, the drop-down displays it for single-room assignments; otherwise, it shows "Multiple Rooms" requiring editing in the Schedule.
Searching for "Other Room..." displays less common or possibly unused locations.
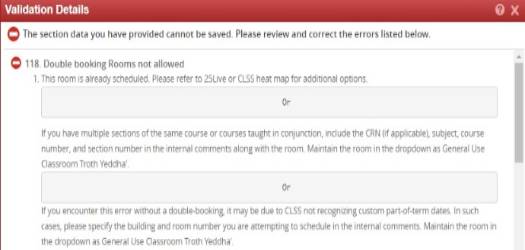
Rule 118 - Double Booking Rooms:
- This error occurs if a location is in use during the specified days and times. For two sections with the same instructor at the same time, list the location and the other section's details in the internal comments, leaving the location as a general-use classroom.
- If this error appears incorrectly (without double-bookings), CLSS may not recognize custom start and end dates; follow the same steps as above.
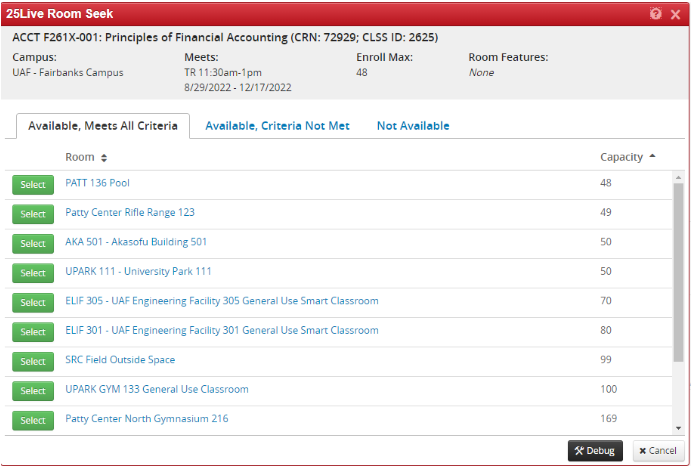
25Live Room Seek:
- Available in Refine Mode for schedulers, 25Live Room Seek displays location availability and allows selection directly from this screen by clicking the green select button.
- Hover over blue location information to view details in 25Live, redirecting to the site for features, layouts, and availability.
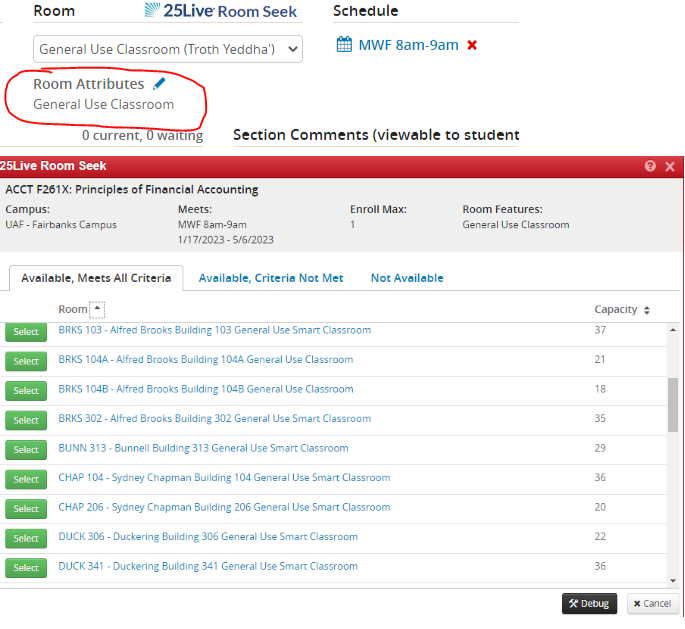
Room Attributes:
- Use Room Attributes in 25Live Room Seek to refine searches by location features (e.g., Computers, Ceiling Microphones).
- Select an attribute from the dropdown in 25Live Room Seek to see available locations for specified meeting days and times, particularly useful for selecting General Use Classrooms.
- Accurate estimates of expected class size help select the proper classroom size and reduce room changes after the semester starts.
- Consult Academic Scheduling when significantly increasing enrollment or consolidating sections to ensure classroom availability.
- Enrollment history or anticipated increases will be used to determine classroom size. Enrollment limits should be reviewed and adjusted based on actual previous term enrollments, with an estimated increase no more than 15%. Justification in writing is required for increases greater than 15%.
In the “Comments” field, you can trigger several processes such as:
- Adding section fees
- Indicating cohorts
- Specifying section co-requisites
- Providing reasons for cancellation
- Requesting a location when hidden by the Registrar’s Office
- Ensuring sections are in the same location (rule 118.)
- Including other important internal information not visible to students
- Labeling eCampus courses as Rural Campus sponsored
Some fields trigger fatal error messages that require specific information to be copied and pasted into the comments, such as if "Does Not Meet" is listed for the meeting days and times, Honors Cohort Code, and Co-requisite. If it is important for internal use, please list it here.
| Heading 1 | Heading 2 |
|---|---|
| CD# | New course description code. Used to overwrite the catalog-level course description that exists for the class in CIM and the Catalog. This is only available for F001-F049 (Non-credit), F-92 (Seminar), F-93 (Special Topics) and F-94 (Trial Courses). We never override/add custom catalog course descriptions for courses listed in the catalog. |
| SN# Notes: | Section notes that are student-facing in UAOnline, used to notify students of important information like extra fees or equipment. |
| PR# Prerequisites | Enter any prerequisites that have been approved for F-93 (Special Topic) and F-94 (Trial Courses). We do not list or add custom prerequisites to existing catalog courses. |
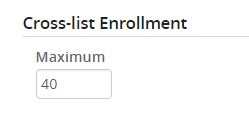
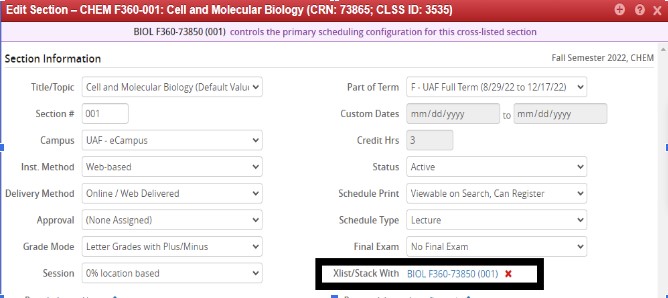
Ensure the total does not exceed the room's capacity. For more details on cross-listing and stacking, refer to the Xlist/Stack With page of this document.
How To's
To cancel a section that is cross-listed or stacked with another section, follow these steps:
- Access the child section (where the cross-listing/stacking occurred).
- Remove the parent section from the xlst area and submit the changes.
- If canceling only the child section, removing the parent section from the xlst area allows both to be canceled simultaneously upon submission.
This process involves just two steps if it's the only change needed. After completing these steps in the workflow, proceed to cancel the section as required. The same steps apply if both sections need to be canceled.
If the sections were manually cross-listed or stacked by an Academic Scheduling Specialist and cannot be edited in CLSS, contact them directly to remove the cross-listing or stacking.
Room Seek also takes into account any events that are not scheduled through CLSS to make sure the schedulers are viewing accurate availability of locations.
To Use:
- For best results select room attributes.
- From the Edit Section form with the “Room” field.
- From the CourseLeaf Snapper on the bottom left of the window.

- From the Meetings Details screen:
When selected, this powerful solution runs an availability search in batches of 10 against all of the spaces that UAF allows individuals to potentially book at that point of the scheduling cycle. The results of that search will return a screen like the following:
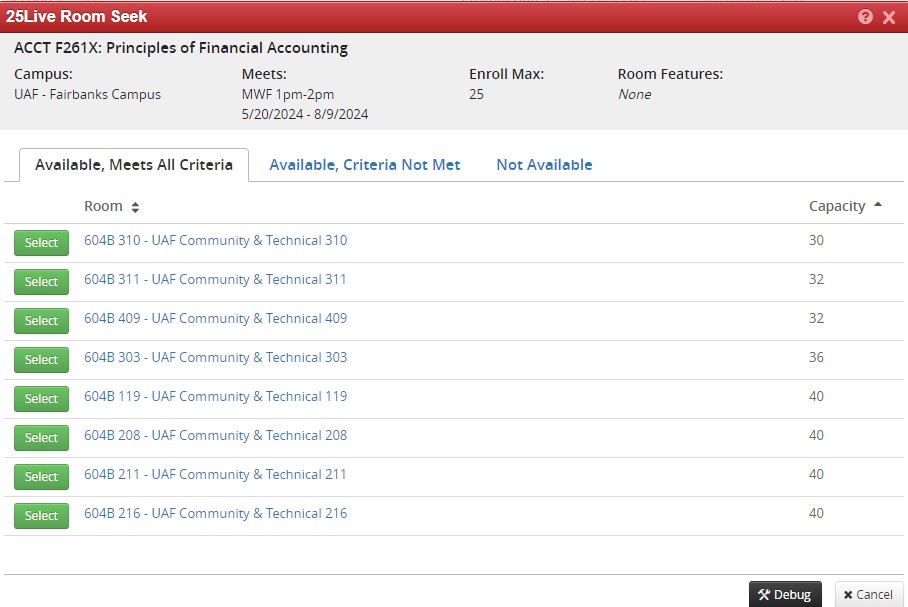
At the top, highlighted in gray, will be all of the data points CLSS uses for its space search. It will then check all meeting days for the entire range of dates the section runs. If there are any conflicts for a room on any of the dates, the room will show under “Not Available”. It is only spaces that are free on ALL dates that will show up as available. If a room is available on all dates, the final two data points, enroll max and room features, are used to determine which “Available” category a room is placed under.
- Navigate to meetings.
- Enter the meeting days and times for the first meeting pattern. (this should be the in person portion)
- Select the plus + sign or the copy icon.
- Select the meeting pattern if you used the plus sign and then enter the meeting days and times for the new pattern.
In Person And Online:
- Navigate to meetings.
- Enter the meeting days and times for the first meeting pattern. (this should be the in person portion)
- Select the plus + sign.
- Select the meeting pattern if you used the plus sign and then enter the meeting days and times for the new pattern in Patterns.
- Select Other/Long Title/Subtitle
- A previous title may be selected from the dropdown, however, it is highly recommended to enter the title manually.
- Enter the transcript title (30 character limit, be mindful to abbreviate if needed with clear indication of what the title is).
- In the Long Title area be sure to list the Catalog Title and add a colon after and then list the subtitle/long title.
-
- This is only available for F001-F049 (Non-credit), F-92 (Seminar), F-93 (Special Topics) and F-94 (Trial Courses). We never override/add custom catalog course descriptions for courses listed in the catalog.
- CD# - This indicates it is a course description and it must be an exact match to what is on the approval form.
- SN# Notes: - This indicates any pertinent information students may need in order to register or to be aware of such as fees, who to contact regarding the section, etc.
- PR# Prerequisites: - This indicates the course has prerequisites and they are required
to match what is listed on the approval form.
- The Academic Scheduling Specialist will also code these in CLSS for the scheduler for the section.
- Click the pen icon in "Section Comments".
- type CD#, space, copy and paste the course description after CD#.
- The box will then turn read as there is a 60 character limit on each line.
- estimate where the character limit is and hit enter, do this until the box is now longer red.
- If there are notes type SN# Notes:, space, and enter any notes.
- Repeat the above steps to clear the red out of the box.
- If there are prerequisites listed on the approval form type PR# Prerequisites: and enter what is listed on the approval form.
What is the difference between a Directed Study and an Individual Study?
Directed Study
Directed Study is used when a course listed in the UAF Course Catalog, is not being offered during the current semester. All information should be the same as it is listed in the UAF Course Catalog.
- NOTE: This includes courses in No-Print Status; please double-check CIM.
Individual Study (Course numbers will always end in 97)
Individual Study is used when a course is not listed in the UAF Course Catalog.
- NOTE: This does not include courses in No-Print Status; please double-check CIM to be sure the course doesn’t actually exist or has been deactivated.
Individual studies can also be used if there will be significant changes to a course offered in the catalog.
- EXAMPLES: Changing the grade mode from letter grade to pass/fail; changing the course level from F300 to F600; if the number of credits will be different if not listed as variable in the UAF Course Catalog.
Step I:
Scheduling is done by the department unit scheduler in CLSS. These can only be created while in Refine Mode after registration begins and are required to be submitted by the 1st Friday of full-semester instruction starting in Fall 2023.
To schedule a DIRECTED STUDY section in CLSS, use the following settings:
- Schedule/Print = Viewable on Search, Can Register
- Schedule Type = Directed Study
- If the Directed Study option is not available, contact UAF-curriculum@alaska.edu
- If anything other than Directed Study is selected, the section will be rolled back
- Section Attribute = ONLY Directed Study Students
- Max Enrollment = 5 (or less)
- If more than one student will be enrolled, adjust the max enrollment in CLSS for each student so they can be registered
- Internal Comments = Enter the number of contact hours per week student(s) will have with the instructor
- If this information is left blank or a variable amount is entered, the section will be rolled back
- Internal Comments = Enter the number of hours per week student(s) will be working independently
- If this information is left blank or a variable amount is entered, the section will be rolled back
- DO NOT include sensitive student information such as the name of the student
To schedule an INDIVIDUAL STUDY section in CLSS, use the following settings:
- Transcript Title and Long Title = Title of the course
- DO NOT include sensitive student information such as the name of the student
- Schedule/Print = Viewable on Search , Can Register
- Schedule Type = Individual Study
- This option will only show for course numbers ending in 97
- Section Attribute = ONLY Individual Study Students
- Max Enrollment = 5 (or less)
- If more than one student will be enrolled, adjust the max enrollment in CLSS for each student so they can be registered
- Internal Comments = Enter number of contact hours per week student(s) will have with the instructor
- If this information is left blank or a variable amount is entered, the section will be rolled back
- Internal Comments = Enter the number of hours per week student(s) will be working independently
- If this information is left blank or a variable amount is entered, the section will be rolled back
IMPORTANT NOTES
For students to be in the same Directed or Individual Study CRN, the information submitted in CLSS must be identical for the following:
- contact hours per week with the instructor
- hours per week worked independently
- instructor
- amount of credits
- credits for Individual studies cannot be entered as blank or variable credits
There should be no sensitive student-identifying information listed anywhere in CLSS.
Students will now enroll themselves in the course in UAOnline. Sections must be scheduled
before the add-drop deadline each semester.
Step II: For Individual Study (F*97) Syllabus
The syllabus is submitted via a NextGen form from the Registrar’s website and should be initiated by the department admin or instructor only, never the student.
- The individual study section must be created in CLSS before you submit the NextGen form so the CRN is ready and active for students to be registered promptly into the course. If the CRN doesn’t match the section created in CLSS, the NextGen will be routed back to the initiator, causing delays in registration.
- Individual Studies require an attached syllabus.
- If more than one student will be enrolled, adjust the max enrollment in CLSS for each student so they can be registered.
- Open the edit window and change the status to "Cancelled."
- Click the red X next to the meeting pattern in the "Schedule" area (if it appears).
- Select "No instructor."
- Set enrollment maximum and waitlist to 0.
- If there's only one location, select "No room needed."
- Enter "Cancelled (reason for cancellation)" in the internal comments.
- Save the section to submit it to the workflow.
- Navigate to CLSS Tools "FIlter"
- Navigate to "Rooms"
- Enter the Room ID (if listing more than one use a comma to separate each location)
- Room ID example: GRUE 307
-
- or
-
- Enter the Building Code, example GRUE or FS314 (FS starts only in spring 2025). this will pull all sections scheduled in rooms associated with that building.
- Room ID example: GRUE 307
- Click the green "Apply" button.
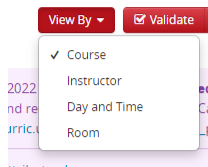
- Sort using "View By" if desired.
CLSS Tools

The Validate button runs every section in the scheduling unit being viewed against all CLSS Rules, displaying every failed section. Failed sections result in either Workflows, Warnings or Errors. Of those only Errors require correction.
Hovering over a red shade reveals the number of sections at that time. Lighter shades mean fewer sections, darker shades mean more sections.
Clicking on the heat map shows detailed information, including sections starting earlier but overlapping the selected time.
A shaded bar at the top of the schedule grid shows section density. The far-left number indicates the fewest sections, and the far-right number shows the busiest time. A smaller blue bar indicates the number of sections that do not meet.
Filters help you search for classes that meet specific criteria, such as those taught
by a particular instructor or held on a certain day. Filters use the information and
codes you provide to generate the desired list of sections. The criteria are based
on what schedulers know about their schedule and class patterns. Here is an example
of how to create a filter:
In the Filter Sections window, add the criteria for your search. For example:
- Course > Subject Code: BIOL (finds all courses with the BIOL prefix)
- Section > Status Code: A (finds active sections, not canceled)
- Campus Code: F (finds sections at the Fairbanks Campus)
In the Filter Sections window, it looks like this: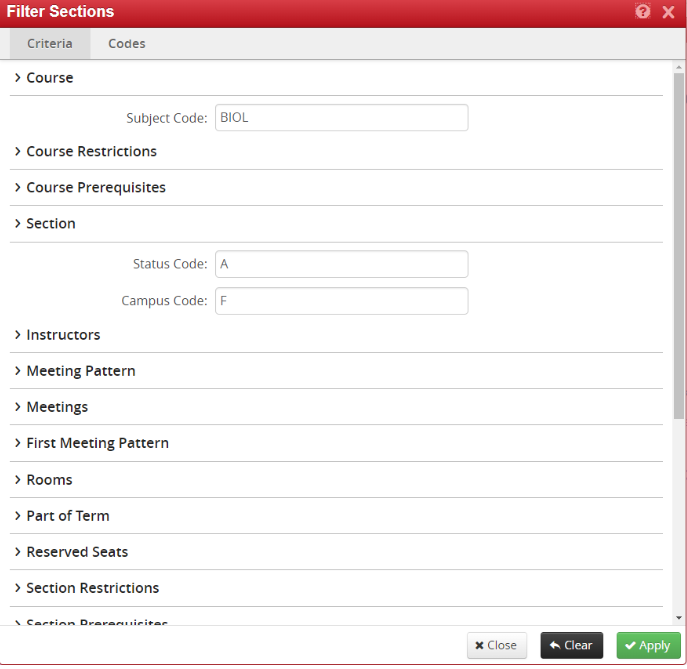
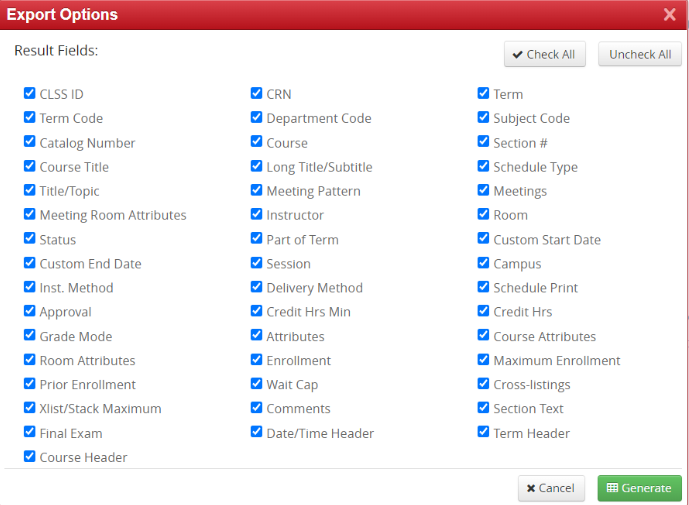
When happy with the parameters, click the green Apply button and check the list. If the filters are applied correctly the list of sections being viewed will meet expectations. Lists can be exported as an Excel File (.csv) or PDF using the “Export” button. Or can be saved as a URL and re-run the filter again and again.
Filtering for sections does not cause changes, feel free to play around with it. Or
contact the Curriculum Management Team and request that we create a filter.
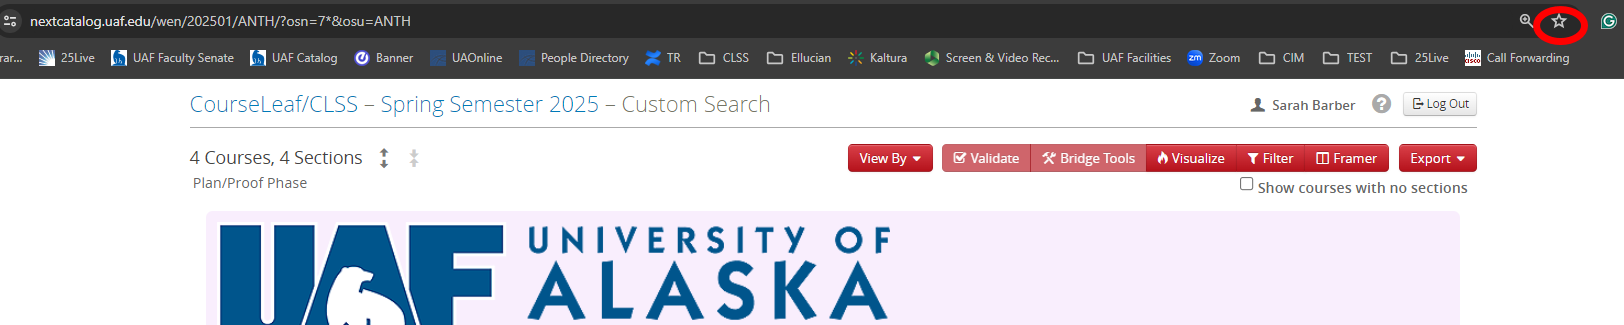
Filters can also be bookmarked for reuse.
- Once a filter is run select bookmark on the top of the page.
| Keyword or Symbol | Description of Use |
|---|---|
| ! | Not |
| , | Match any of the items in the comma-separated list |
| = | Exact match, ignoring other special characters |
| ? | One wild card character |
| * | 0 or more wild card characters |
| > | Greater than |
| >= | Greater than or equal to |
| < | Less than |
| <= | Less than or equal to |
| :: | Range |
| same | Field's value is the same as the corresponding field in another group |
| NUM | Numeric |
| ALPHA | Alphabetic |
| ALPHANUM | Alphanumeric |
| [0-9] | Matches one character (Number) from the range given in the bracket |
| [A-Z] | Matches one character (Capital Letter) from the range given in the bracket |
| [a-z] | Matches one character (Lower Case Letter) from the range given in the bracket |
| [A-Za-z] | Matches one character (Any Letter) from the range given in the bracket |
| [^wW] | Matches one character that is not a W of either case |
| Keyword or Symbol | Description |
|---|---|
| @ | Any (i.e., @LAB would find sections that will allow students to register for any lab) |
| # | Multiple (i.e., #LAB would find sections that will allow students to register for a number of different labs) |
Excel:
PDF: