25Live Help Guide
25Live User FAQS
What Is & Why Should I Start Using 25Live
-
Campus-Specific Features: 25Live is designed specifically for educational institutions, offering features tailored to scheduling classrooms, events, and campus resources, which Google Calendar does not provide.
-
Integration with Campus Systems: 25Live integrates seamlessly with other campus management systems, such as CLSS and Banner, ensuring a cohesive and efficient scheduling process.
-
Resource Management: 25Live allows for detailed management of campus resources, including rooms, equipment, and facilities. It helps prevent double-bookings and ensures optimal use of available resources.
-
Compliance and Reporting: 25Live supports compliance with regulations like the Clery Act by maintaining accurate records of events and space usage. It provides reporting tools to help with campus safety and resource allocation.
-
Centralized Scheduling: 25Live provides a centralized platform for all campus scheduling needs, ensuring consistency and reducing conflicts. It allows administrators to see and manage all campus events in one place.
-
Advanced Functionality: 25Live offers advanced features such as automated workflows, approval processes, and notifications, which enhance efficiency and communication within the institution.
In summary, 25Live is purpose-built for the needs of educational institutions, offering comprehensive and integrated scheduling, resource management, and compliance features that Google Calendar lacks.
You can view this information in the Upcoming Class Scheduling Deadlines Calendar.
25Live will be open for reservations of events in the "Review Phase" of the above calendar each semester.
What is Publisher?
Publisher is a tool that uses 25Live data to populate calendars that can then be customized to fit the functional and aesthetic needs of your institution. Publisher provides a variety of formatting options for event data, including basic calendars, rolling lists, and tile views. Once a feed is customized, Publisher generates code that can be embedded into public-facing or internal websites.
To list an event in the Publisher:
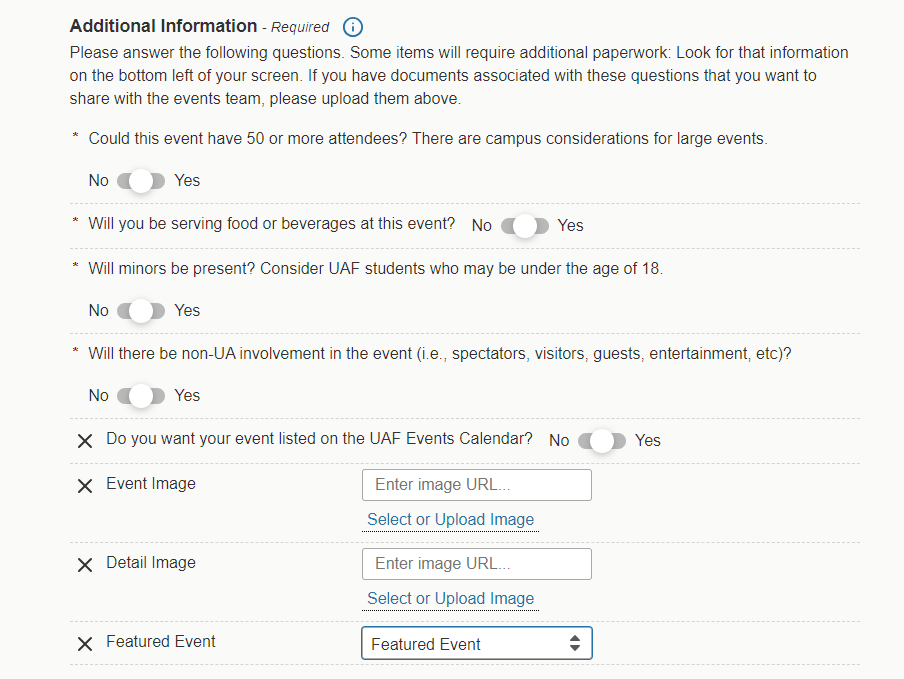
- When filling out the event form select yes to "Do you want your event listed on the UAF Events Calendar"
- Add an Event Image and Detailed Image
- Select Featured Event
Express Scheduling in 25Live is a streamlined feature designed to quickly and easily reserve a space for short, simple events without needing to go through the full event creation process. Here are the key aspects of Express Scheduling:
-
Quick Reservations: Allows users to reserve a space in just a few clicks, ideal for brief, straightforward events like meetings, study sessions, or impromptu gatherings.
-
Simplified Interface: Provides a simplified, user-friendly interface that focuses on essential details such as date, time, location, and basic event information.
-
Immediate Confirmation: Often offers immediate confirmation of space availability and booking, reducing wait times and administrative overhead.
-
Pre-Defined Spaces: Typically allows reservations for a limited set of pre-defined spaces that are frequently used for short events, ensuring quick access and reducing complexity.
-
Time Limits: Usually includes a restriction on the duration of the event to ensure that spaces are available for others and to maintain efficient space utilization.
-
Accessibility: Makes it easy for a wide range of users, including students, faculty, and staff, to book spaces without needing extensive training or detailed knowledge of the system.
**Users are required to request this by contacting uaf-academic-scheduling@alaska.edu for their owned spaces.**
**Express Scheduling will not publish events in Publisher**
Creating an Event
Best practice is to not create an event that is happening that same day.
If the individual that created the event is not responding and an adjustment is needed as soon as possible, please reach out to uaf-academic-scheduling@alaska.edu or uaf-university-relations@alaska.edu.
There are a few reasons why you might be able to see a location in 25Live but not be able to request it:
-
Permission Restrictions: You might not have the necessary permissions to request the location. Different users can have different levels of access based on their roles and responsibilities.
-
Location Status: The location might be viewable but not available for booking due to its status. It could be reserved for specific events, under maintenance, or otherwise restricted.
-
Date and Time Restrictions: The location may be available to view but not requestable for the specific date and time you are interested in. It could be already booked or not available during that period.
-
Setup and Teardown Time: Some locations require setup and teardown time which might conflict with your requested time, making it unavailable even if it appears open on the schedule.
If you continue to have issues, it is best to contact uaf-academic-scheduling@alaska.edu or uaf-university-relations@alaska.edu for further assistance. They can provide more details about specific location policies and help resolve any access issues.
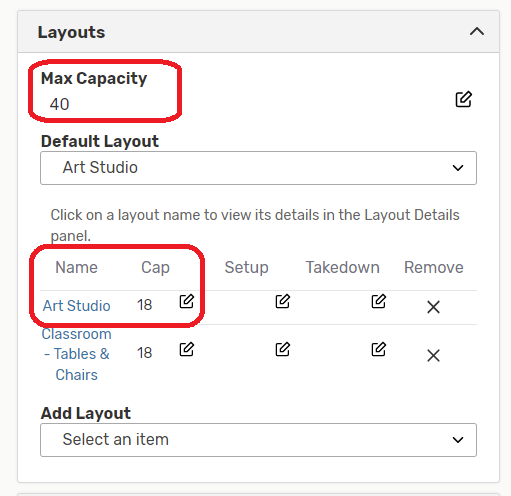
When looking for location availability in 25Live Event Form, it does not compare the expected headcount of the event to the maximum capacity
of each location except as a warning after a location that is too small has been selected,
and this warning is not related to layout capacities themselves–only the location's
maximum capacity. It's up to the assigning scheduler to know whether a given layout
is too small for their event needs.
Note: Most locations are set up to have a default capacity of "Student Seating".
The "Max Capacity" is the maximum amount of individuals that can occupy the space without furniture.
- Spectators
- Visitors
- Guests
- Entertainment
- Audience
- Performers
- Outside Groups
Do be aware that the audit trail lists the individuals UAID and not their name, if you require assistance with identifying an individual in the audit trail please reach out to uaf-academic-scheduling@alaska.edu.
To view an event's audit trail:
1. Find the Event
Search for the event you wish to delete or choose from your dashboard starred events.
Tap or click on the event name to view the event's details.
2. Use the Audit Trail Link
In the event's details view, use the Audit Trail link to go to that section. You can
click the Date, User, or Action column header to sort the entries by that data.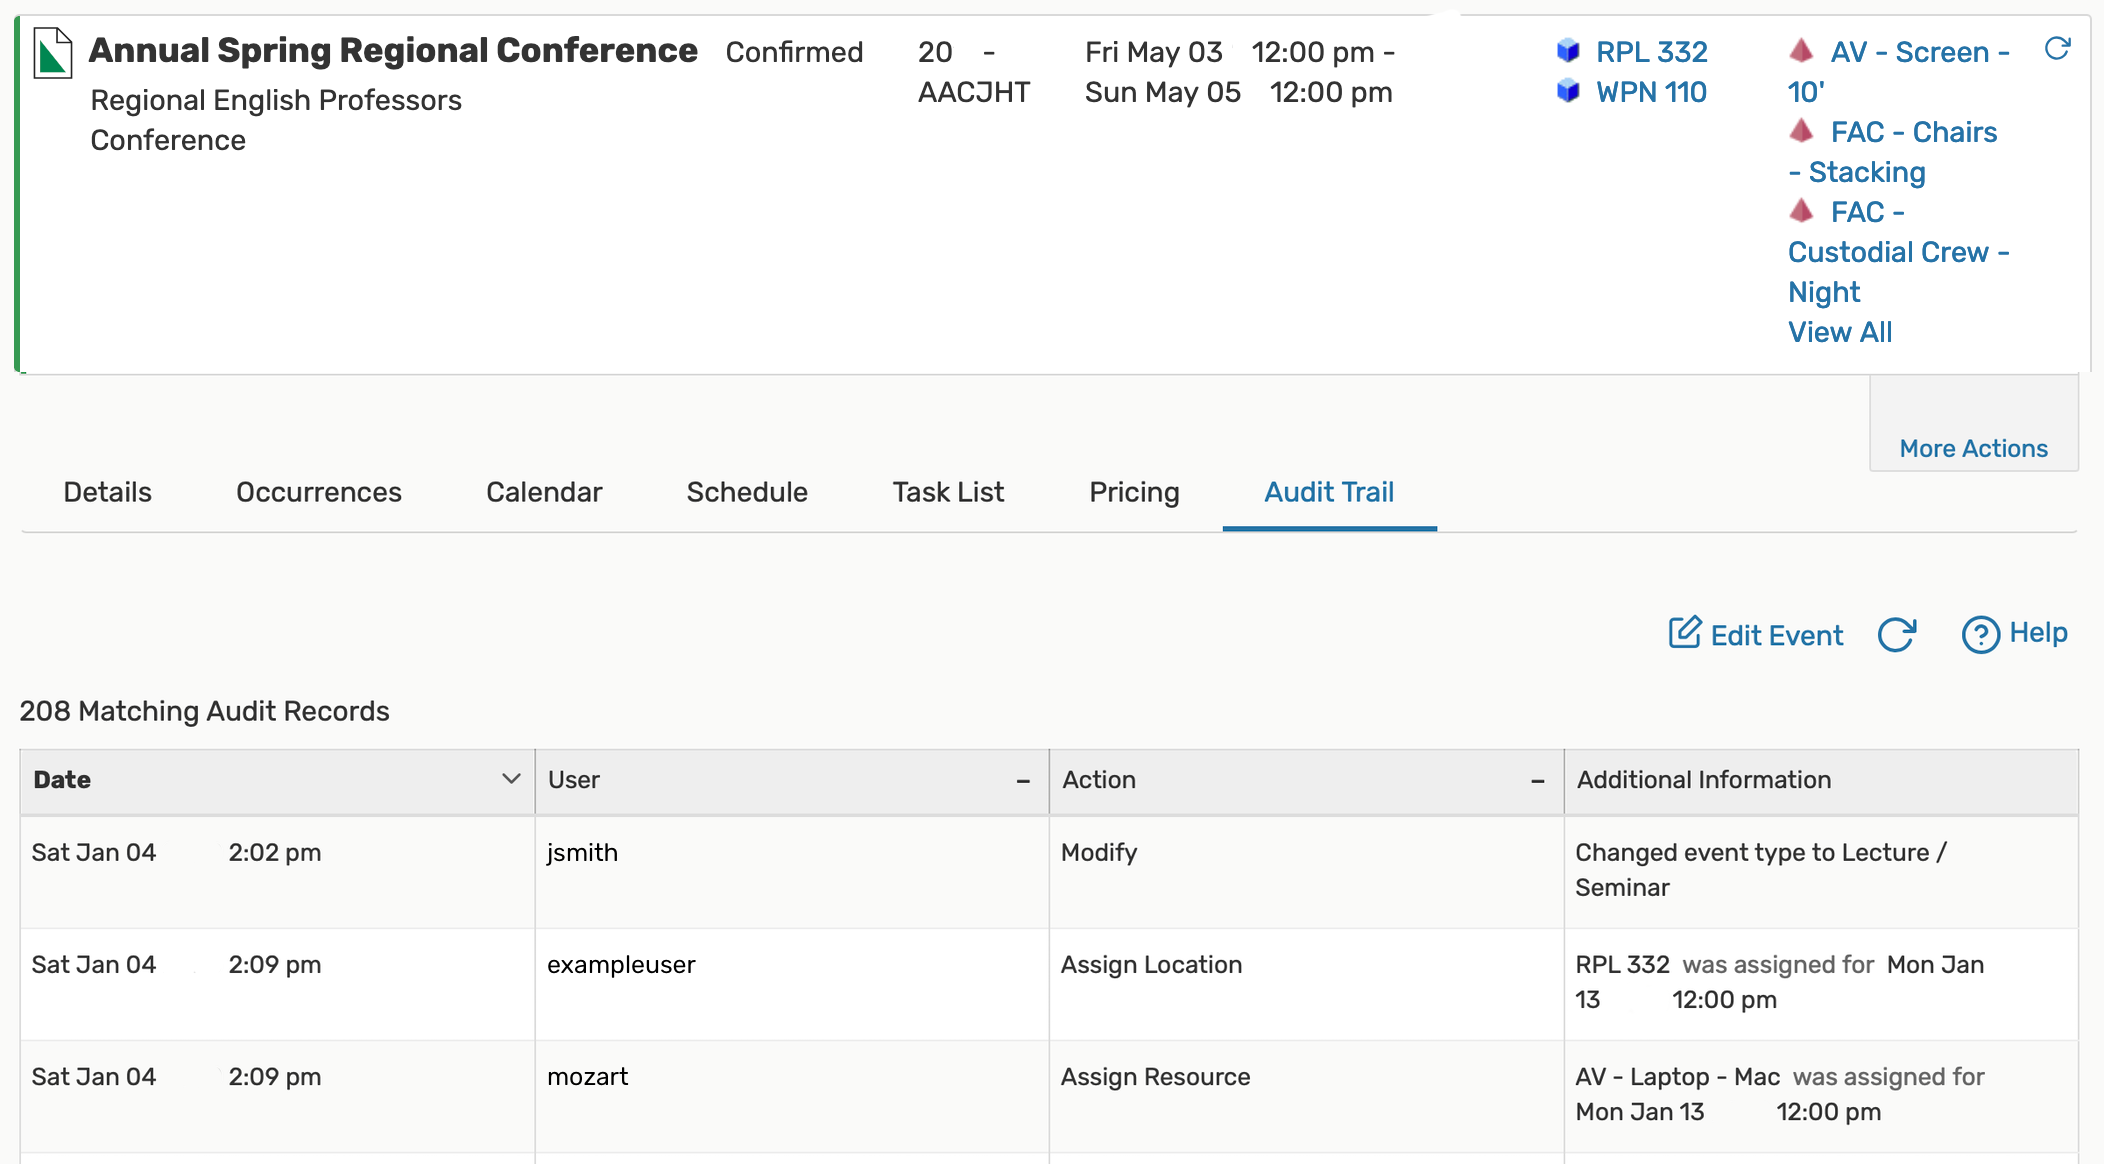
You will see that the audit trail also displays location, resource, and organization changes.
During Your Event
However, if the need arises, contact the following for assistance:
For spaces that are Key Access:
For spaces with Swipe Card Access:
For spaces with Key Code Access:
- Contact the location scheduler
Other FAQs
The 25Live system ensures that all locations and events are logged, providing essential information for campus safety and security.
The data collected can be used to monitor and report incidents, enhancing transparency and compliance with the Clery Act's requirements for reporting campus crime statistics and ensuring timely warnings and emergency notifications.
- Office of the Chancellor Memo: Clery Act Compliance and Authority
Starring your favorite events, locations, resources, organizations, and contacts gives you quick access to the objects you work with most often.
- A filled star
 icon next to an item indicates the item is currently a favorite
 - Tap or click the filled star
") icon to remove that object from your favorites
icon to remove that object from your favorites - Tap or click the empty star
") icon to add that object to your favorites
icon to add that object to your favorites - Starred events, locations, resources, organizations, and contacts are available in a default pre-defined group listed in the Saved Searches choices in the Search section.
Tip: Favoriting Copied Searches:
- New searches created by sharing from other users are created as unstarred/unfavorited searches. If the user who receives the copied search wants to use it with a report, they must first mark the search as starred.
Security Note: The ability to star items of interest is available only to users who have signed in and are 25Live schedulers/users.
The only individuals that have edit access to scheduled sections are the Registrar's Office.
If the administrators see any scheduled changes for a scheduled section in the system it will be denied.
The only exception to this is if the class needs the room to be unlocked during a holiday.
We do not hide locations in 25Live, but we can make them not requestable. To request this, please email uaf-academic-scheduling@alaska.edu and ask for the location to be made unrequestable in the system.
Include the building and room number of the location you want to be unrequestable.
25Live is a comprehensive event scheduling and space management system that offers a wide range of features beyond just booking rooms. Here are some of the key capabilities of 25Live:
-
Event Scheduling: Allows users to schedule events, including setting up recurring events, and manage event details such as time, date, and participants.
-
Resource Management: Enables users to book resources like AV equipment, catering, and other event-related services alongside room reservations.
-
Event Publishing: Provides tools to publish event details to calendars, websites, and digital signage, helping to promote events and inform the community.
- Pricing: Price events and generate price quotes and invoices for customers.
-
Space Utilization Analysis: Offers detailed reporting and analytics on room and space usage, helping institutions optimize their space utilization and plan future needs.
-
Workflow Management: Streamlines the approval process for event requests, ensuring all necessary permissions and steps are completed before an event is confirmed.
-
Conflict Detection: Automatically checks for scheduling conflicts and double bookings, ensuring efficient use of spaces and resources.
-
Customizable Layouts: Allows users to customize room layouts and setups for different types of events, ensuring spaces are configured correctly.
-
Integration with Other Systems: Integrates with other campus systems such as academic scheduling software, facility management systems, and campus security systems for comprehensive event management.
-
Mobile Access: Offers mobile access to scheduling features, making it easy for users to manage bookings and view schedules on the go.
-
Communication Tools: Includes built-in communication tools to notify stakeholders about event details, changes, and updates.
-
Calendar Management: Provides a centralized calendar view of all events happening on campus, allowing users to see availability and plan accordingly.
-
Emergency and Safety Features: Supports emergency management by providing real-time data on space usage and occupant locations, which can be critical during emergencies.
-
Support for Different Event Types: Handles a wide range of event types, from academic classes and meetings to large conferences and special events.
25Live How To's:
User Basics:
How to view 25Live as a user:
- View as a guest
- Doesn't require the user to sign in
- User can only view information about events
- Will be unable to create an event
- Sign in
- Sign in using your SSO
- Users can view or create an event in the system
- have access to reports
- Send emails within the system to to sign in:
- Go to 25Live -https://25live.collegenet.com/pro/uaf#!/home/dash
- Select Sign In
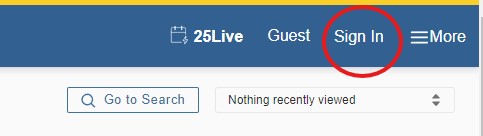
- Enter your SSO if you have not already signed in using it.
The 25Live dashboard uses element sections to give you quick access to commonly used
objects. You can customize the placement of the elements and hide those you don't
wish to see. The default dashboard includes all the available elements in their expanded
view.
Customizing Your Home Dashboard View:
Use the  (Customize Dashboard) link at the bottom-right of the page to open the customization
view. Your view will scroll to the top of the page to the revealed customization controls.
(Customize Dashboard) link at the bottom-right of the page to open the customization
view. Your view will scroll to the top of the page to the revealed customization controls.
Within the shaded customization controls section, there are written instructions to remind you how to move elements in and out as well as an option to Reset Dashboard.
Use the Done button to close the customization controls.
To Move Elements:
As you hover your mouse over the title of an element, the mouse cursor will change
to a crosshair icon ![]() . Click on the title of an element to move it. Drag the box to the desired position,
then release it.
. Click on the title of an element to move it. Drag the box to the desired position,
then release it.
Outlines will appear as you drag the element over available spaces.
If you are finished moving elements, use the Done button to close the customization controls.
To Add or Remove Elements:
You can hide an element from view (remove it from your dashboard) by clicking its title and dragging it into the shaded customization control area.
The customization control area displays titles of elements that have previously been hidden from view. Simply drag any element by its title back onto the dashboard to restore it. Outlines will appear as you drag the element over available spaces.
If you are finished moving elements, use the Done button to close the customization controls.
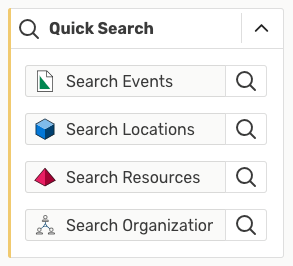
- Enter the location name or short name or
- Hit Enter or click on the magnifying glass icon
In a location search
Under "Availability" in More.
In "Location Details"
- Enter the event name, event title, event reference number
- Hit Enter or click on the magnifying glass icon
- Reminder: You must be signed in to save a search
Saving a New Search
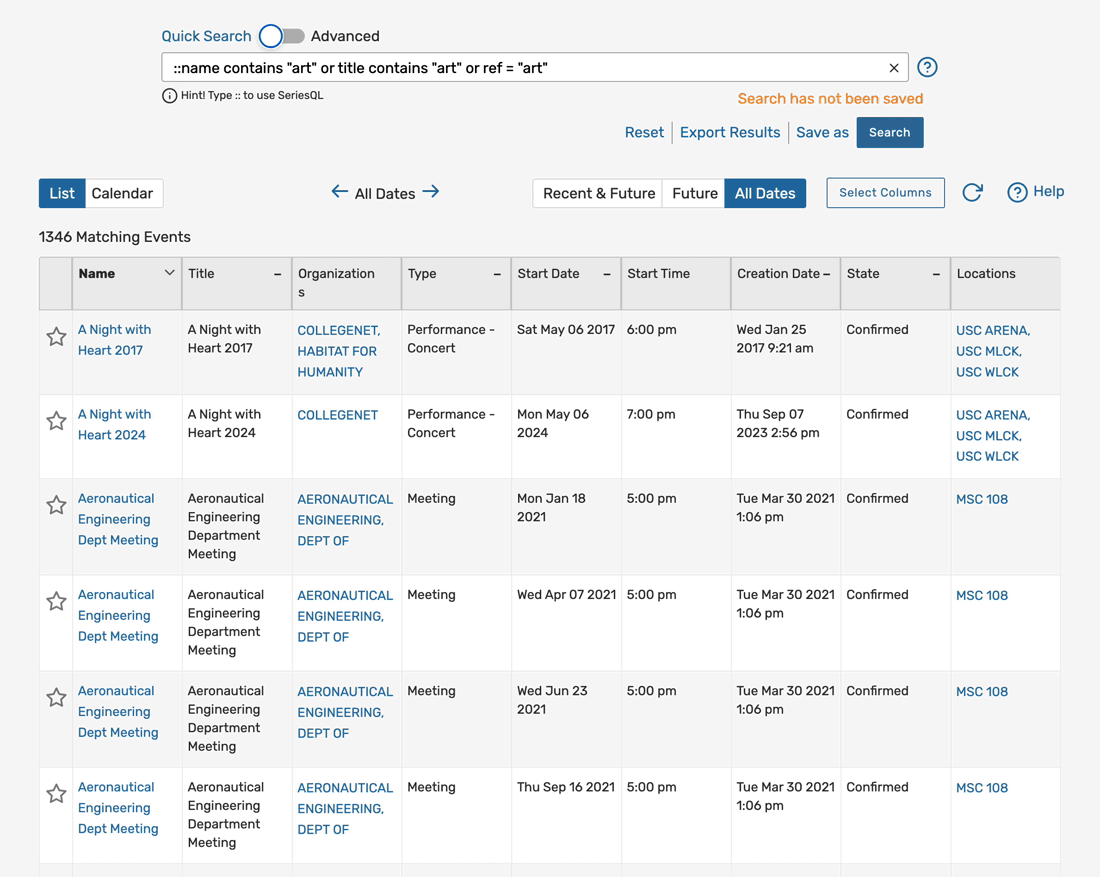
After completing a search and looking at your search results, you have the option to save a search.
- Use the "Save AS" link near the search button
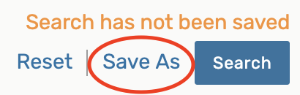
- Name the search
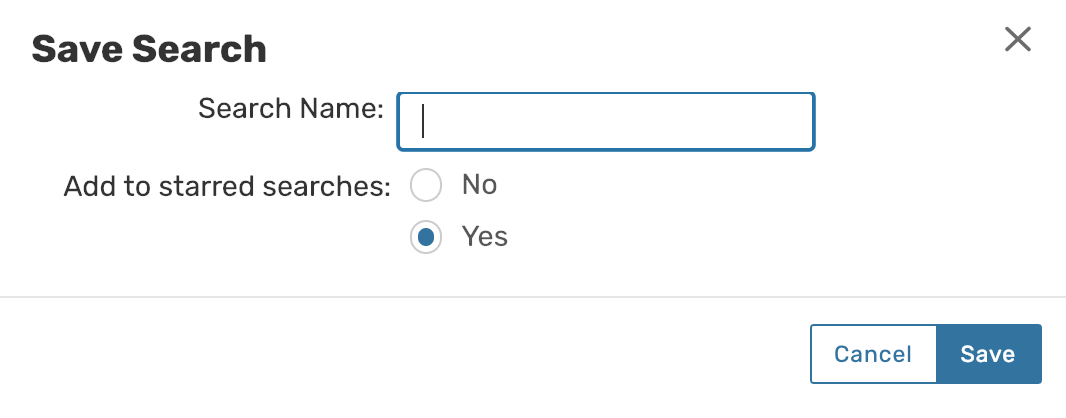
- Type in the name of your search, choose whether you want to add to starred (favorite) searches for easy access later, then use the Save button.
Why would I need to save a search?
- For running reports
- To use later on
- To share with others
- First and last name
- Phone number
- Department
- Locations (building and room number) the individual will oversee
- Select Edit Event
- Scroll down to the Event State field, and choose the Cancelled event state.
- Use the Save button to complete cancelling the event.
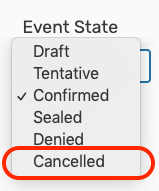
- Change the event state to Cancelled

To Cancel Individual Occurrences of a Repeating Event:
- Select Edit Event
- Select Mange Occurrences in the Event Form
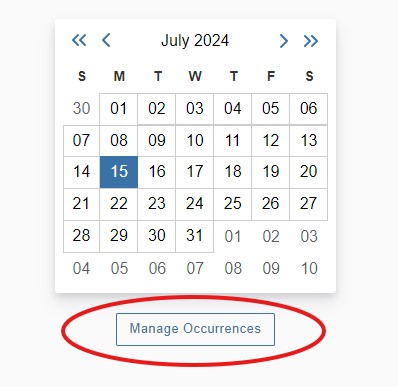
- Change the status of the occurrence to cancelled
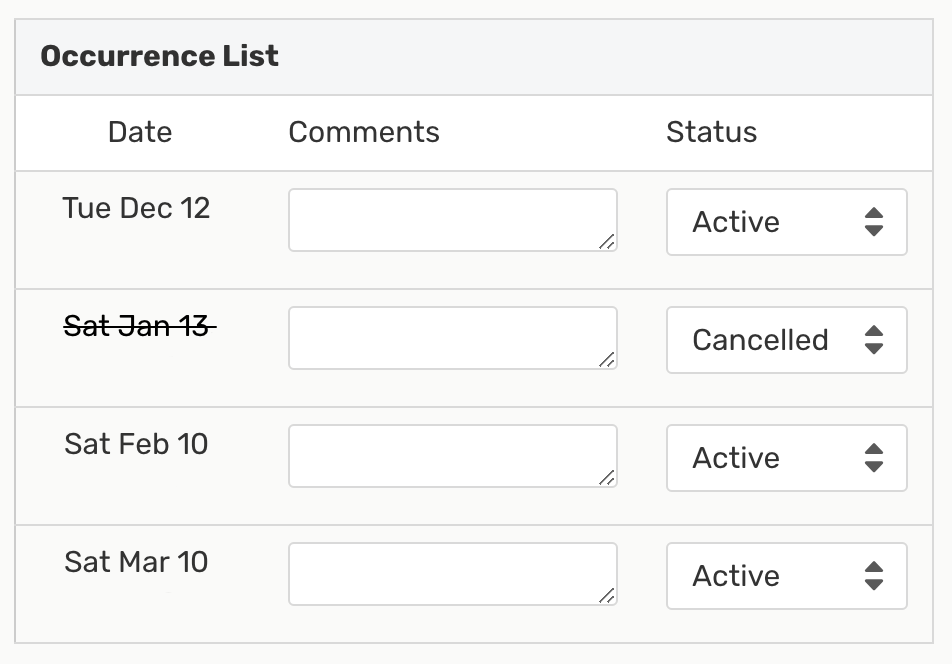
- Save the event.
Note: Reversing a Cancellation
If you need to restore an event that has been cancelled, you can change the state again from the event details view (with appropriate security permissions). You'll need to edit the event to restore any discarded location or resource assignments.
- Navigate to or search for the event
- Use your favorites events section on the dashboard or search for the event, then click on the event name to go to its details view.
- Select the email event detail option
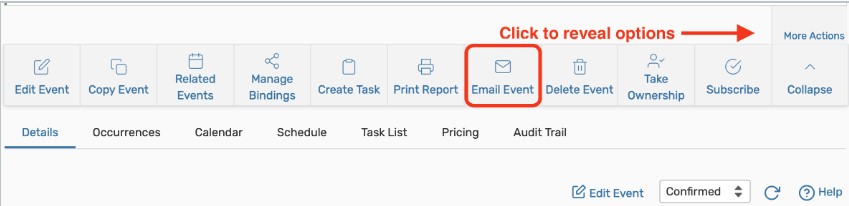
- In the main Details tab, use the More Actions link to reveal options, and select the Email Event option.
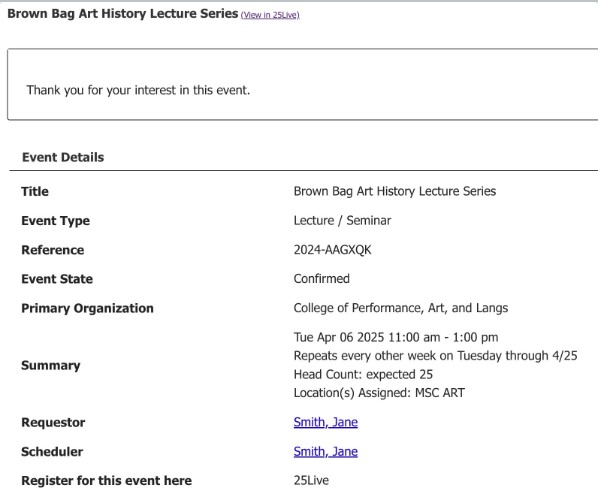
- Choose Event confirmation email from the email template if you are confirming the
event and sending a confirmation. If you are communicating with the requestor leave
that area blank.
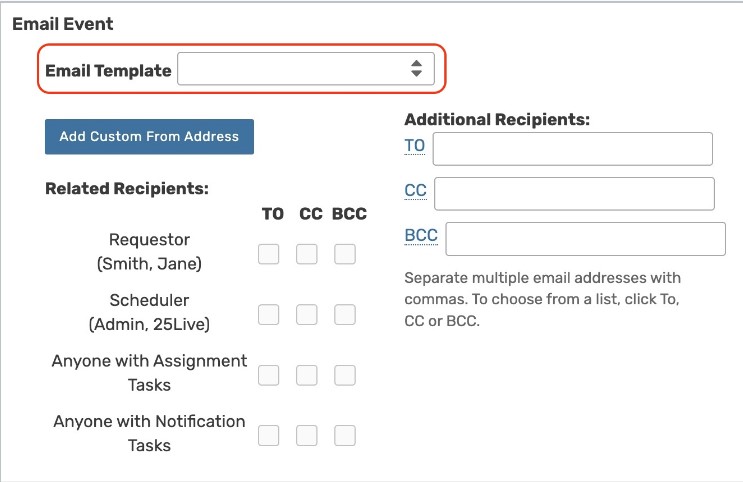
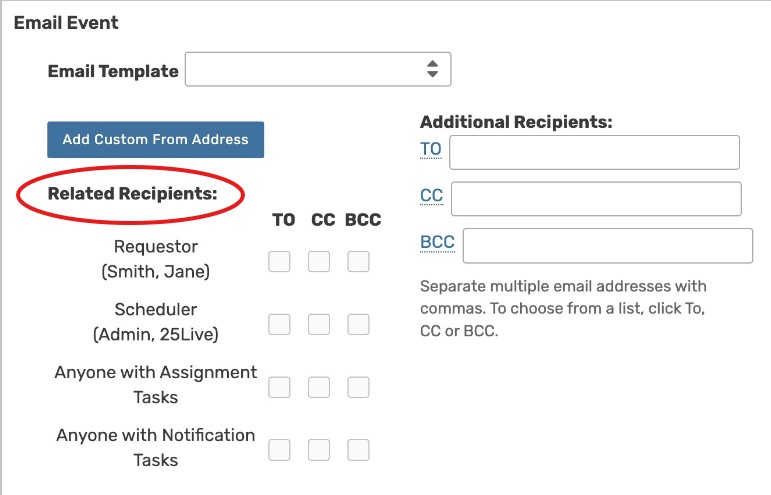
- Complete the related recipients sections
- In the first sections of the dialog that are shown, check the boxes next to the event
roles to add Related Recipients. You can add each role as the To, CC (carbon copy),
or BCC (blind carbon copy/hidden). An error will display if any of the users in event
roles don't have a valid email address associated with their 25Live contact.
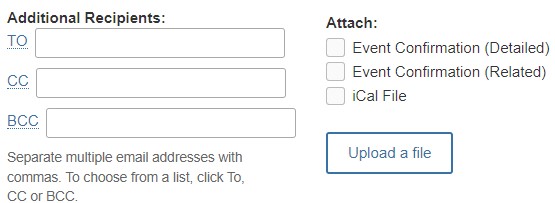
- You can also type in Additional Recipients addresses separated by commas for individuals that are not in related event roles or contacts outside of 25Live. If the use of a manual template added Additional Recipients that you don't want to use for this email, you can remove them.
- Optionally add attachments
- Select any of the available reports as PDF attachments. The reports available will
depend on the reports in your instance and may include event confirmations, cost quotes,
invoices, iCal files, custom documents, and more. You may also upload files to attach to the email. We don't recommend uploading files
larger than 10 MB.
- Optionally edit the subject line and add body content
- You can edit the default email subject line that will be used. There is also an option
to add custom text that will appear in the body of the email. To automatically add
a link to the event in 25Live, check the Include link to 25Live box.
- You can edit the default email subject line that will be used. There is also an option
to add custom text that will appear in the body of the email. To automatically add
a link to the event in 25Live, check the Include link to 25Live box.
- (Optional) Schedule the email
- To send the email add a later date, select the Scheduled Email checkbox. Choose Days
from Event Start, Days from Event End, or Days From Now. Then, enter a number in the Schedule
Offset Days field. Scheduled emails go out at 3:00 a.m. (Pacific time, 6:00 a.m. Eastern
time) each day.

- To send the email add a later date, select the Scheduled Email checkbox. Choose Days
from Event Start, Days from Event End, or Days From Now. Then, enter a number in the Schedule
Offset Days field. Scheduled emails go out at 3:00 a.m. (Pacific time, 6:00 a.m. Eastern
time) each day.
- Send the email
- Use the Send button to send or schedule the email.
- After sending, you will receive a browser alert informing you that the email was sent successfully. If you have uploaded any large attachments, you may experience a delay before seeing the success message.
After you choose whether or not your event has more than one occurrence, you are ready to select event times and, optionally, add Setup, Pre-Event, Post-Event, and/or Takedown times
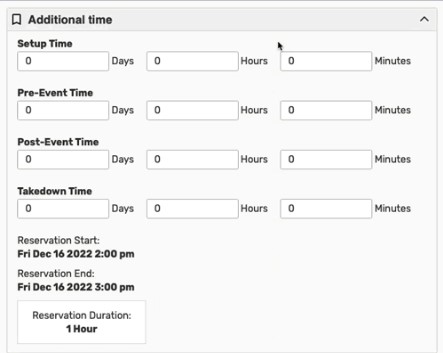
The Event Form shows and changes the Reservation Start date/time, Reservation End date/time, and the total Reservation Duration as you add or remove additional time.
Type in times in any of the fields. Any added time will be included in the total Reservation Duration.
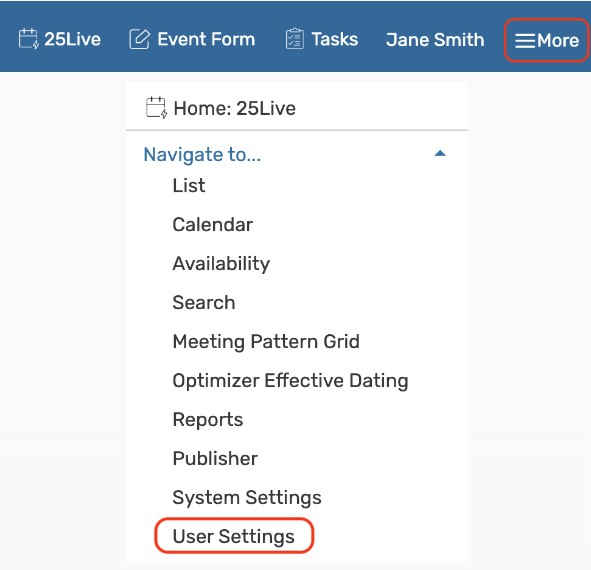
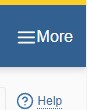
- Use the More menu in the top navigation bar to access User Settings option.
- Go to the Email Signature box and input your email signature.
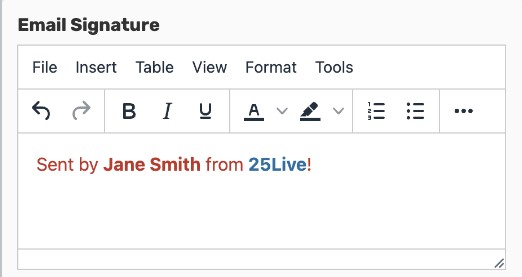
- Click the Save button.
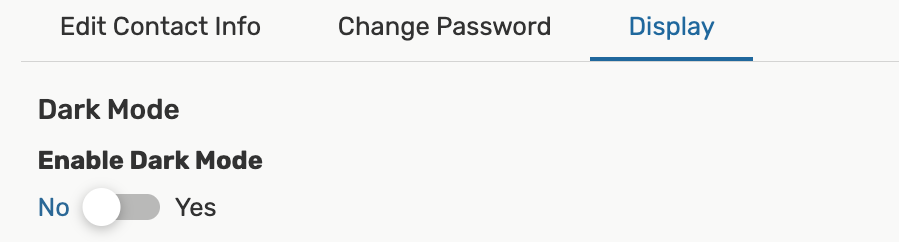
- Use the More menu in the top navigation bar to access User Settings option.
- Select Display
- To switch to a darker theme, toggle the setting for Dark Mode to Yes.
- Save your changes.
Advanced Users:
Here's an example:
Suppose there is a large film festival every December. The main event in the example is a Three-Day Film Festival, which has several events related to it. After creating the main event, you create other events and then “Relate” them to the main event.
Events with a relationship to the main event might include:
- Three nights of film screenings
- A Q & A with film directors
- A film award ceremony
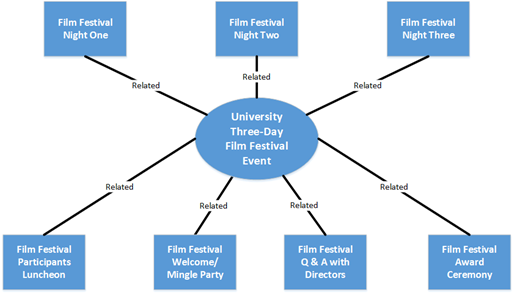
You can relate events to create a new event set or add an event to an existing set from two places in 25Live:
- From the summary of More Event Options displayed when you finish creating or editing an event
- When you're viewing an open event
- Click or tap on the event's name in any view to see the event's details.
- Use the more actions display to access related events, With one of the events open
in the details view, choose Related Events from the More Actions display.

- Use the Add Events to Set button. In the Manage Related Events display, you're informed if this event is in a related event set. To add events to a set or to create a new set, use the Add Events to Set button.
- Find the events you want to relate. Use the keyword search field or filter dropdown to find events you wish to relate to the current event or set.
- Select and add the events you want to relate. In the search results list, check the
box of each of the event(s) you want to add to the set, then use the Add Selected button.
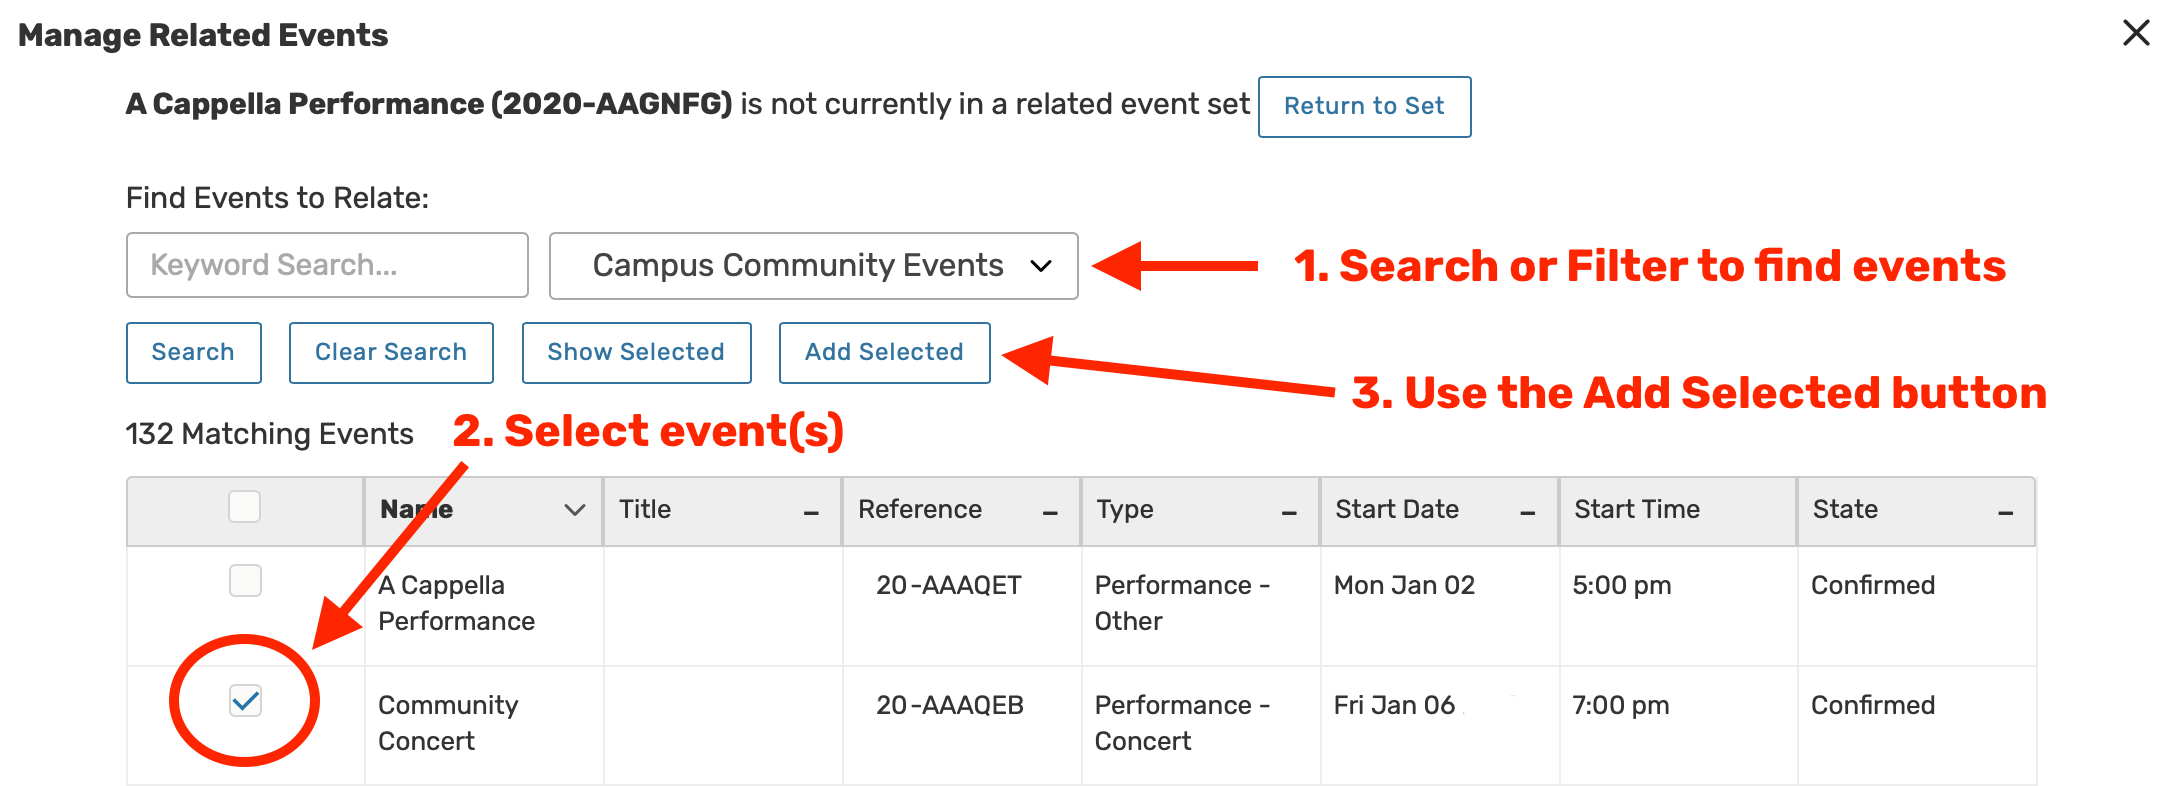 You don't need to search for and select all members of a set to add a new event to
it. Just choose the events you want to add. For long search result sets, use the Next, Last, and other pagination controls at the bottom of the list to view additional pages
of results and adjust the number of results on the page. The Show Selected button can also be used to more conveniently review only the events you have checked
in the list before adding them to your related event set.
You don't need to search for and select all members of a set to add a new event to
it. Just choose the events you want to add. For long search result sets, use the Next, Last, and other pagination controls at the bottom of the list to view additional pages
of results and adjust the number of results on the page. The Show Selected button can also be used to more conveniently review only the events you have checked
in the list before adding them to your related event set.
- A complete list of all events in the related events set displays after successfully adding events to the set.
- Close the window, or use the Add Events to Set button to add additional events.
Note: The Event Form has an option at the end to Create Another Related Event or Create A Related Copy of This Event before saving your event.
When you copy an event that is related to other events, you will see an option to Copy and Relate which allows you to create a copy and relate it back to the original event or the original related event set.
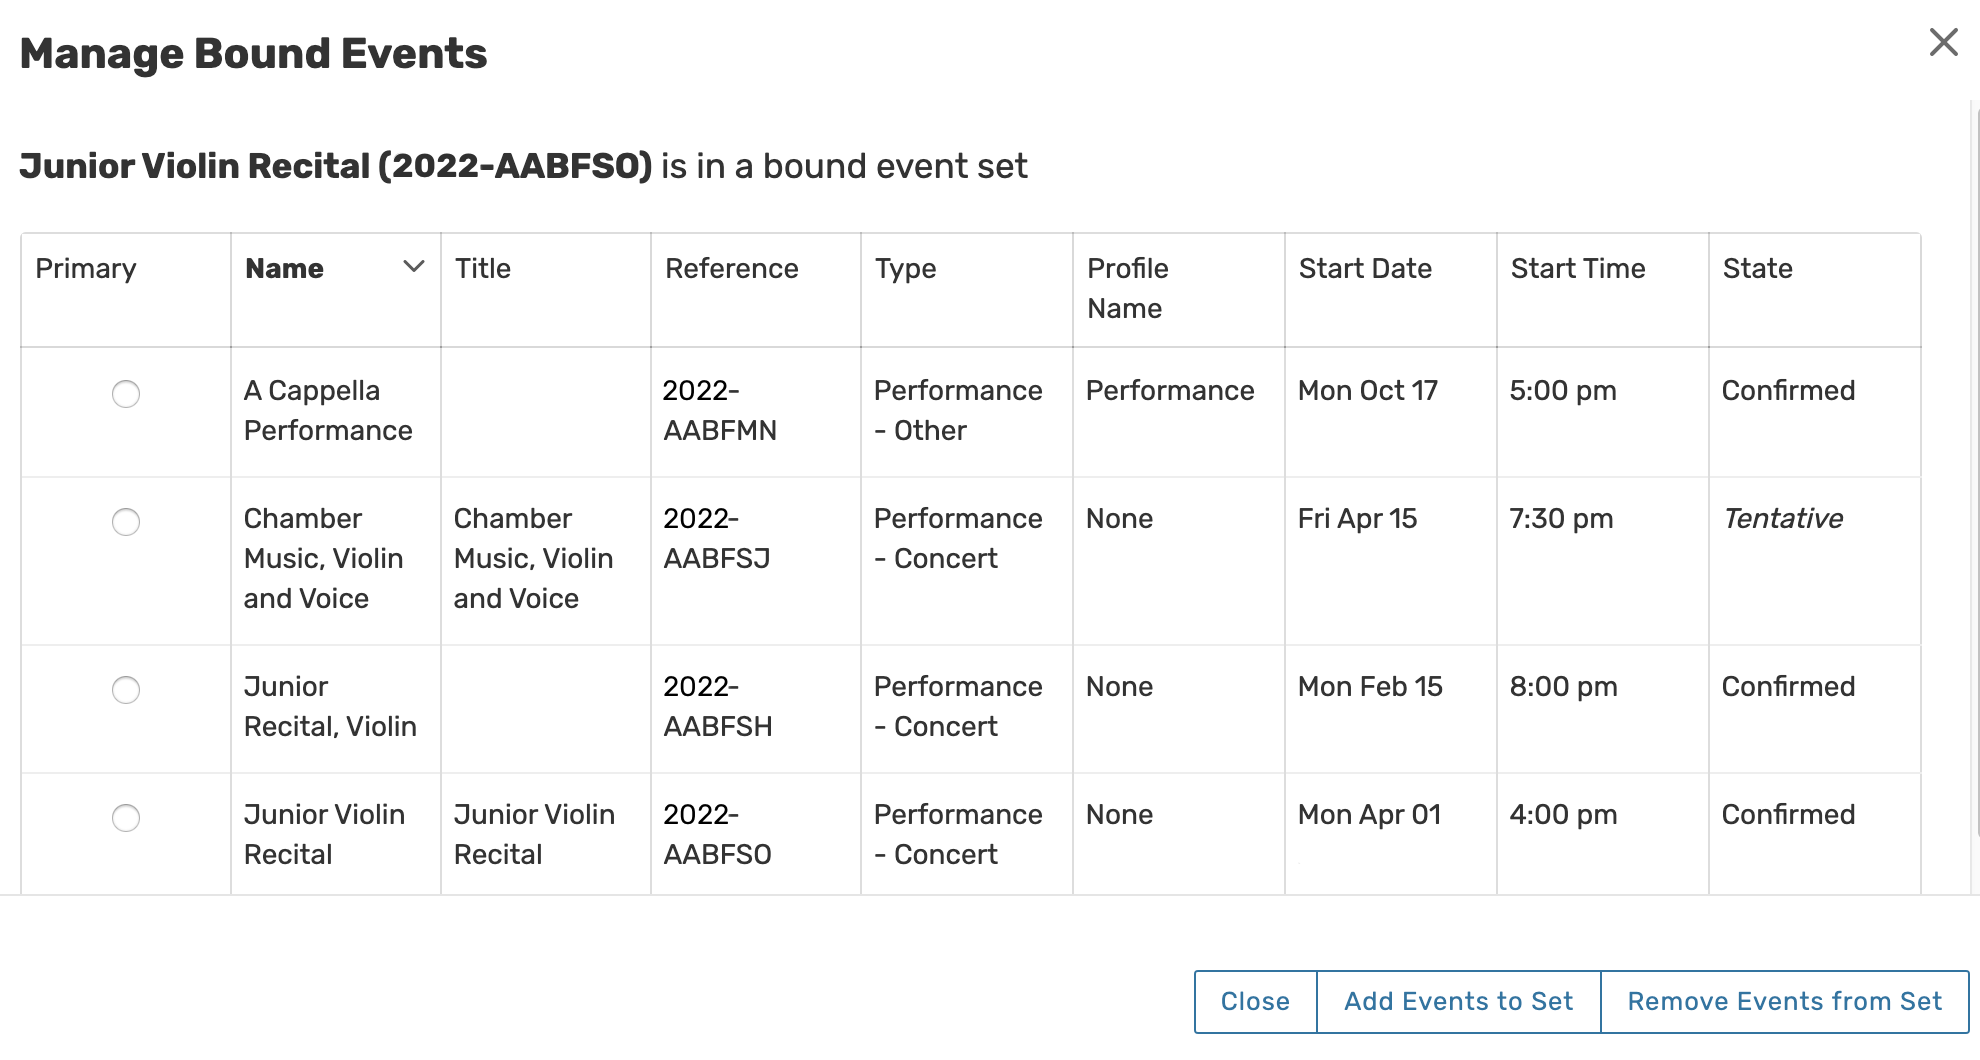
If you're the event Scheduler, you can bind an event to other events. Events that are "bound" must have the same location(s) assigned, although they may occur at the same or different dates/times.
The following rules govern bound events:
- Location changes can be made for single occurrences, but it's common to have all occurrences of all events in a bound event set assigned the same location(s), regardless of dates or times.
- If you create a binding relationship between your events, then all location assignments to one event should automatically also be made to the other event upon subsequent updates.
- Changing the assigned location of an event in a bound set automatically changes the location assignment of all other members of the set to that same location.
To create or add events to a bound event set:
- Access the manage bound events window
- With one of the events open in the details view on the Events tab, choose Manage Bindings from the More Actions display, or select Manage Bindings in More Event Options immediately after saving a new or edited event.
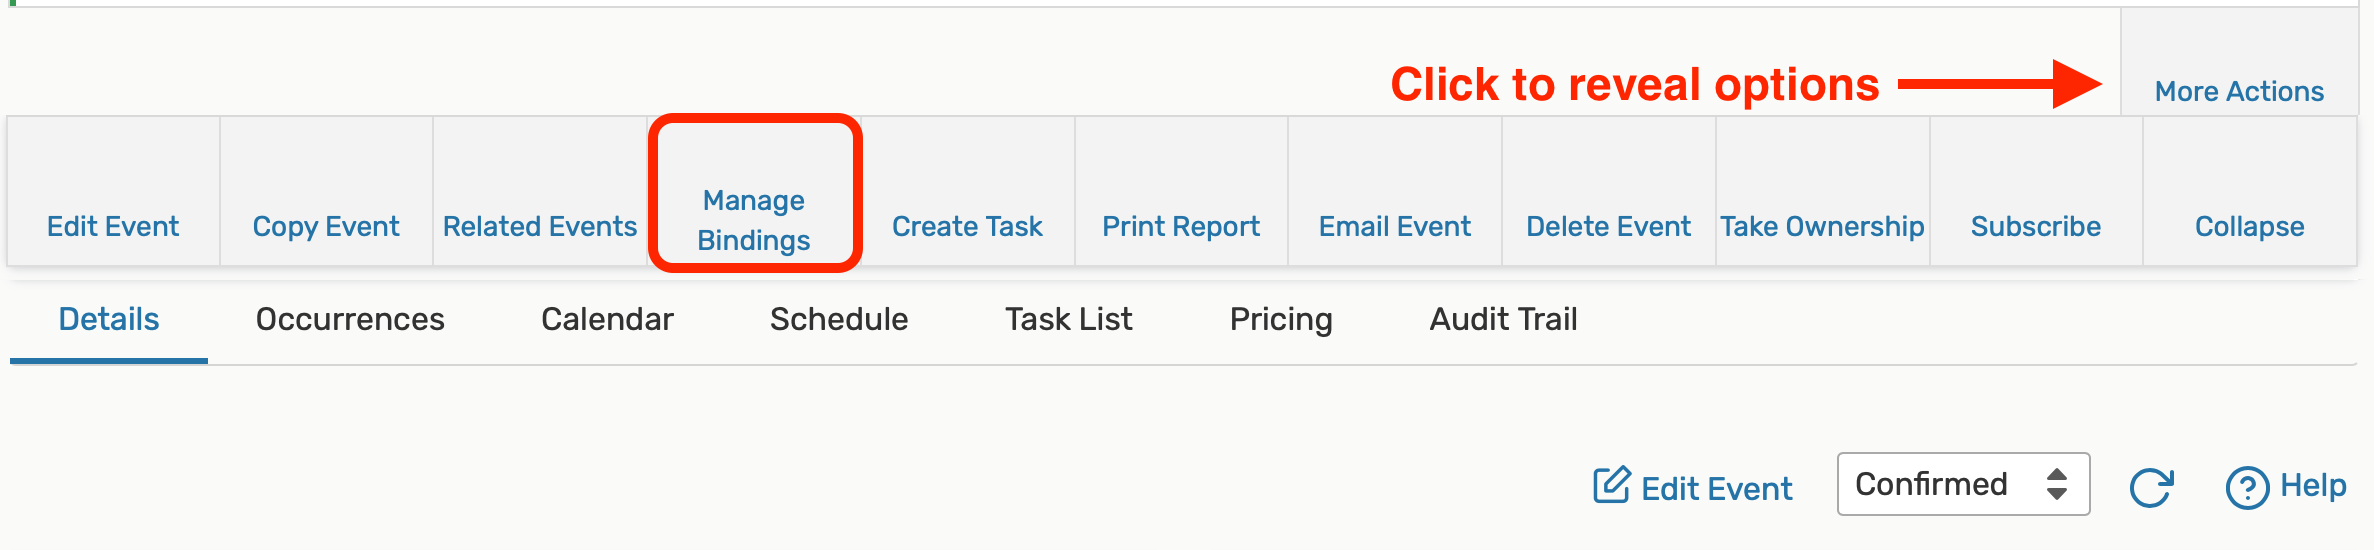
- With one of the events open in the details view on the Events tab, choose Manage Bindings from the More Actions display, or select Manage Bindings in More Event Options immediately after saving a new or edited event.
- In the Manage Bound Events window, the title informs you if this event is in a bound event set. To add events to the set or create a new set, use the Add Events to Set button.
- Use the keyword search field to find events you wish to bind to the current event or set.
- In the search results list, check the box of each event you wish to add to the set,
then use the Add Selected button.
 For long search result sets, use the Next, Last, and other pagination controls at the bottom of the list to view additional pages
of results and adjust the number of results on the page. The Show Selected button can also be used to more conveniently review only the events you have checked
in the list before adding to your related event set.
For long search result sets, use the Next, Last, and other pagination controls at the bottom of the list to view additional pages
of results and adjust the number of results on the page. The Show Selected button can also be used to more conveniently review only the events you have checked
in the list before adding to your related event set.
A complete list of all events in the related events set will display after successfully adding events to the set. - Close the Manage Bound Events Window, or use the Add Events to Set button to add additional events.
To Run a Report:
- Navigate to More at the top of your screen
- Select Reports
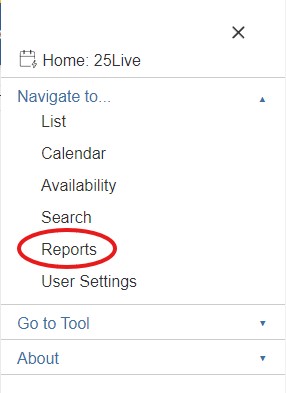
- Search or choose a report to run
 You can choose a report using the categories on the application home page or in the
report choices section.
You can choose a report using the categories on the application home page or in the
report choices section.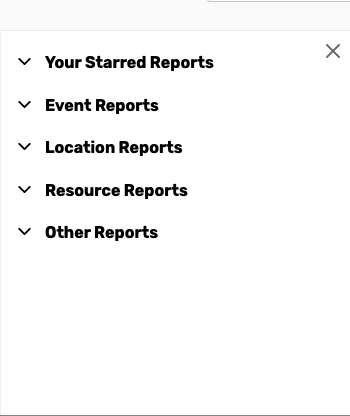
- After choosing any report from the list, you can read the description of the report
by using the information (
 ) icon, or you can view a sample image of the report using the View Sample link. For sample images and descriptions of all standard reports, see the 25Live Standard Report Reference.
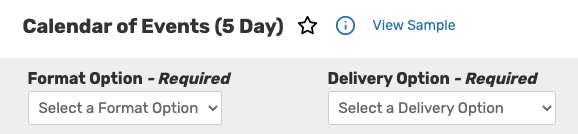
- Choose the format and delivery option.

Reports have several format options to choose from:
- Excel
- Rich Text Format (compatible with Microsoft Word)
- HTML
- (Plain) Text
Each of these formats can be saved, printed, or exported as needed.

The available delivery options are:
- View this report now — to save, export it via a method other than email, or print
- Email this report to yourself — using the email address in your 25Live contact record
- Email this report to... — displays a field for you to complete with any valid email address
Both of these fields are required.
- Complete report parameters.
Each report has its own set of parameters to complete, some required and some optional.

For example, if you chose the Daily Events report, you must complete the Event Search, Start Date, and Location Search parameters. If your report parameters include a start date and end date, you cannot choose a start date that occurs before the end date.
Some reports that allow for date ranges of data are limited to 8-day ranges to help ensure the speed of reporting.
- Run the report. Use the Run Report button
 . A success message with additional information on retrieving your report will be
displayed. If an error is displayed, follow the directions in the error message, such
as trying to run your report again later.
. A success message with additional information on retrieving your report will be
displayed. If an error is displayed, follow the directions in the error message, such
as trying to run your report again later. - Retrieve the report. Follow the displayed instructions to retrieve your report from a browser tab or email application.
- Select to Go to Tool from the More dropdown.
- Select 25Live Reports.
- Select Reports Admin.
- Select a Report from the dropdown menu to create a scheduled report.
- Click Create
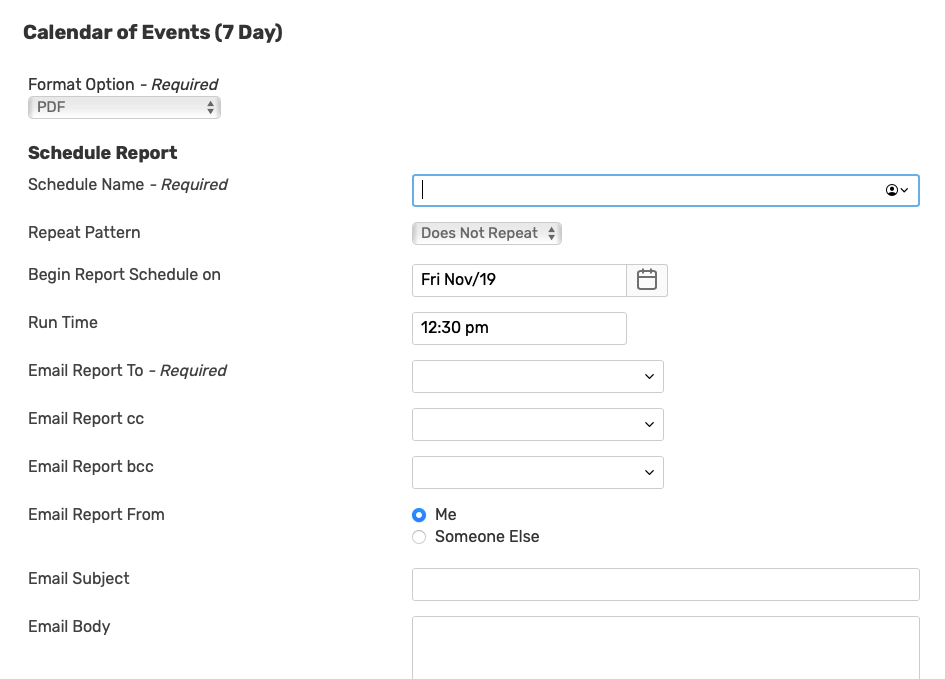
- Schedule this report
- Completion of a short form is required to schedule a report to send to one or more
recipients, including:
- Schedule Name: Name of this patter to re-use at a later time
- Repeat Pattern: Choose if you would like to repeat sending this report, and, if so, whether to send on a daily or weekly basis
- Begin Report Schedule on: The starting date of the schedule
- Run Time: The time of day to send the report
- Email Report To: Type to search for a 25Live contact or use the dropdown to choose. You may choose more than one recipient then remove any with the "X" icon
- Email Report cc, Email Report bcc: Similarly to the "To" field, search or select 25Live contacts to send to copied or blind copied
- Email Report From: Choose "Me" to have the email come from the email address on your user's 25Live contact record. Choose "Someone Else" to search for or select a 25Live contact as the sender
- Email Subject: Complete what you'd like the subject of each email to be
- Email Body: Type content that will appear in the body of each scheduled email
- Completion of a short form is required to schedule a report to send to one or more
recipients, including:
Use the Run Report button to run the report and complete your delivery option.
-
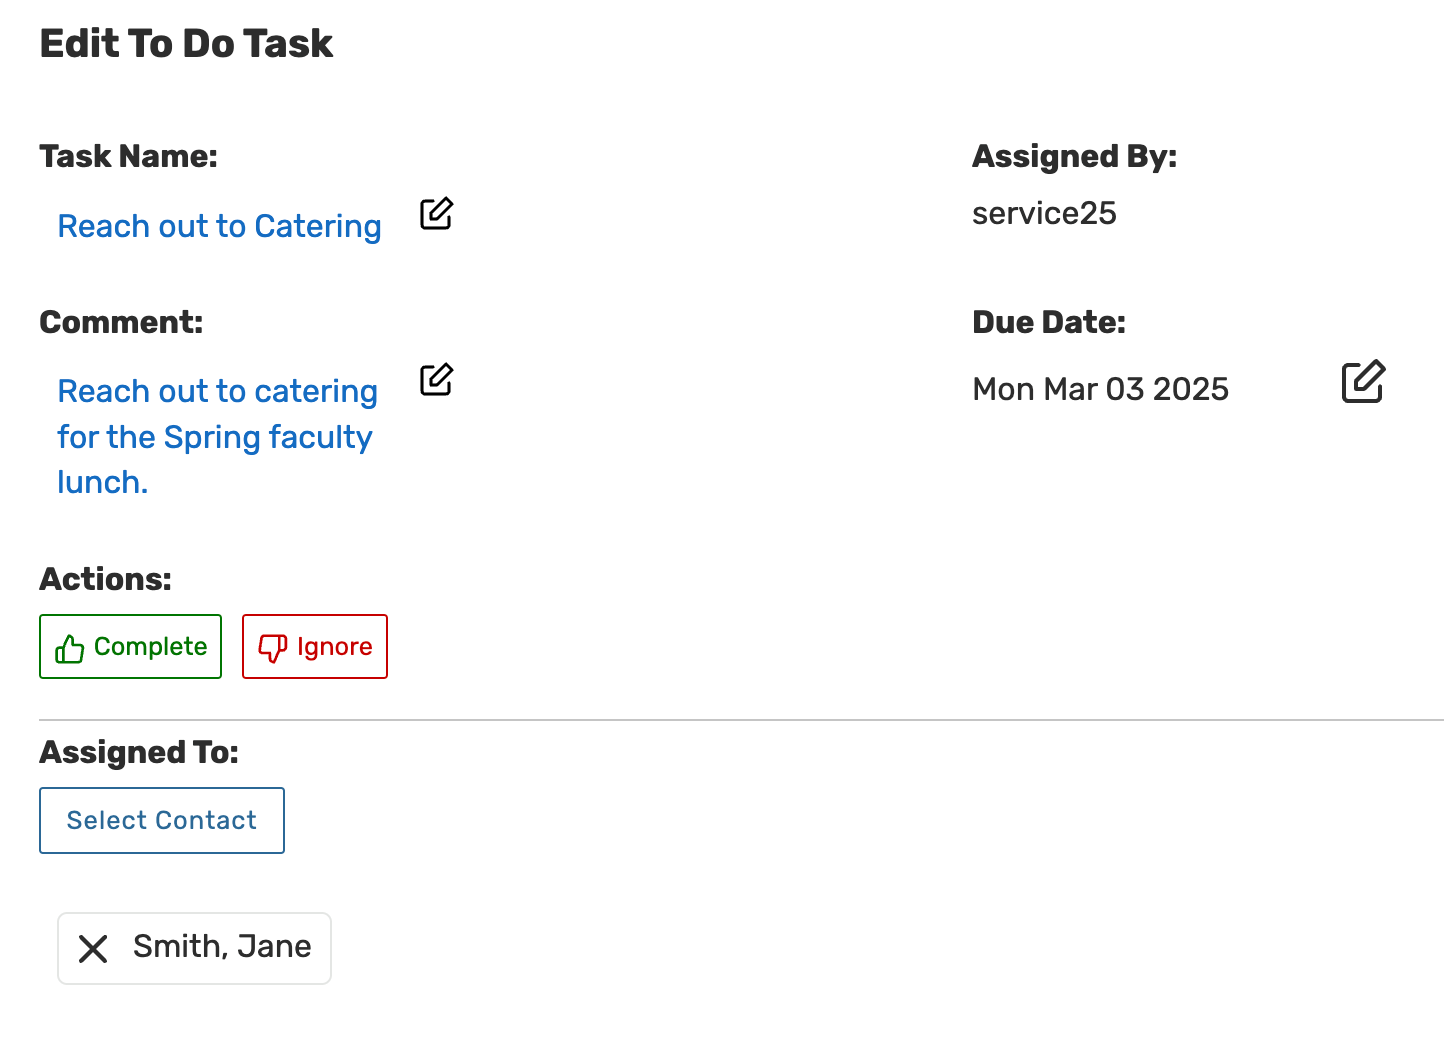
Find and open the event you want to create a To Do task for, then choose Create Task from the More Actions menu.

- Add a name for the task, any comments, and select the task completion due date.
In the Create Task display that opens, enter a name for the task and any comments you want to make about the task, then select the task completion due date. Task name and completion due date are required. You are listed as the task assignee by default.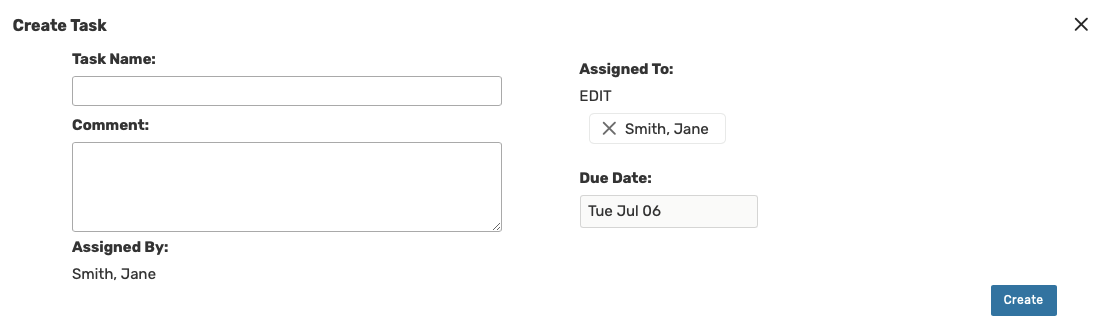
- If the person (25Live contact) you want to perform the To Do is someone other than
yourself:
- Click or tap Edit link near Assigned To
- Type all or part of the contact's name to search
- Select the contact from the displayed list, then use the Done button


-
Click or tap Create to generate the To Do task and add it to the tasks associated with the event. Close the confirmation window.
You may need to use the Refresh button to see your new task.
-
From the 25Live Home page, use the Tasks link in the top navigation bar.

-
Use the Create To Do Task button to start the process.

- In the Create To Do Task window that opens, enter the Task Name, any Comment
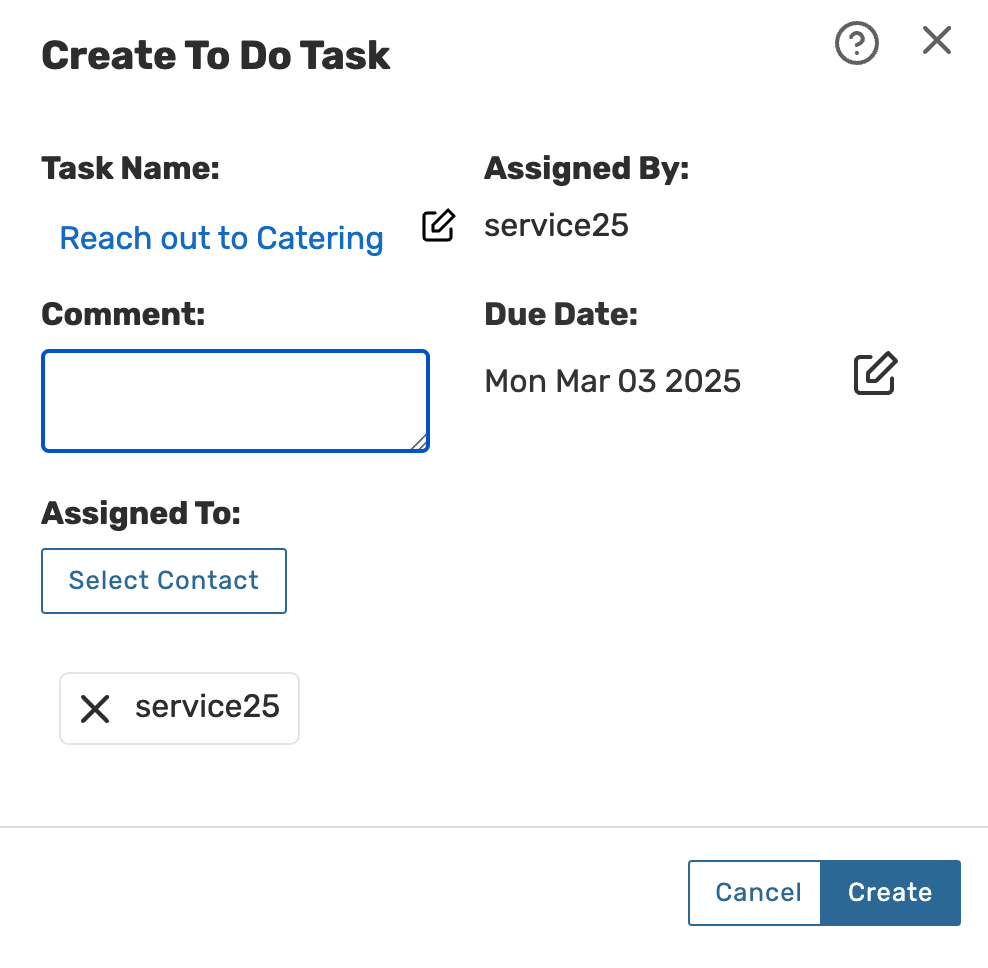
- You are listed as the task assignee by default. If the person (25Live contact) you want to perform the To Do is someone other than yourself:
- Click or tap Edit below Assigned To
- Type all or part of the contact's name
- Select the contact from the displayed list, then use the Done button
Then, select the task completion Due Date,
Click or tap Create to generate the task. Close the confirmation window.
You may need to use the Refresh button to see your new task.
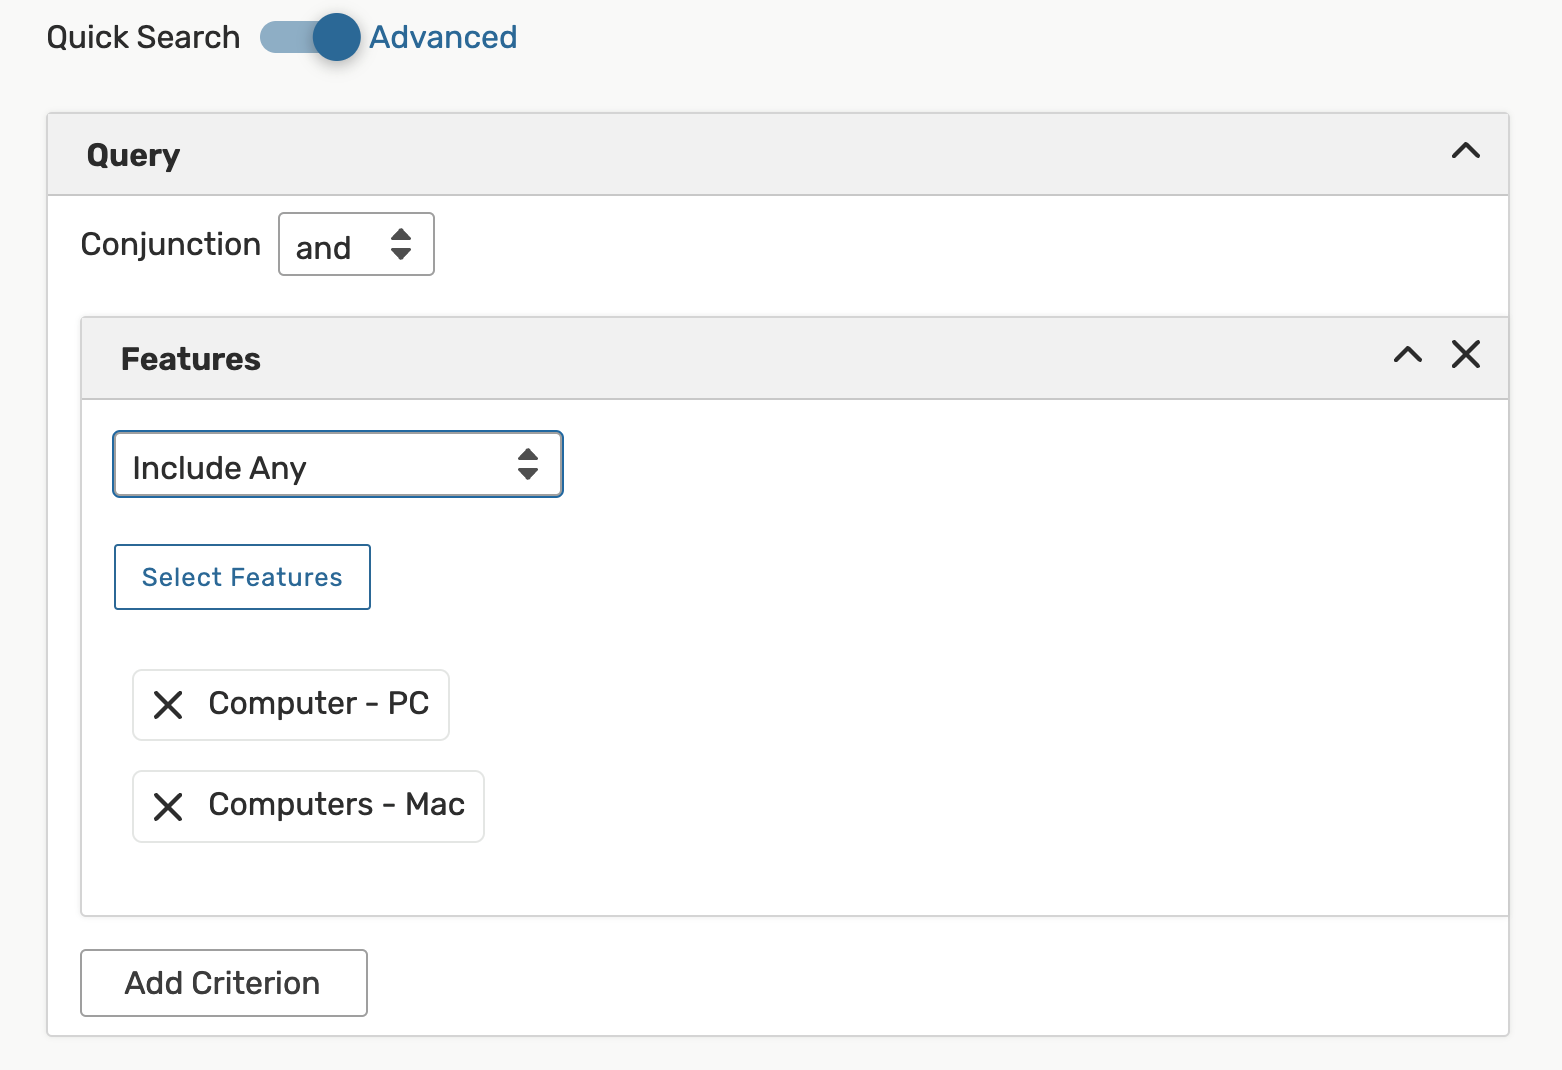
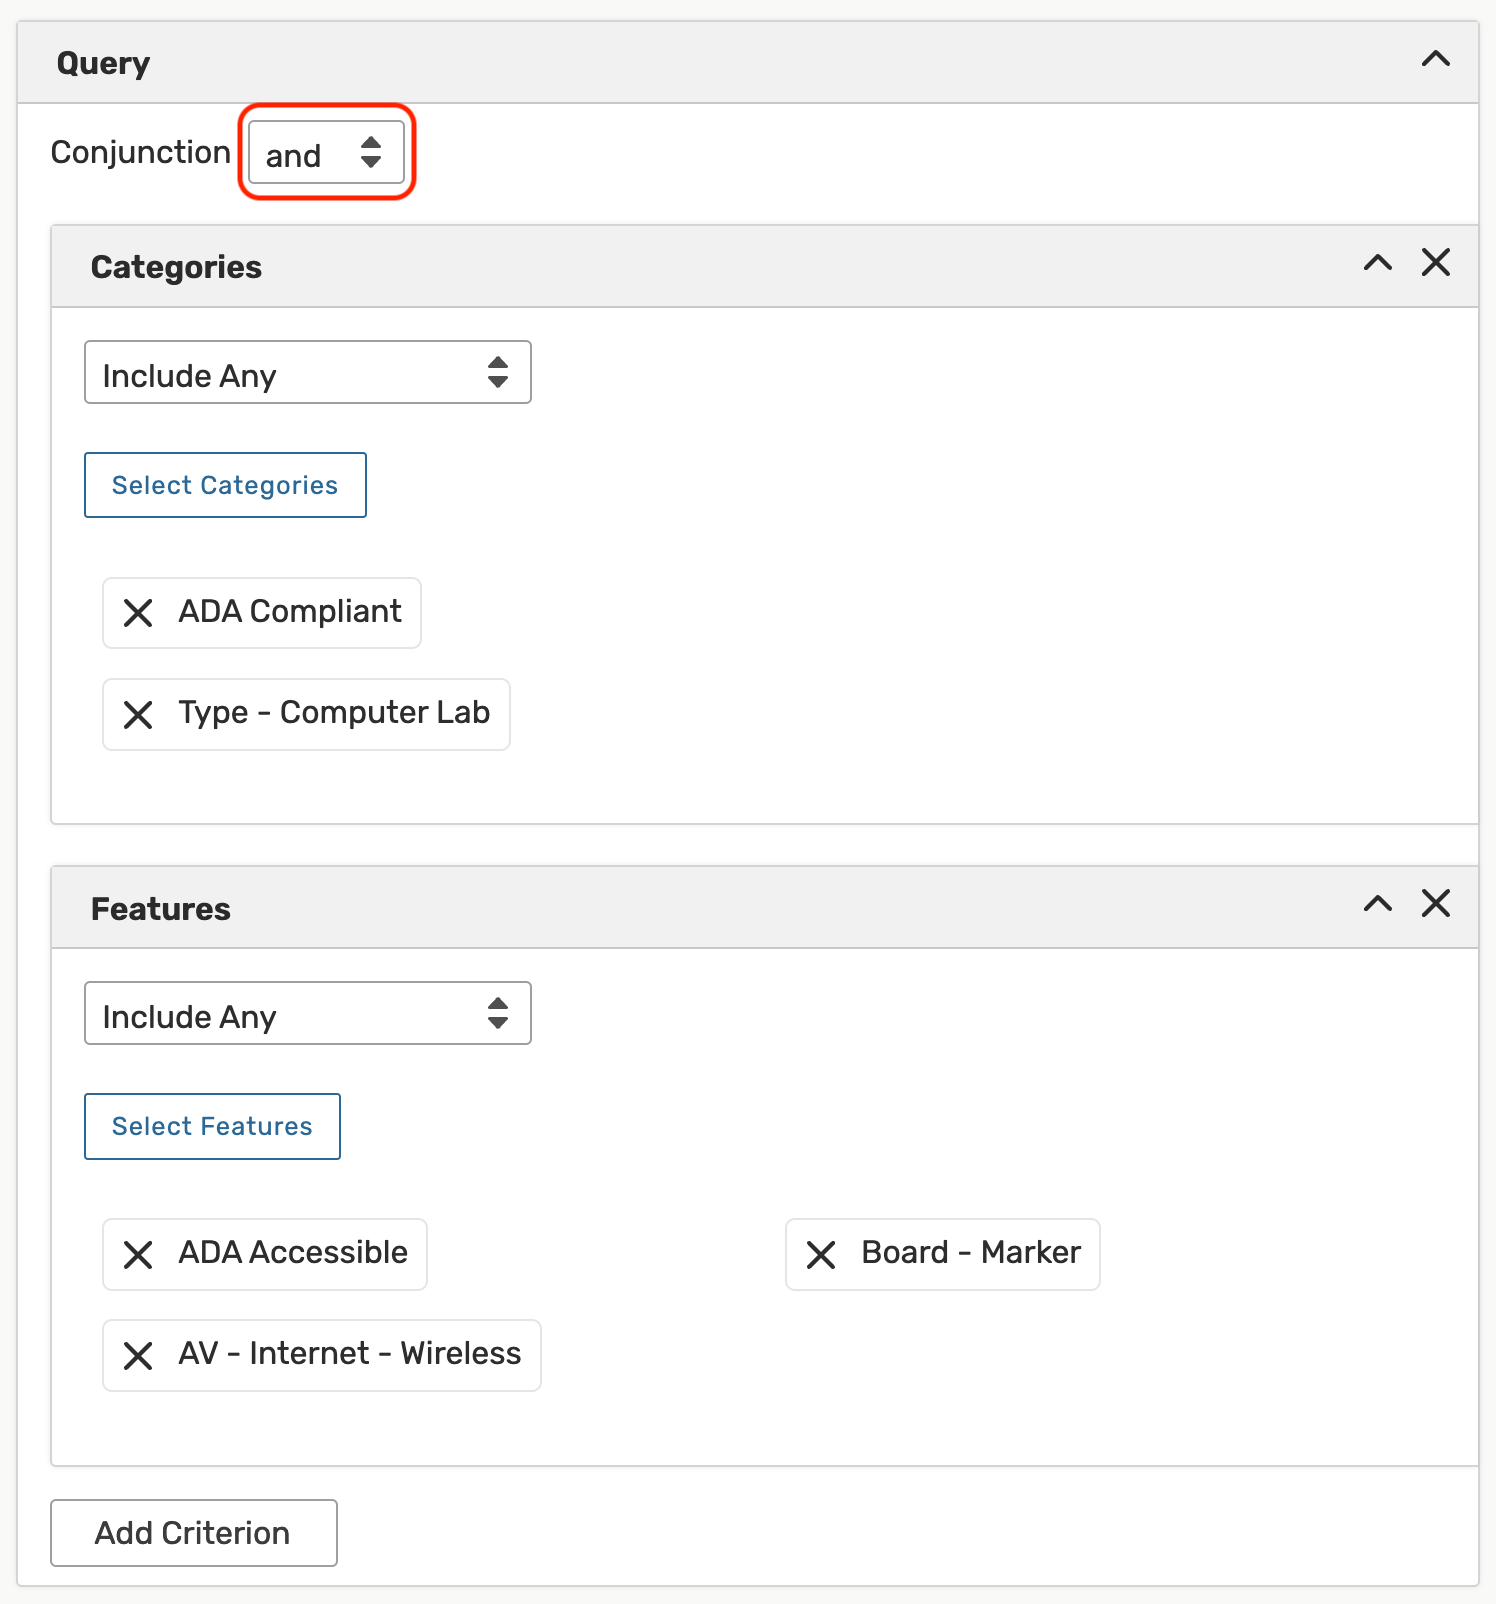
When searching for events, locations, organizations, resources, and tasks, you can add more filters and options to narrow your search.
Note: Because searching for contacts is simpler than searching for other objects,
the Contacts search only utilizes the simple keyword search.
- Switch to the Advanced Search section. Use the Advanced search toggle to reveal the advanced search area.
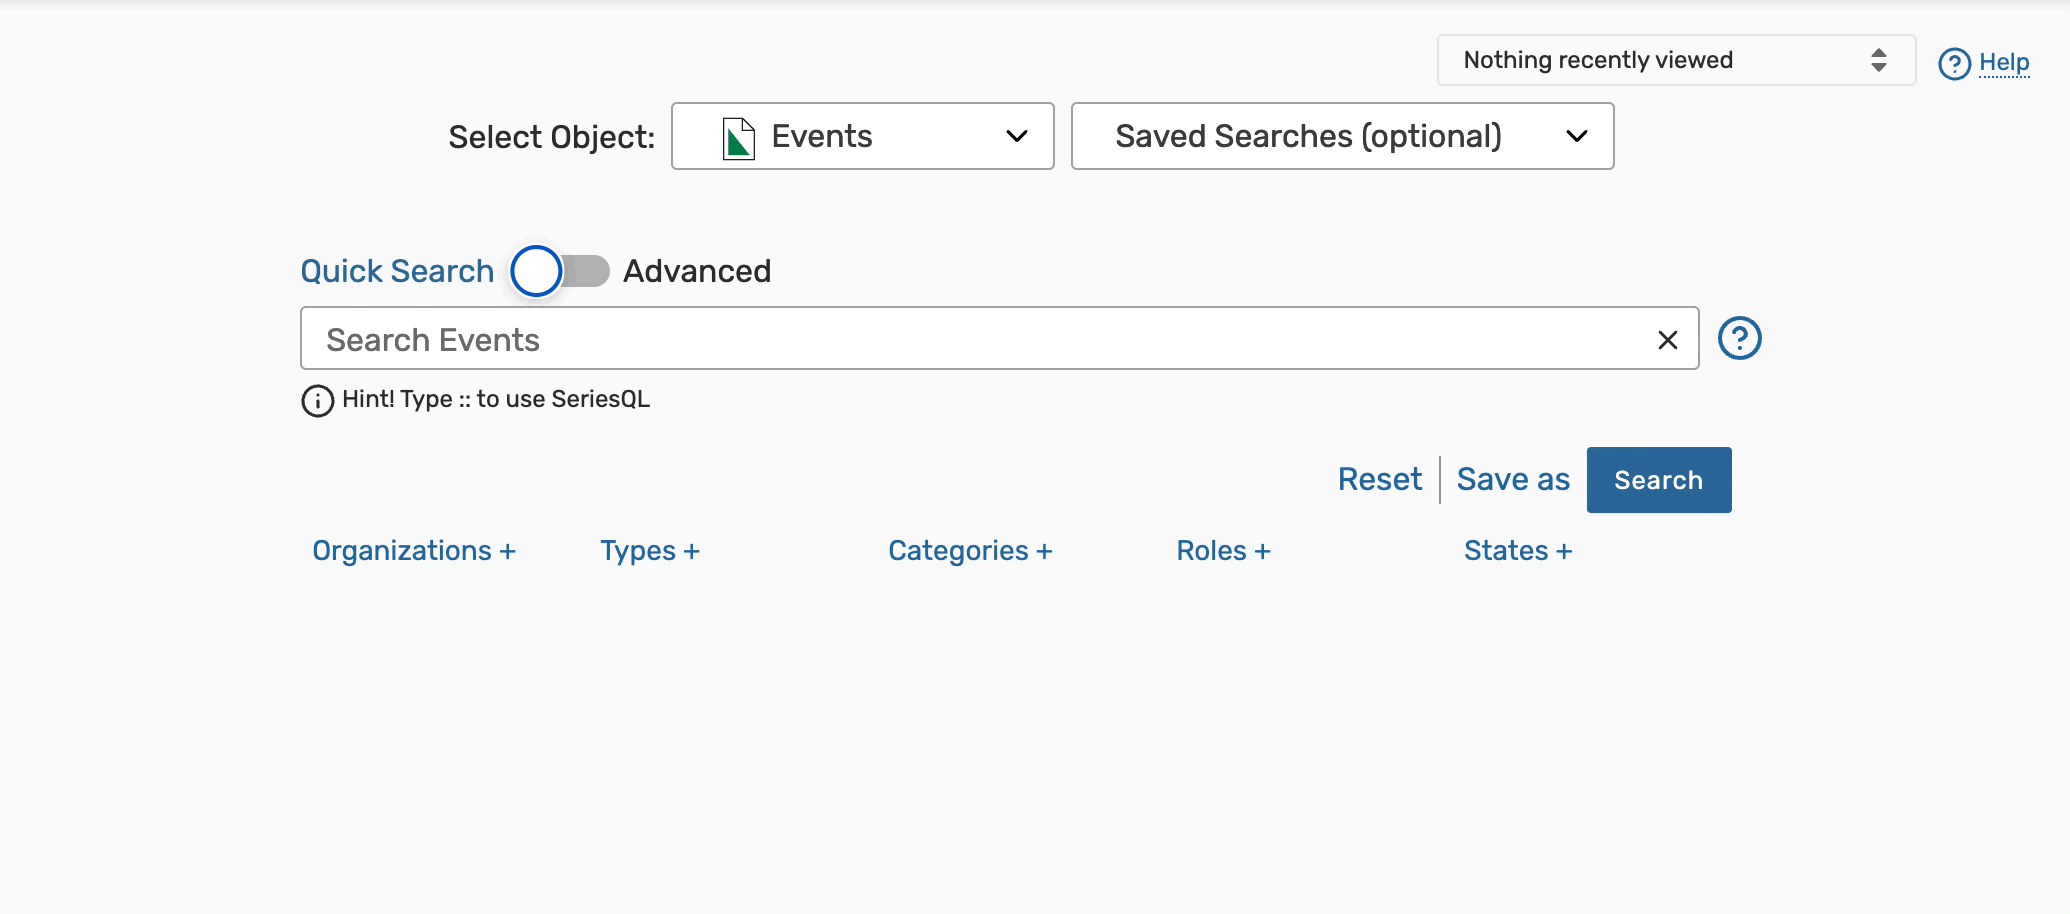
- The Add Criterion button shows a drop-down menu with the items available to build your search. Add
as many criteria as needed.
- Ecluding Searches From Results
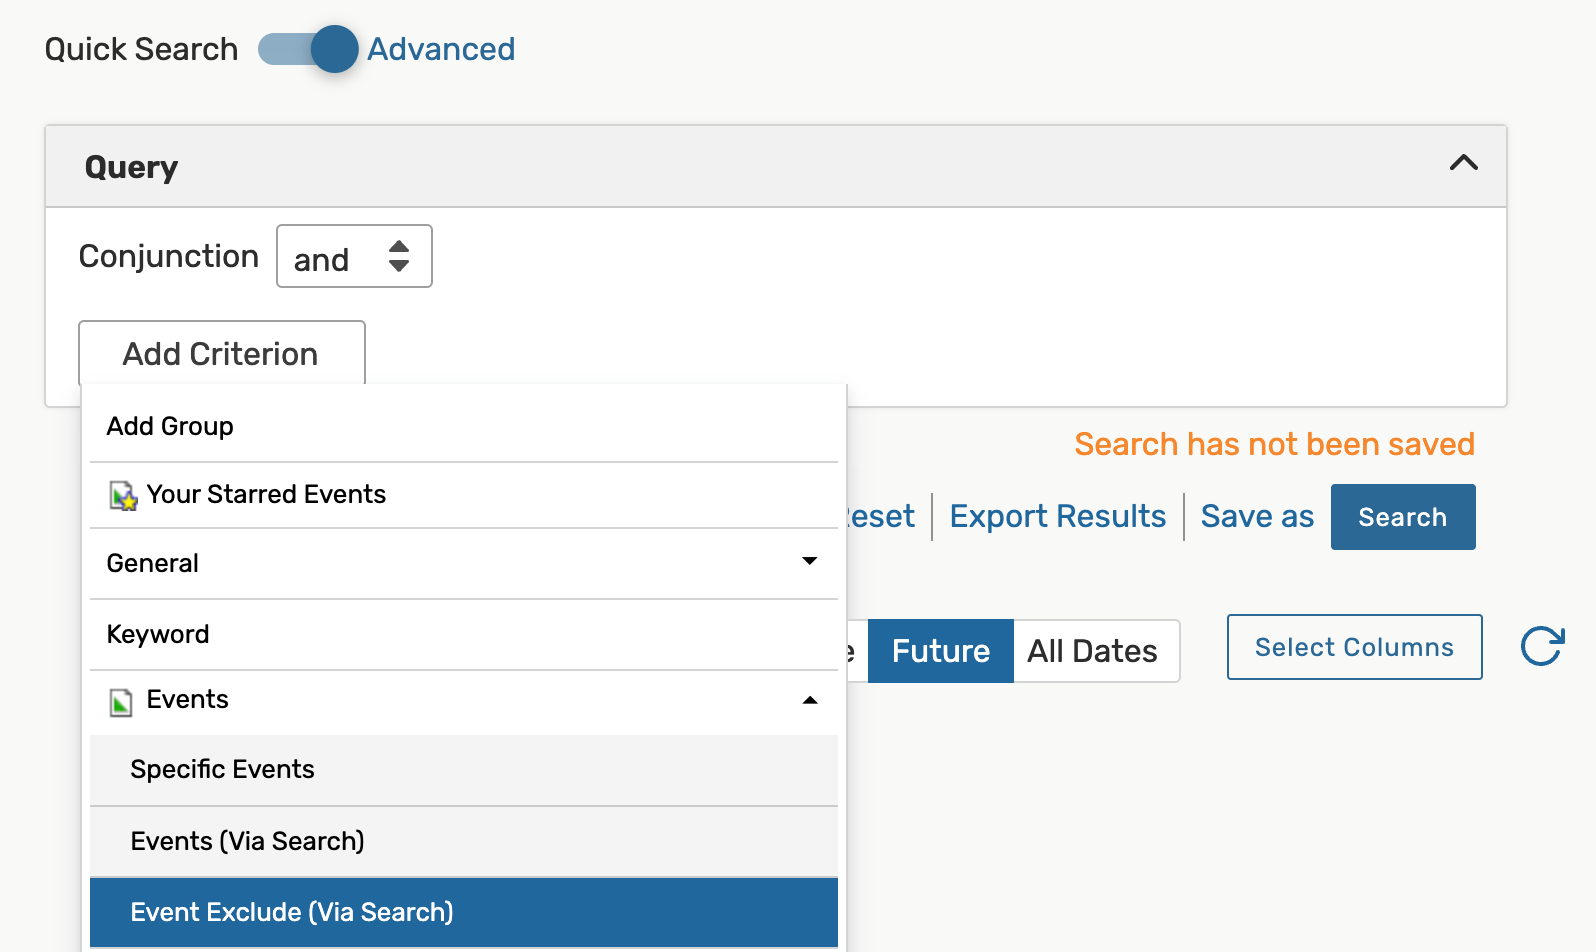 Image: Choose Event Exclude (Via Search) under the Events dropdown to exclude results
that are included in an existing search.
Image: Choose Event Exclude (Via Search) under the Events dropdown to exclude results
that are included in an existing search. When creating an advanced search for events, you can exclude some events from the results via saved searches.
Navigate to the Events criteria category, and choose Event Exclude (Via Search).
To exclude the results from more than one search, use the Add Criterion button again to add another search.
Searching for Custom Attributes:
When searching for custom attributes in 25Live, search options differ by attribute type.Boolean
- Is True
- Is False
- Exists
- Not Exists
Images and Large Text
- Exists
- Not Exists
Organization
- Contact
- Location
- Resource
- Equals
- Exists
- Not Exists
File Reference
- String
- Equals
- Starts With
- Contains
- Exists
- Not Exists
Date
- Time
- Date Time
- Equals
- Earlier
- Later
- Exists
- Not Exists
Integer
- Float
- Duration
- Equals
- Less Than
- Greater Than
- Contains
- Exists
- Not Exists
All Other
- Equals
Filtering Searches Using System Tags
With permission, any user can filter by tags anywhere that they might use categories, such as searching for locations, organizations, events, and resources.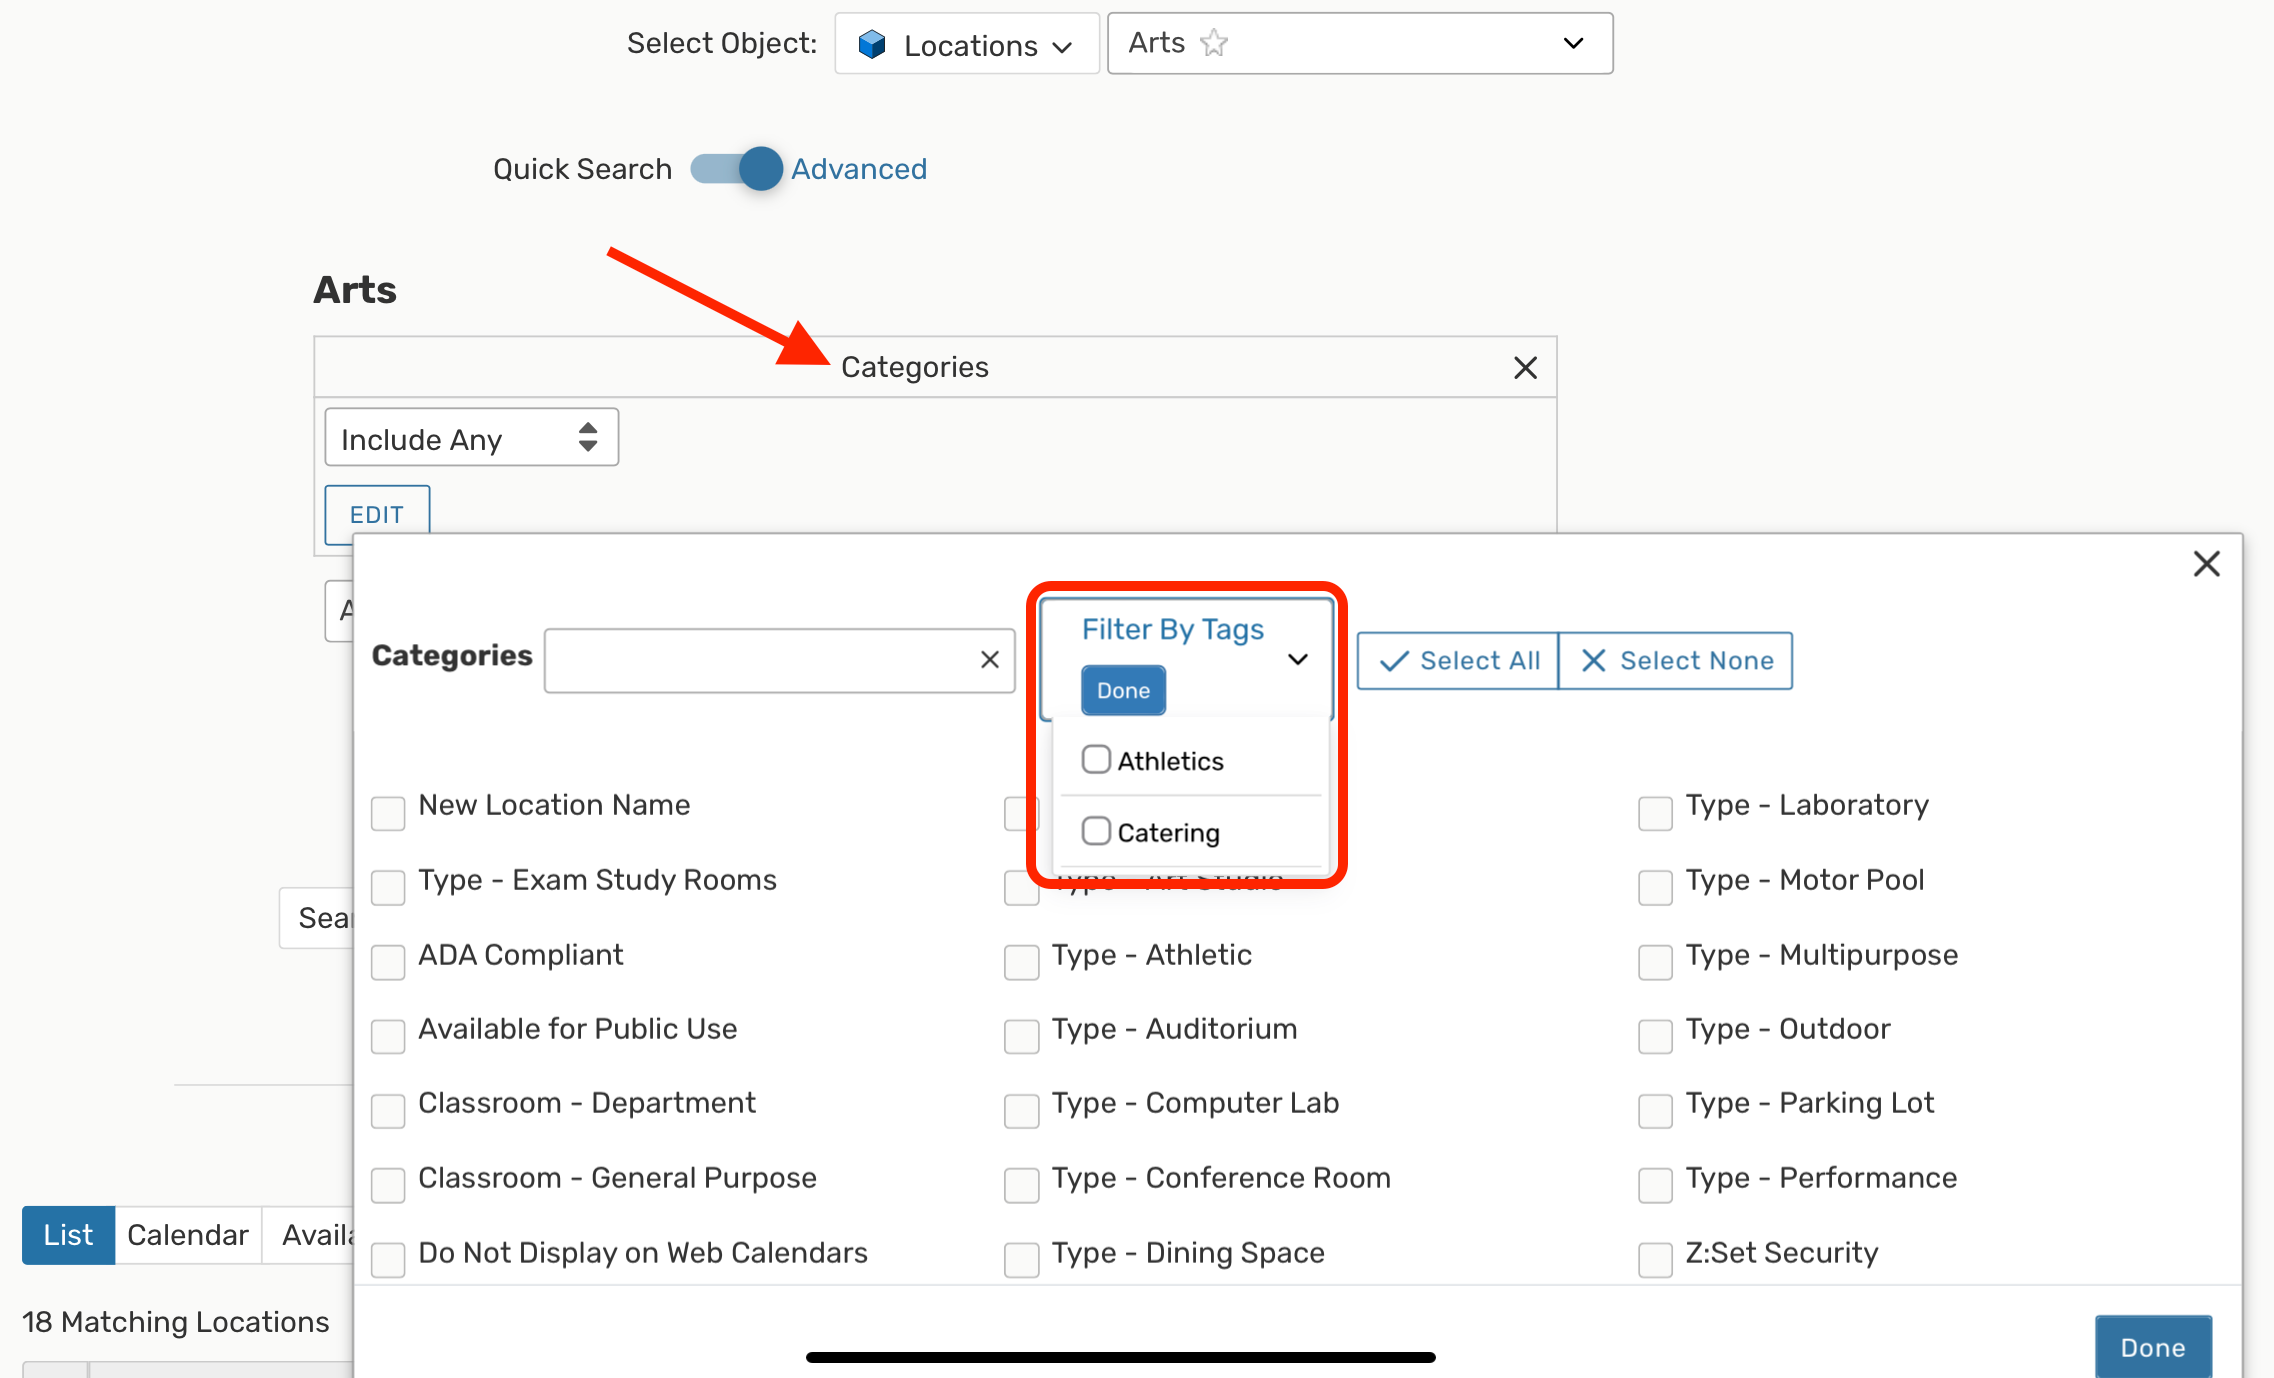
If you add Categories as a criteria item, you can open the Filter By Tags dropdown to check categories and narrow your results.
Using Relative Create Dates in Event Searches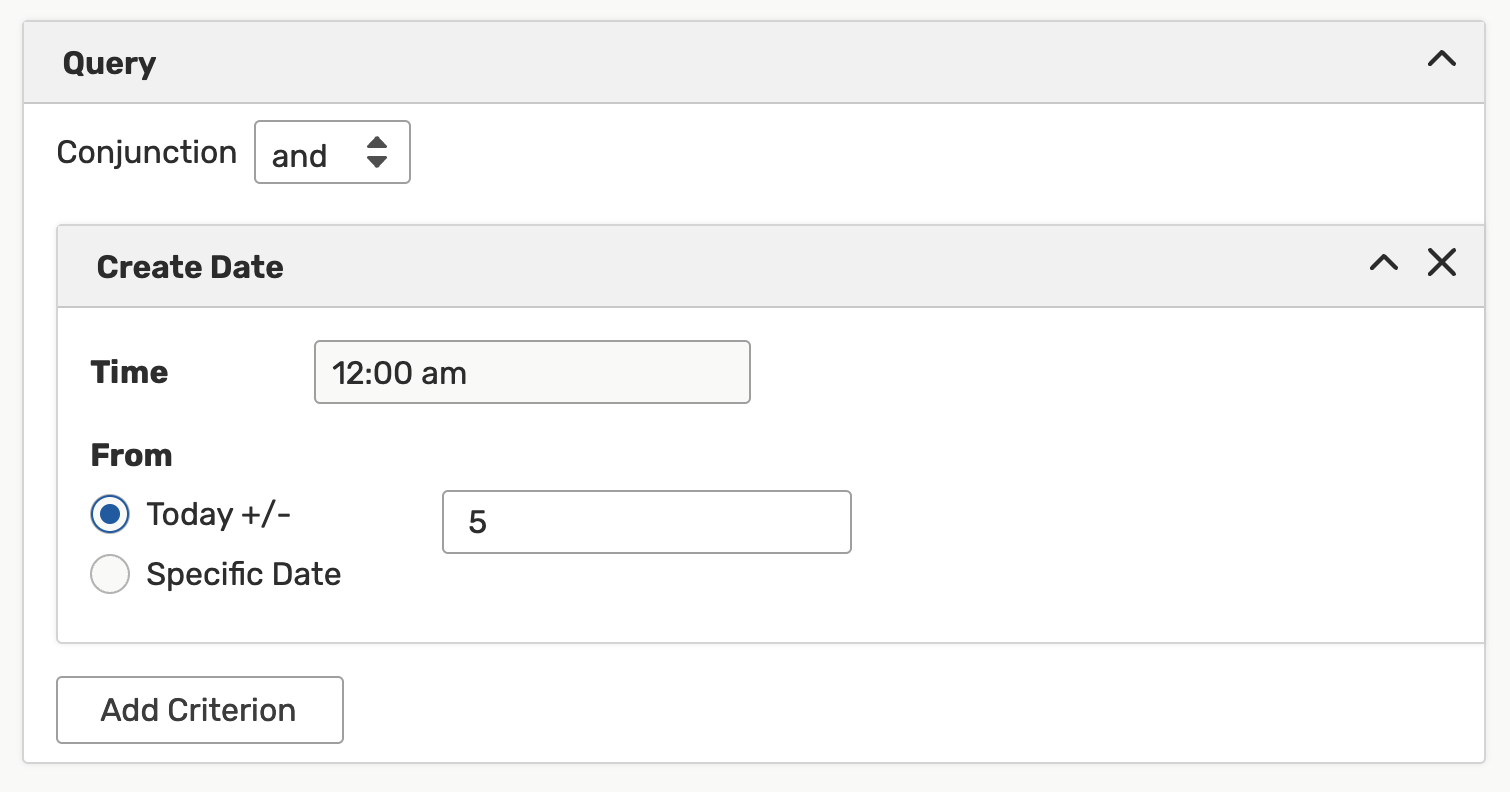 Image: Using relative date controls when searching for an event by the Create Date.
 When performing an advanced search for events, 25Live allows you to search both for a Specific Date or for relative dates using the Today +/- field to set how many days from the current date you would like to include in your search criteria. You may also add a time.
After completing these fields, you may continue to further narrow your search using the Add Criterion button.
- Ecluding Searches From Results
- Complete options for each criterion. Check and complete any fields for operators, relationships, or other details in each
criterion block you add.
- Optionally use operators to add more criteria. There are operators between each criterion block. You can adjust each to indicate
whether the relationship between each item should be “and” or “or.”
- Use the Search button to view search results. To clear your advanced search, use the X symbol
 to remove criteria, or use the Reset link. The Save As link will save your search.
Tips: Don't add too many criteria, Selecting too many criteria may yield too few results to find what you’re looking for. It’s best to initially select fewer, then add more as needed.
- Create or select a saved search.
- Add contacts to the shared search. Start typing the name(s) of contacts you wish to share the search with. 25Live will
search as you type to reveal matching names. Check next to the names of contacts you
want to share the search with. You can filter by only favorite contacts, select all
shown, or select none using the buttons provided.
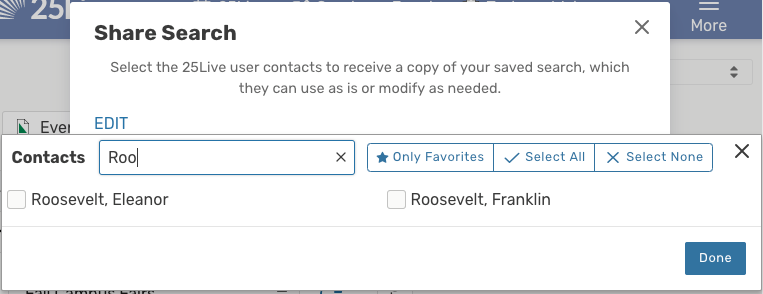
- Share by group. 25Live also provides the quick option to share a search to a security group. Check
the Share By Group box to reveal a searchable dropdown list of available groups. Choose a group by typing
ahead or scrolling through the list.
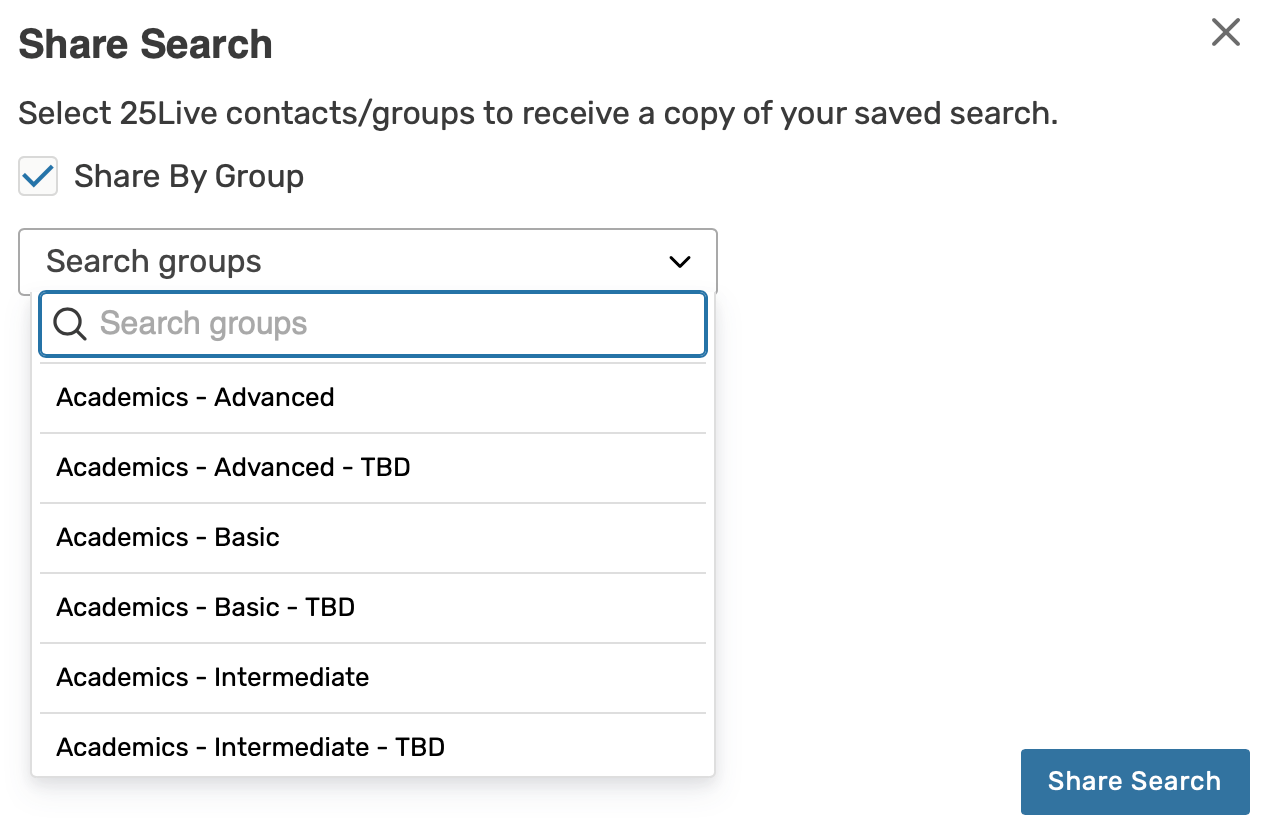
- Use the Done button to close the Contacts choices, then the Share Search button to initiate sharing. The modal display will close upon success. Use the X in the upper-right corner to exit the Share Search dialog.
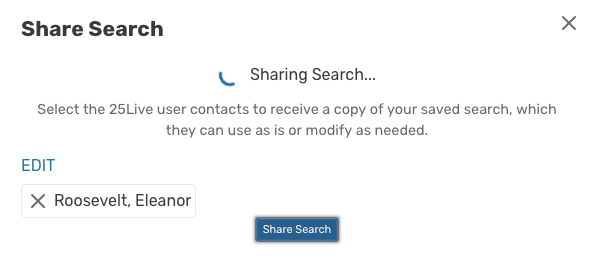
- Repeat these steps to share your search with additional contacts.

- Run the saved search. After selecting the area you want to search in (Events, Locations, etc.), use the adjacent drop-down menu to reveal choices for Pre-Defined Groups of searches, Your Starred Searches, and a list of All of Your Searches. Select one and use the Search button to run the search.
- Use the Save As link to save a copy.
- After selecting the area you want to search in (Events, Locations, etc.), use the adjacent drop-down menu to reveal choices for Pre-Defined Groups of searches, Your Starred Searches, and a list of All of Your Searches. Select one and use the Search button to run the search.
- Switch the search type toggle to Quick Search to view the SeriesQL (the internal search language of 25Live) syntax for your saved
search or to Advanced to view the building blocks for your search. Make any necessary changes.
- Use the Save link adjacent to the Search button to save a new version, or use the Save As link to make a copy with your new edits.
-
After selecting the area you want to search in (Events, Locations, etc.), use the adjacent drop-down menu to reveal choices for Pre-Defined Groups of searches, Your Starred Searches, and a list of All of Your Searches. Select one and use the Search button to run the search.
-
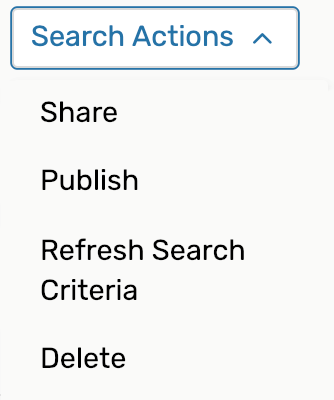
Use the Search Actions drop-down menu to reveal the options. Select Delete then confirm in the Deletion Confirmation box that is displayed.

- Navigate to the Search section using the Go to Search button in the top navigation bar. There is also a Search link in the More menu in the top navigation.

- Choose a saved search or perform a search. Be sure the Events search type is selected, and perform a search or choose the search you want to use
from the Saved Searches dropdown menu. If selecting a search, you must select a saved search that was created
by you or another user, such as those in the All of Your Event Searches section of the list.
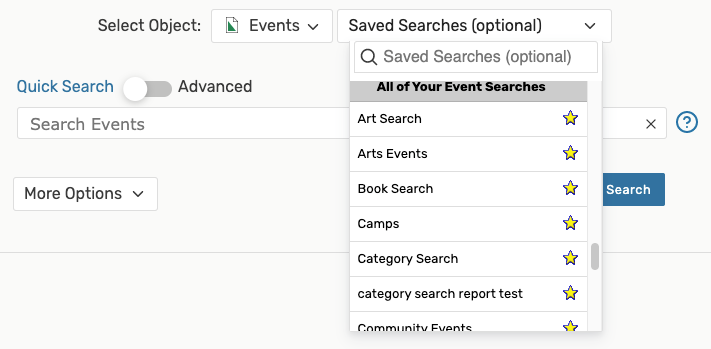 Use the Search button to run the search.
 - Choose from the event list after selecting the bulk edit option.

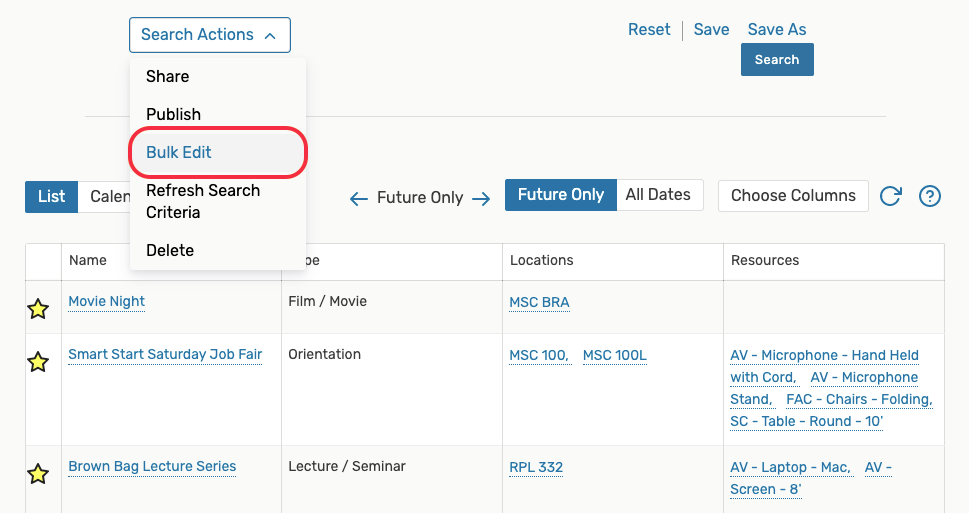
Selection for bulk editing is currently limited to 1,000 events or less to optimize performance.
On the search screen, use the Search Actions dropdown to select the Bulk Edit option. Or, if searching from a newly performed search, use the Bulk Edit button above the search results table.

The Event List screen allows you to check which events you want to bulk edit. After selecting, use the Go to Actions button to continue.
-
Regular Expression Examples
- 1.) A keyword find and replace is the most simple edit to make.
- Event Name/Title: Apple Festival Orientation
- Find: Apple
- Replace: Banana
- Result: Banana Festival Orientation
- Event Name/Title: Apple Festival Orientation
- 2.) For a more complicated regular expression edit, you can add a prefix to all values.
- Event Name/Title: Apple Festival Orientation
- Find: (^)
- Replace: Autumn
- Result: Autumn Apple Festival Orientation
- Event Name/Title: Apple Festival Orientation
- 3.) Similarly, you can add a suffix to all name/title values.
- Original Event Name/Title: Apple Festival Orientation
- Find: ($)
- Replace: Brunch
- Result: Apple Festival Orientation Brunch
- Original Event Name/Title: Apple Festival Orientation
- 4.) You can replace the whole of the name or title content.
- Original Event Name/Title: Apple Festival Orientation
- Find: .*
- Replace: Brunch
- Result: Brunch
- Original Event Name/Title: Apple Festival Orientation
- 5.) Use this to replace a blank title.
- Original Event Title: (blank)
- Find: ^\s*$
- Replace: Brunch Reception
- Title Result: Brunch ReceptionSelect from the available actions in the dropdown menu. Each action has its own set
of criteria to enter and notes about the action results.
Add/Remove Event Categories
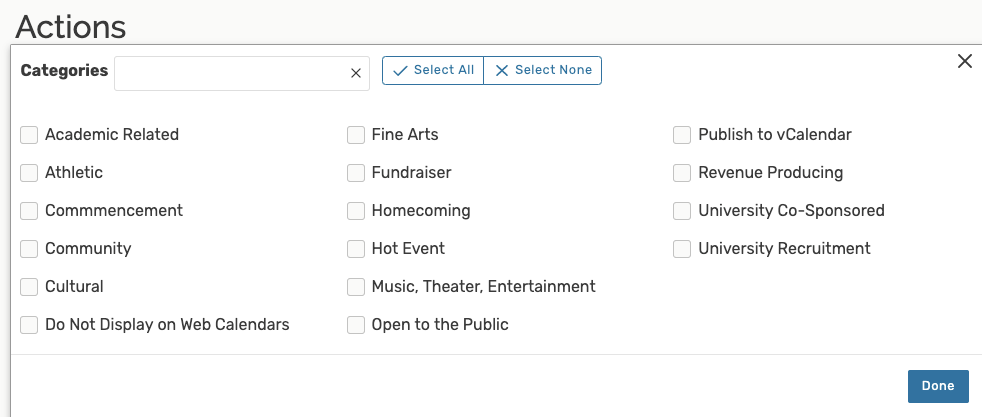
Adding a Category: Criteria to Enter
- To add Categories, set the toggle to Add.
- Use the Select Categories button and check each category that you wish to add. There are options available to Select All or Select None to reset your checked choices. Then tap Done.
- Use the Add Categories button.
Action Notes
- If a category is already on an event, it will not be added twice.
Removing a Category: Criteria to Enter
- To remove Categories, set the toggle to Remove.
- Use the Select Categories button and check each category that you wish to remove. There are options available to Select All or Select None to reset your checked choices. Then tap Done.
- Use the Remove Categories button.
Action Notes
- If one or more categories are not already associated with one of the events, no change will be made when running the action.
Add/Edit Event Custom Attribute
Criteria to Enter
- Choose one custom attribute from the Select Custom Attribute dropdown menu. Set the value of the attribute, if required.
- Use the Update Custom Attributes button.
Action Notes
- Only one custom attribute can be edited at a time.
- If the custom attribute is already on any event, the value will be updated.
- If the custom attribute is not on any event, it will be added.
- Custom attributes with discrete values are available to bulk edit multiple options.
Remove Event Custom Attribute
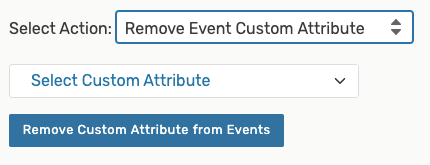
Criteria to Enter
- Choose one custom attribute from the SelectCustom Attribute dropdown menu.
- Use the Remove Custom Attributes button.
Action Notes
- Only one custom attribute can be removed at a time.
- If the chosen custom attribute is not on one of the events, no change will be made.
Add/Edit Contact Role

Criteria to Enter
- Choose or search for a role from the Search roles dropdown menu.
- Choose or search for a contact using the Search contacts dropdown menu.
- Use the Update Contact Role button.
Action Notes
- Only one contact role can be added or removed at a time.
- The contact role does not directly affect assignment policy or notification policy in the application but may impact those policies based on your institution's business practices.
Remove Contact Role
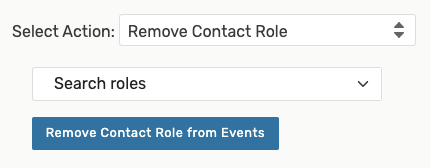
Criteria to Enter
- Choose or search for a role using the Search roles dropdown menu.
- Use the Remove Contact Role button.
Action Notes
- Only one contact role can be removed at a time.
- If the chosen contact role is not on one of the events, no change will be made.
Edit Event Name and Edit Event Title
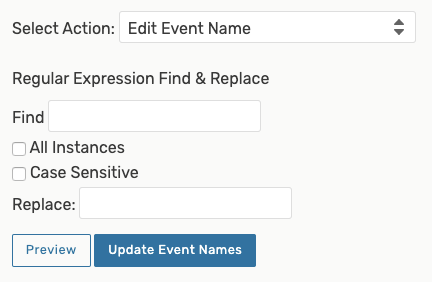
Criteria to Enter
- You can find and replace strings of text in the titles of Event Names and Event Titles
with simple keywords or using regular expressions. Use the checkboxes to apply your terms to:
- All Instances - If this box is checked, all of the matches will be replaced. If it is unchecked, only the first match will be replaced.
- Case Sensitive - If this box is checked, it will only match on strings that are an exact match including case. If it is unchecked, it will not consider case when looking for a match.
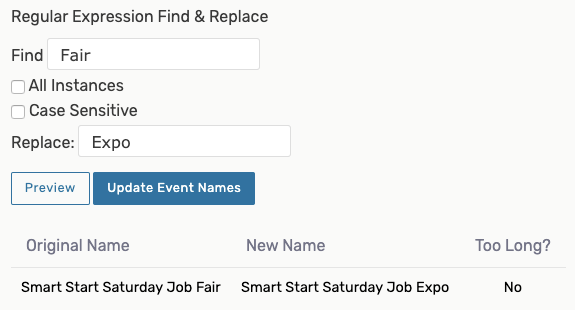
- (Optional) Preview how your edit will apply.
- When you're sure your edit will apply as intended, use the Update Event Names or Update Event Titles button.
Action Notes
- It is helpful to search online for guides and examples for using regular expression syntax.
Change Event Ownership
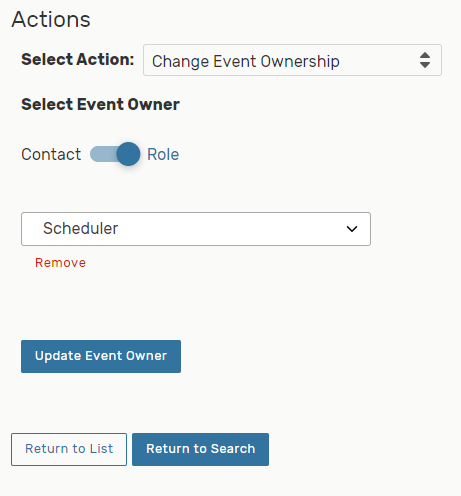
Criteria to Enter
- Choose by toggle whether you'd like to search for a Contact or select from an event Role
- Search or select
- Use the Update Event Owner button to save
Action Notes
- Be careful changing this important property for multiple events
- This action is useful after importing events where the event owner role defaulted to the user that imported the events
- Original Event Title: (blank)
Note: The result of your regular expression name edit cannot be blank
If your regular expression syntax edit would result in a blank name value, the edit will not be applied. Titles are not affected.
Edit Primary Organization
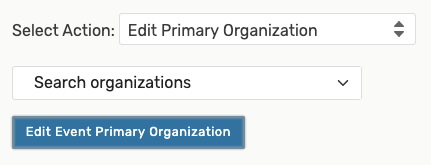
Warning bulk edits can affect pricing.
Some bulk edits, such as editing the Organization, can affect event pricing. If pricing is affected, the event will have a note displayed on its pricing view alerting that a pricing refresh/update is needed.Best practice is to go to the affected events in your chosen bulk edit search to refresh pricing right away after making the edits.
Criteria to Enter
- Search for and select the new primary organization from the Search organizations dropdown.
- Tap the Update Primary Organization button to save.
Action Notes
- If any events in the bulk edit do not have a Primary Organization, the chosen organization will be added. Otherwise, the Primary Organization will be replaced.
Edit Event Type
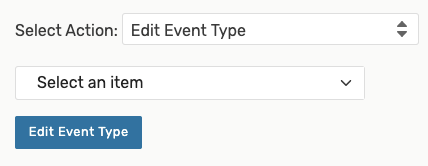
Criteria to Enter
- Select an event type from the Select from Types dropdown.
- Use the UpdateEvent Type button to save.
Action Notes
- Just as when inline editing the Event Type, changes made will not affect the current folder or currently applied custom attributes.
Edit Event State
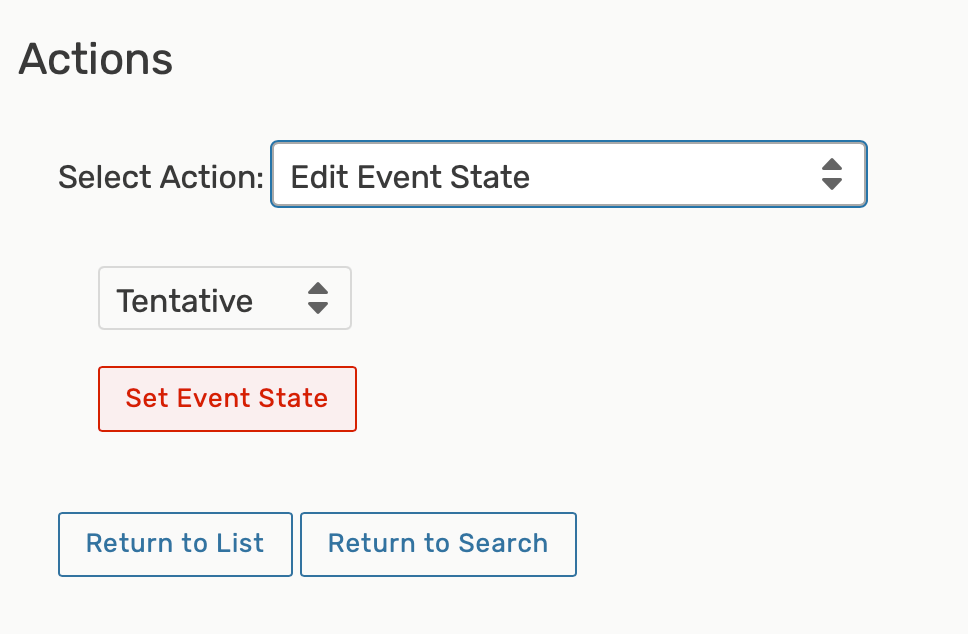
Criteria to Enter
- Select from the allowed Event State options in the dropdown.
- Use the Update Event State button to save your selection.
Action Notes
- Only Event States that your user has permission to view/use will display in the dropdown menu.
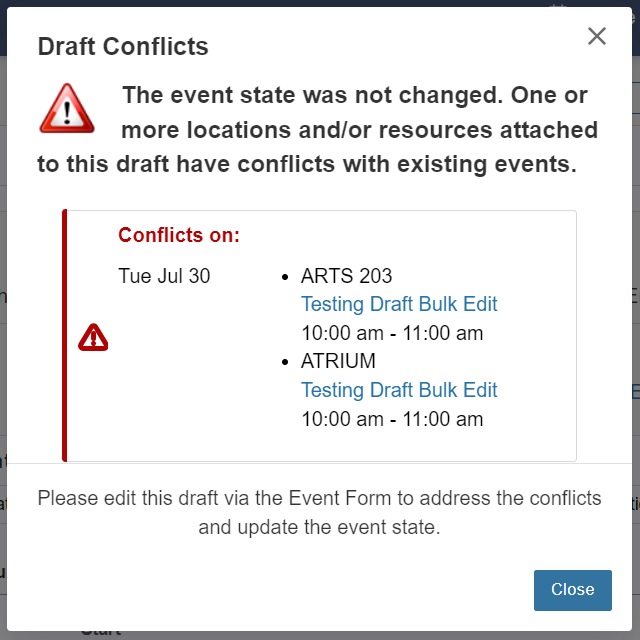
- You may encounter location conflicts that need to be resolved before continuing.
Unassign Locations
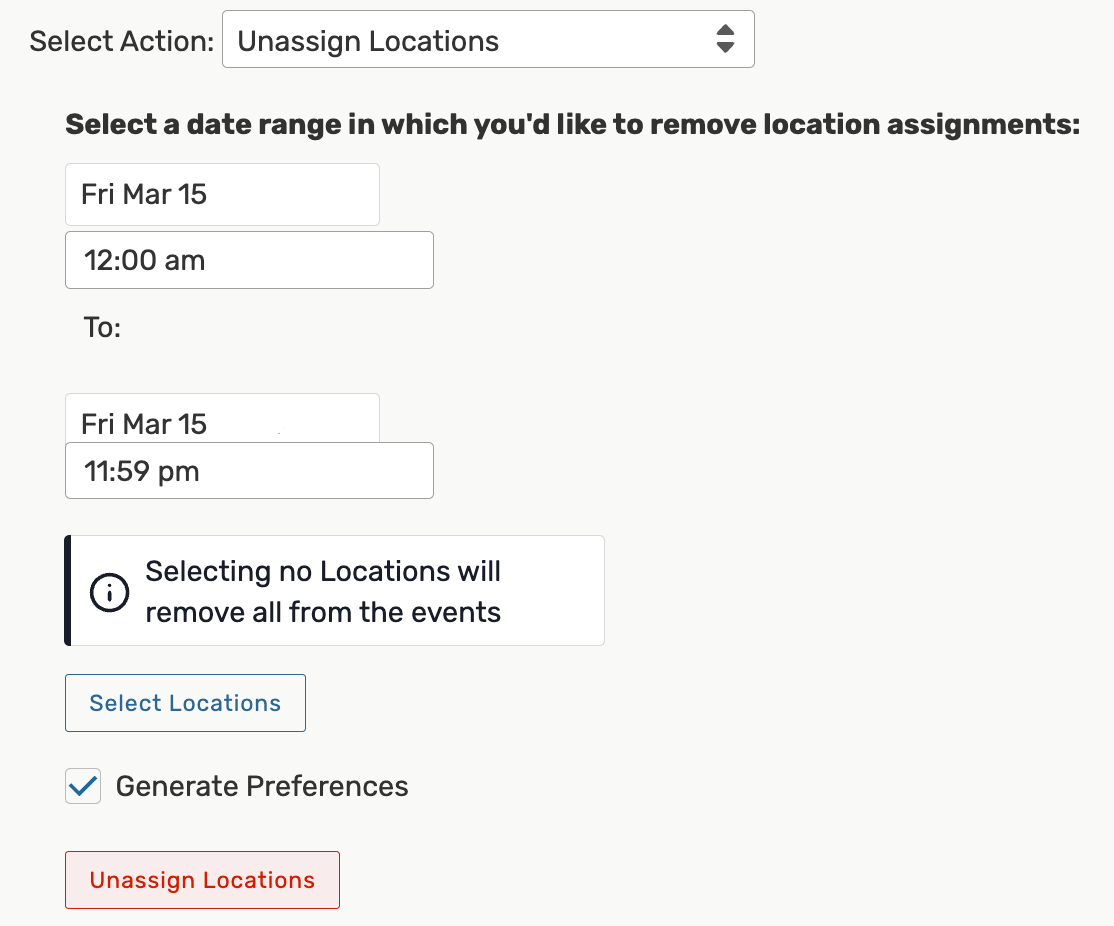
Criteria to Enter
- Choose the beginning and end of the date range (including times) in which you want to remove location assignments.
- Use the Select Locations button to choose specific locations you want to remove.
OR You can choose no locations to allow the action to remove all locations from the events you're editing. - (Optional) Deselect the Generate Preference box to set if you do not want the location to be set as a preference upon unassignment.
- Use the Unassign Locations button to complete the bulk edit.
Action Notes
- This feature is only available for administrators (in the (-1) security group), but it will soon be optionally expanded to other security groups.
Add/Edit Event Requirement
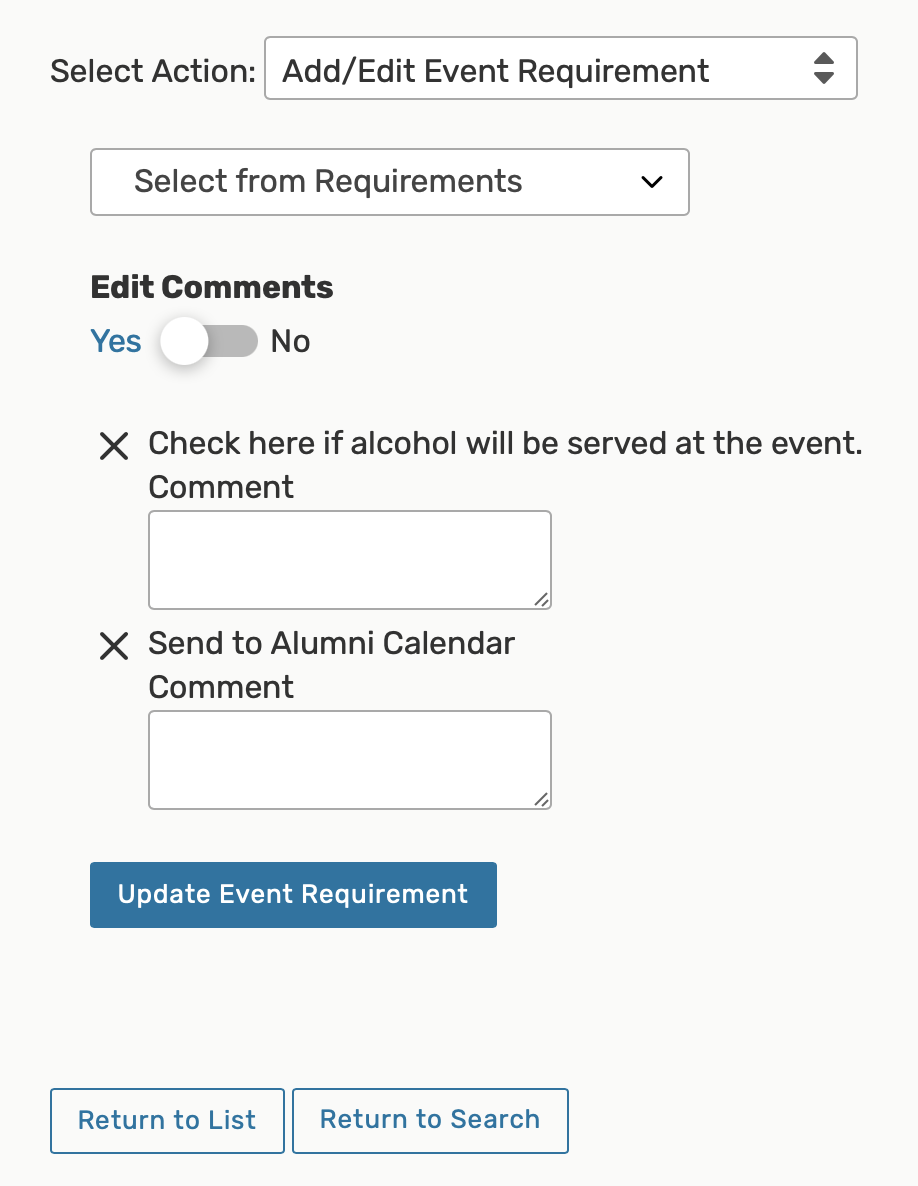
Criteria to Enter
- Use the Select from Requirements dropdown menu to choose an available requirement.
- Selecting again will add additional requirements.
- Use the X next to any requirement to remove it from this display before saving.
- Toggling Edit Comments to Yes if you need to add text.
- Tap or click on the Update Event Requirement button to save your selection.
Remove Event Requirement
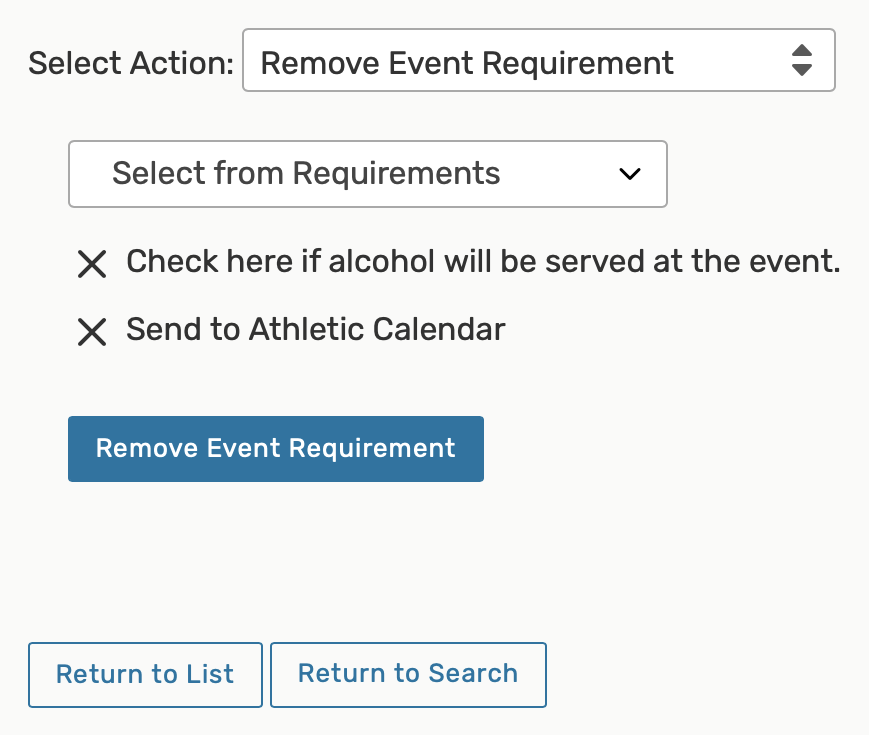
Criteria to Enter
- Use the Select from Requirements dropdown menu to choose an available requirement.
- Selecting again will add to the list of requirements to remove.
- The X link next to any requirement will remove it from this display before saving.
- Tap or click on the Remove Event Requirement button to save your selection.
Delete Events
Warning: Be Sure You're Making an Informed, Puposeful Change.Deleting an event is permanent and cannot be reversed. Deleting events will also remove all references to them.
- Toggle Delete Mode from Off to On.
- Be sure to note the warning.
- Use the Delete button.
Change Event Folder
This option is only available to users in the System Administrator (-1) security group.
- From the Select From Folders dropdown, choose which folder you would like to move your selected events to.
- Tap Update Event Folder to save.
Inherit Events
This option is only available in instance that do not use LYNX. Currently, this feature is only available to users in the System Administrator (-1) security group.
- Review the list of events that you want to inherit folder categories and constraints to.
- Tap the Inherit date to event button to save.
- 1.) A keyword find and replace is the most simple edit to make.
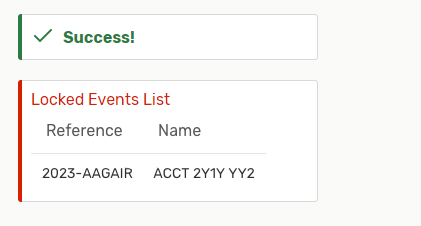
- After completing each action, a Success message will be displayed. You may also see a Locked Events List of events that could not be edited due to a lock or insufficient permissions. You
can try to edit those events individually or contact your 25Live Administrator to discuss the locks or your current security
permissions.
Approvers Only:
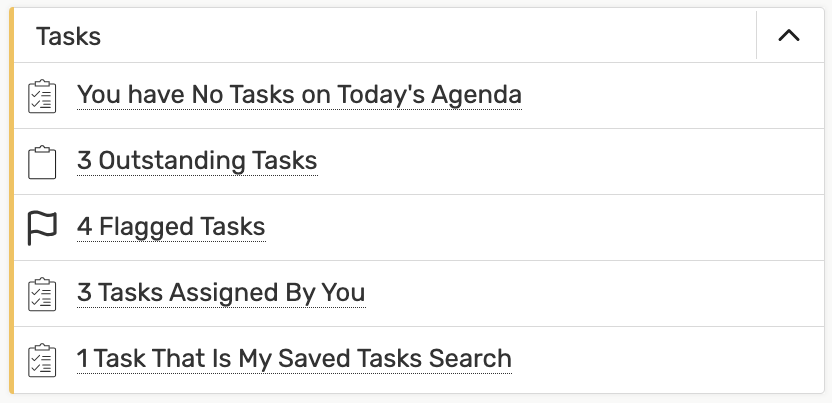
A "task" is an actionable item that needs to be responded to such as a location/resourceassignment request, orapproval/FYInotificationassigned to one or more 25Live users. Location/resource assignment requests and approval/FYI notifications are automatically generated by the system based on yourworkflowsetup.To Do tasks are created manually by 25Live users and can be assigned to themselves or other users.
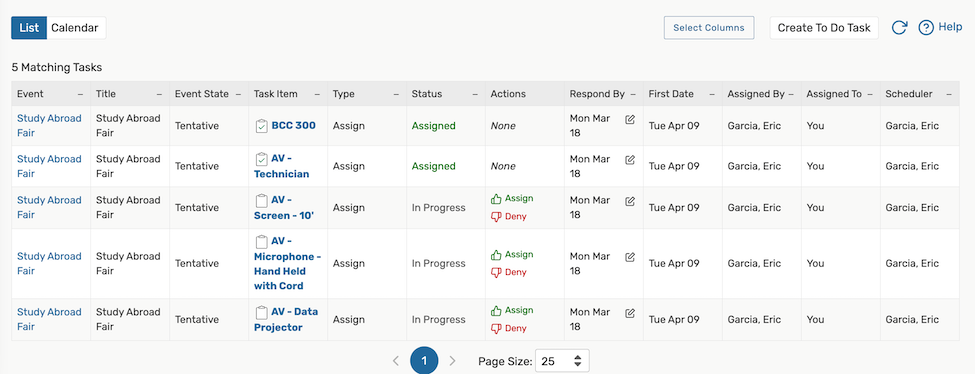
Tasks assigned to you and tasks assigned by you are displayed (and can be searched for and completed) on the Tasks page. This example shows the Tasks page in the list view.
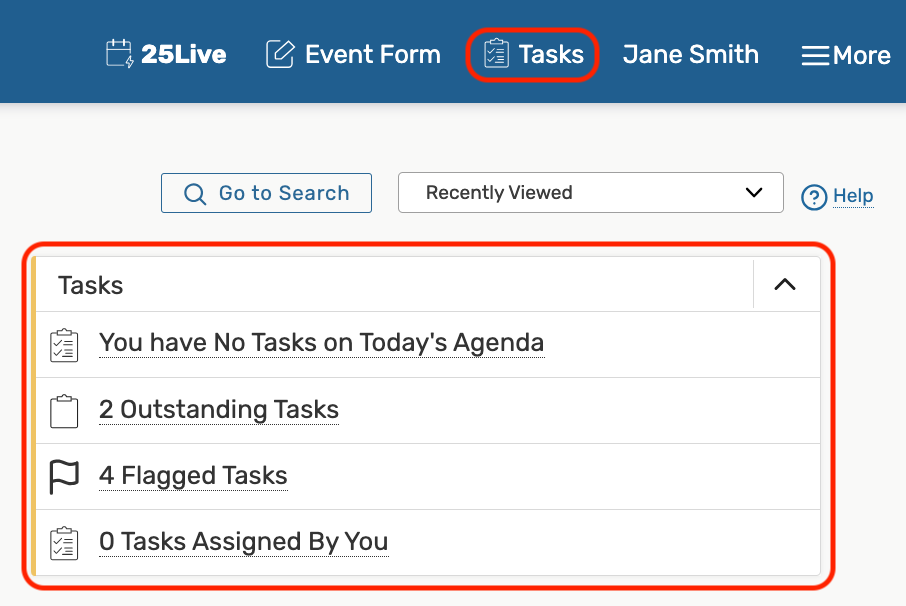
There are two ways to access the Tasks page from the 25Live Home page:
- By using the Tasks link in the Home dashboard widget
- When you do this, the tasks in the group you clicked (described below) are shown on the Tasks page in a list view. You can change this view as needed
OR
- By using the Tasks link in the top navigation bar
- When you do this, your overdue tasks (as described below) are shown on the Tasks page in a list view. You can change this view as needed

Tasks Area Links:
The links in the Tasks widget of your 25Live Home dashboard are used to access and display the tasks in each of the groups described below. If a group is not listed, there are no tasks in that group. These categories are also used as "Pre-Defined Groups" of tasks in the search view.
- Overdue: Incomplete tasks assigned to you, due X days in the past
- Outstanding: Incomplete tasks assigned to you, due between X days in the past and Y days in the future
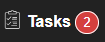
- This status will be reflected with a red notification
- Flagged: All tasks that are flagged for attention, due between X days in the past and Y days in the future
- Completed: All tasks assigned to you and completed, due between X days in the past and Y days in the future
- Assigned by You: All tasks you've assigned to other users
By default, X and Y in the searches above are each 30 days.
To View Tasks:
You can do any of the following when viewing tasks on the Tasks page:
- Use the List button to see the selected tasks in a list view, as shown above
- Choose the columns you want to be displayed in the list view by using the Choose Columns button, selecting and/or deselecting columns, then clicking or tapping Done. Columns you can choose include:
- Title
- Event State
- Task Item
- Type (including Authorization, FYI, Assign, Unassign, To Do, etc.)
- Status
- The Status will display as "Various" on a multi-occurrence event with some locations or resources approved or denied
- Actions
- Respond By
- First Date
- Reference
- Assigned By
- Assigned To
- Members of the System Administrator (-1) security group and the task assignee will have an Add Assignees button in this column to add additional task assignees to tasks that are not completed
- Scheduler
- Set the page controls below the list view to go to particular pages in the task list and specify the number of tasks you want to be displayed on each page
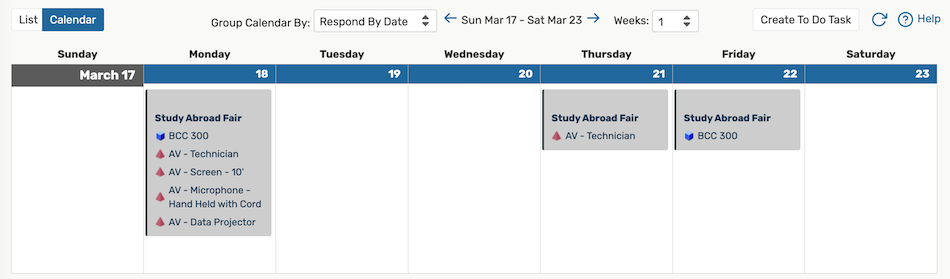
- Use the Calendar button to see the selected tasks in a calendar view with event times and other information
- By default, the current week is displayed, but you can use the forward and backward arrows below the calendar display to move forward or backward in the calendar based on your view
- Use the Weeks dropdown to view up to 20 weeks at once
- Click or tap a date number on the calendar to see that day's task agenda
- Click or tap on an object's name (location, resource, etc.) to view its details page
- You can also choose to group the tasks in the calendar by Respond By Date or Occurrence Date
- When viewing by Occurrence Date, you can see event occurrence times
- The Display Additional Time checkbox will also be available to show additional time
- View the details of a task in either the list or calendar view by clicking or tapping
the task's link
- This opens the Edit Task window where you can view task details, edit the task if it has not yet been completed, and/or complete the task
- Access the tasks page. From your 25Live Home page, access the Tasks page by clicking a link in the Tasks
area or by clicking Tasks in the top navigation bar.
- Find the task you want to complete. Use the links for the appropriate action to complete the task.
- Approve or Deny to complete an approval notification
- Assign or Deny to complete a location or resource assignment request
- Complete or Ignore to complete a To Do task
Before you act on a task, you may want to click the task's link to open the Edit Task window to see the task details, possibly record comments, then complete the task from there.